
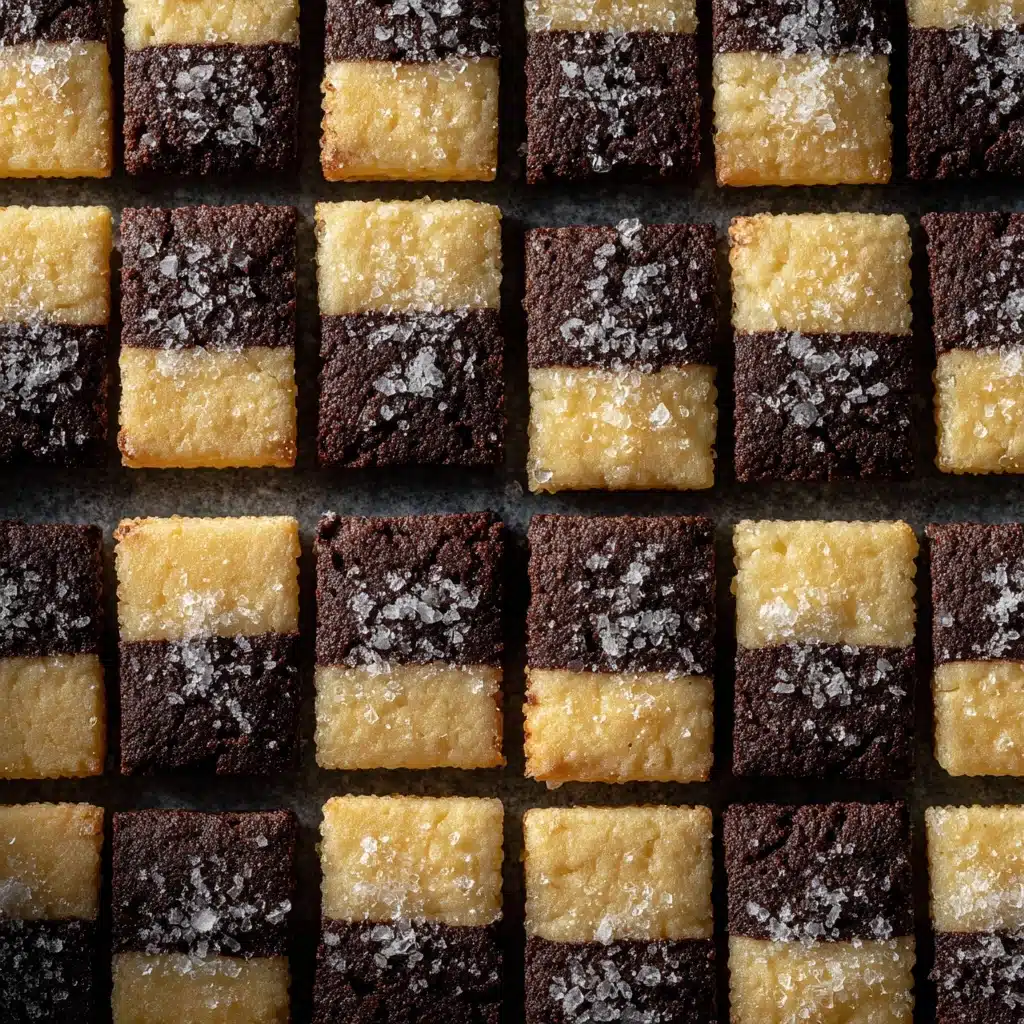
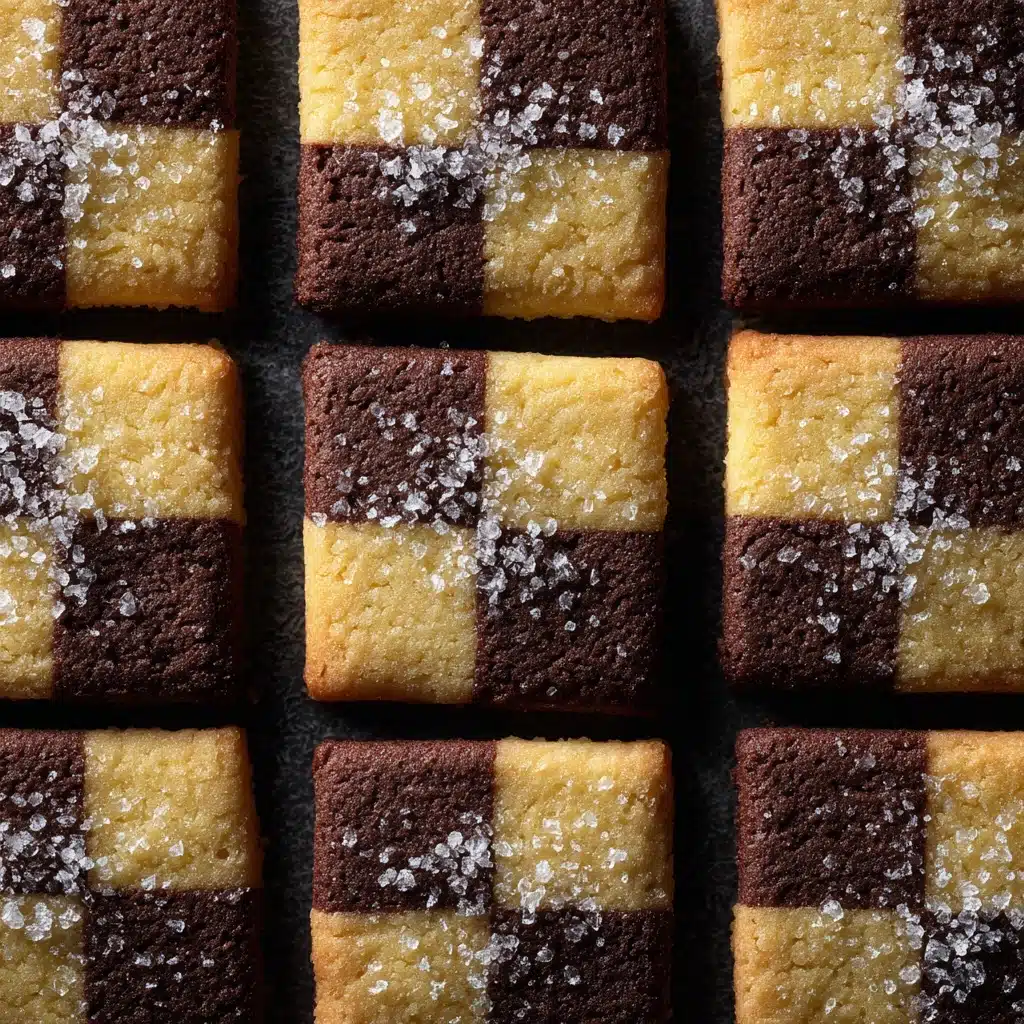
Mint Chocolate Checkerboard Cookies are such a show-stopping treat, it’s hard to believe how easily they come together right in your kitchen. These delightful squares bring together rich cocoa and cool peppermint in a stunning checkerboard pattern—perfect for impressing guests, sharing with family, or gifting during the holidays. Every bite offers that crave-worthy combo of chocolate and mint, with a buttery, tender texture you’ll want to enjoy all year long. Trust me, if you love visually striking cookies that taste even better than they look, Mint Chocolate Checkerboard Cookies are about to become your new favorite!
Ingredients You’ll Need
Let’s gather everything before we dive into baking—these ingredients are simple pantry staples, but each one plays an essential role in crafting Mint Chocolate Checkerboard Cookies. Some add flavor, while others contribute structure and their signature color, making every bite beautifully balanced.
- All-purpose flour: This is the backbone of the cookie, giving structure and keeping them tender rather than cakey.
- Baking powder: Just a touch for lift, so your cookies bake up light and never dense.
- Salt: Balances out the sweetness and really makes the mint and chocolate flavors pop.
- Unsalted butter (softened): Gives the cookies their classic richness and melt-in-your-mouth texture—softened is key for easy creaming!
- Granulated sugar: The sweetener that also helps the cookies spread just the right amount.
- Large egg: Binds everything together and keeps the dough supple.
- Vanilla extract: Brings warmth and rounds out both the mint and chocolate flavors.
- Peppermint extract: Adds that unmistakable cool, fresh minty finish—go easy, a little goes a long way!
- Unsweetened cocoa powder: For a deep chocolate flavor that contrasts beautifully with the mint.
- Green food coloring (optional): For an extra pop of fun, add vibrancy to the mint portion of your checkerboard.
How to Make Mint Chocolate Checkerboard Cookies
Step 1: Mix the Dry Ingredients
Start by whisking together the flour, baking powder, and salt in a medium bowl. This ensures everything is perfectly combined and helps your Mint Chocolate Checkerboard Cookies bake evenly—don’t skip this step for lump-free, consistent dough!
Step 2: Cream the Butter and Sugar
In a separate large bowl, beat the softened butter and granulated sugar until the mixture is pale and fluffy. This process not only adds air for a lighter crumb, but sets the stage for all the delicious cookie flavors to marry beautifully.
Step 3: Add the Egg and Flavors
Once the butter and sugar are creamed, mix in the egg, vanilla extract, and peppermint extract. This brings together all those signature minty-chocolate notes and binds the dough. The aroma is already incredible at this point!
Step 4: Combine Wet and Dry Ingredients
Gradually add your dry mixture to the wet ingredients, mixing gently just until a soft, cohesive dough forms. Over-mixing can make cookies tough, so stop as soon as everything looks combined.
Step 5: Divide and Color the Dough
Split the dough in half. Leave one half plain (or tint with green food coloring for a playful touch). The other half gets all the cocoa powder goodness mixed in thoroughly. This is where the Mint Chocolate Checkerboard Cookies get their beautiful two-tone look.
Step 6: Chill the Dough
Shape each dough half into a flat rectangle, wrap tightly in plastic wrap, and refrigerate for 30 minutes. This makes the dough easier to roll out and cut, and ensures clean, sharp checkerboard stripes.
Step 7: Roll and Cut Strips
On a lightly floured surface, roll each dough out into rectangles about 1/4 inch thick. Slice each into long strips about 1/2 inch wide. Try to keep the sizes as even as possible—precision here makes for extra-stunning Mint Chocolate Checkerboard Cookies!
Step 8: Assemble the Checkerboard
Now the fun part: alternate strips of chocolate and mint dough side by side, brushing edges with a little water to help them stick. Stack additional layers as desired for more intricate checkerboards. Press gently to bind together, then rewrap and chill for 30 more minutes to firm up the block.
Step 9: Slice and Bake
Preheat your oven to 350°F (175°C) and line baking sheets with parchment. Slice the chilled dough block into 1/4-inch cookies and arrange them about 2 inches apart. Bake for 10 to 12 minutes, just until the edges set. Cool on the baking sheet for a few moments, then move to a wire rack to finish cooling completely—if you can wait that long!
How to Serve Mint Chocolate Checkerboard Cookies
Garnishes
For an extra special touch, try dusting your Mint Chocolate Checkerboard Cookies with a little powdered sugar, a drizzle of melted chocolate, or even a scatter of festive sprinkles. A few fresh mint leaves on the serving platter add instant elegance and hint at the flavors inside.
Side Dishes
These cookies are a dream with a big glass of cold milk, but if you’re entertaining, pair them with a scoop of vanilla or peppermint ice cream. A cup of hot cocoa or a creamy latte on the side turns snack time into a true treat!
Creative Ways to Present
Box up a dozen Mint Chocolate Checkerboard Cookies with a ribbon for a standout homemade gift, or stack them in a tall glass jar for a playful, eye-catching centerpiece. For parties, arrange them in neat rows on a platter or alternate with other holiday cookies for a beautiful cookie tray that will draw every eye.
Make Ahead and Storage
Storing Leftovers
Keep any leftover Mint Chocolate Checkerboard Cookies in an airtight container at room temperature and they’ll stay fresh for up to a week. They’re perfect for popping into lunchboxes or as a quick grab-and-go sweet fix.
Freezing
These cookies freeze fantastically! Layer baked (or unbaked) cookie slices with parchment paper in a freezer-safe container or bag. Baked cookies keep for up to three months; just thaw at room temperature. You can also freeze the assembled unbaked dough block, then slice and bake fresh when you’re ready.
Reheating
If you prefer warm cookies, a quick 5–7 seconds in the microwave revives the just-baked magic. For bigger batches, pop them on a baking sheet in a 275°F oven for 3–4 minutes. Be careful not to overheat, as they can dry out.
FAQs
Can I use natural or Dutch-processed cocoa powder?
Absolutely! Either cocoa powder works in Mint Chocolate Checkerboard Cookies. Natural gives a lighter flavor, while Dutch-processed offers extra richness and deep color—choose the one that suits your taste best.
Is it possible to make the dough ahead and refrigerate overnight?
Yes, you can prepare the dough (or assembled checkerboard block) a day in advance and refrigerate overnight. In fact, this often results in crisper, easier-to-slice cookies with even sharper patterns.
How do I get neat, clean checkerboard patterns?
Chilling the dough thoroughly before slicing is the secret—don’t skimp on fridge time. Use a sharp chef’s knife and clean the blade between slices for bakery-worthy checkerboard stripes every time.
Can these cookies be made gluten-free?
Yes, substitute your favorite cup-for-cup gluten-free baking blend for the all-purpose flour. The texture may be a bit more delicate, but the flavor and appearance will delight gluten-free cookie lovers just as much!
Are Mint Chocolate Checkerboard Cookies kid-friendly?
Definitely! The cookie-making process is super interactive and fun for little hands, especially assembling the checkerboard pattern. Just keep an eye on the peppermint extract and use less if your kids aren’t big mint fans.
Final Thoughts
I can’t wait for you to experience the playful look and delicious flavor of Mint Chocolate Checkerboard Cookies. They’re the kind of treat that makes everyday moments feel like a celebration, whether you’re baking for a crowd or just quietly enjoying with your favorite tea. So gather your ingredients, unleash your creativity—and let the checkerboard baking adventure begin!
Print
Mint Chocolate Checkerboard Cookies Recipe
- Total Time: 1 hour 30 minutes
- Yield: 36 cookies 1x
- Diet: Vegetarian
Description
These Mint Chocolate Checkerboard Cookies are a delightful treat for the holidays or any time you crave a sweet, minty chocolate combination. The checkerboard pattern adds a fun twist to a classic cookie recipe.
Ingredients
Dough:
- 2 1/2 cups all-purpose flour
- 1/2 teaspoon baking powder
- 1/4 teaspoon salt
- 1 cup unsalted butter, softened
- 1 cup granulated sugar
- 1 large egg
- 1 teaspoon vanilla extract
- 1/2 teaspoon peppermint extract
Additional:
- 2 tablespoons unsweetened cocoa powder
- Green food coloring (optional)
Instructions
- Prepare the Dough: In a medium bowl, whisk together flour, baking powder, and salt. In a large bowl, beat butter and sugar until light and fluffy. Add egg, vanilla extract, and peppermint extract; beat until combined. Gradually add dry ingredients and mix into a soft dough.
- Divide and Color: Split dough in half. Leave one plain and mix cocoa powder into the other half. Optionally, tint the plain dough green.
- Shape and Chill: Roll each dough into rectangles, cut into strips, and assemble in a checkerboard pattern. Chill for 30 minutes.
- Bake: Preheat oven to 350°F (175°C). Slice dough into cookies, place on baking sheets, and bake for 10-12 minutes.
- Cool and Serve: Cool on baking sheets before transferring to a wire rack to cool completely.
Notes
- For a crisper edge, chill assembled dough block overnight before slicing.
- Store cookies in an airtight container for up to one week.
- Prep Time: 40 minutes (plus chilling time)
- Cook Time: 12 minutes
- Category: Dessert, Holiday
- Method: Baking
- Cuisine: American
Nutrition
- Serving Size: 1 cookie
- Calories: 110
- Sugar: 6g
- Sodium: 35mg
- Fat: 5g
- Saturated Fat: 3g
- Unsaturated Fat: 2g
- Trans Fat: 0g
- Carbohydrates: 14g
- Fiber: 0g
- Protein: 1g
- Cholesterol: 20mg


