
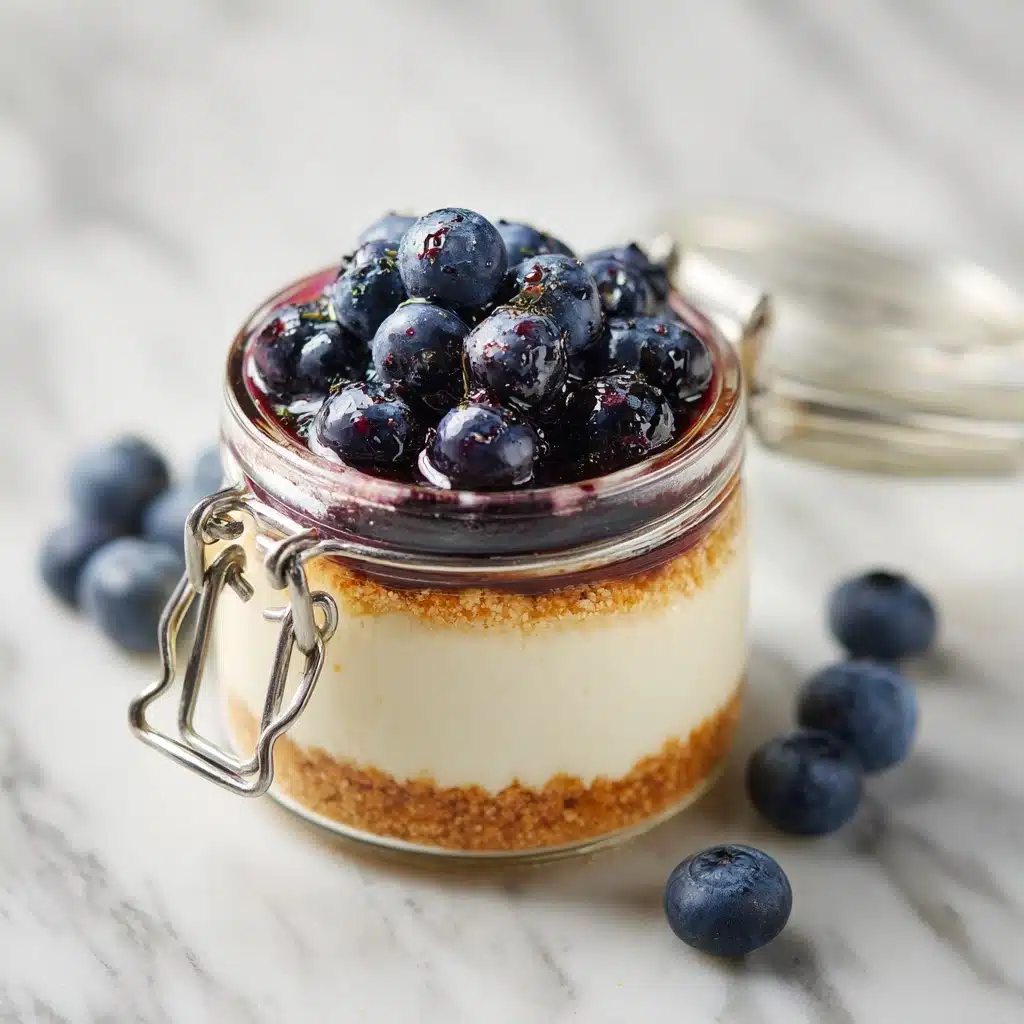
Say hello to your new favorite sweet treat: High Protein Cheesecake Jars! These no-bake delights are everything you crave in a cheesecake, wrapped up in individual jars for ultimate convenience. Creamy, tangy, satisfyingly rich, and crowned with fresh berries, these jars come with a hefty boost of protein thanks to Greek yogurt and reduced-fat cream cheese. Whether you’re fueling up post-workout or treating yourself to a better-for-you dessert, these portable cheesecakes have you covered. They’re quick to whip up, endlessly customizable, and every spoonful delivers that luscious cheesecake flavor you love—without the fuss.
Ingredients You’ll Need
Let’s talk about the simple, powerhouse ingredients that make these High Protein Cheesecake Jars shine. Each one is chosen to bring just the right taste, texture, or visual flair—and together, they create the perfect balance of creamy, crunchy, and fresh.
- Low-fat Greek yogurt: Packs in protein and adds a lovely tang, keeping the cheesecake light yet creamy.
- Reduced-fat cream cheese, softened: The base of any fabulous cheesecake—smooth, rich, and velvety, but with a lighter touch.
- Honey or maple syrup: Natural sweetness that blends beautifully with the dairy and provides a subtle, caramel-like flavor.
- Vanilla extract: Rounds everything out with a warm, inviting aroma; it’s the secret behind that classic cheesecake taste.
- Graham cracker crumbs: Give that classic cheesecake crunch, acting as the perfect buttery foundation for each jar.
- Melted butter: Binds the crumb mixture and ensures the crust holds its shape. Plus, flavor—always flavor!
- Fresh berries for topping: Bright, juicy bursts that add color and a refreshing finish to every bite.
- Optional mint leaves for garnish: Adds a little extra pop of green and elegance, especially when you’re looking to impress.
How to Make High Protein Cheesecake Jars
Step 1: Prepare the Graham Cracker Crust
Start by mixing your graham cracker crumbs with melted butter in a medium bowl. Stir until every crumb glistens and the texture resembles damp sand—this is how you get that iconic cheesecake base. Spoon about 2 tablespoons of this crust into the bottom of each jar, pressing gently so it comes together into a neat layer that’ll hold up beautifully beneath the creamy filling.
Step 2: Make the Creamy Cheesecake Filling
In a separate bowl, beat the softened cream cheese until it’s irresistibly smooth and lump-free. Fold in the Greek yogurt, honey (or maple syrup), and vanilla extract. Mix until creamy and unified—this is where all those decadent flavors marry together to create our signature high-protein cheesecake jar magic.
Step 3: Assemble the Jars
Divide the silky cheesecake mixture evenly among your jars, layering it right on top of the crust. Use the back of a spoon to smooth out the top for a professional finish. Don’t worry if you’re tempted to sneak a taste at this point—it’s impossible to resist!
Step 4: Chill to Set
Cover the jars and pop them into the fridge for at least one hour. This chill time lets the flavors meld together and gives the filling just the right amount of firmness for true cheesecake satisfaction. You can even leave them overnight if you want to get ahead—no fussy timers required.
Step 5: Add Fresh Toppings and Serve
When you’re ready to enjoy, pile on your fresh berries and add a mint sprig or two if you’re feeling fancy. That hit of color and juicy contrast finishes off the jars perfectly, making them as beautiful as they are delicious.
How to Serve High Protein Cheesecake Jars

Garnishes
Fresh berries are only the beginning! Top off each High Protein Cheesecake Jar with sliced strawberries, juicy blueberries, plump raspberries, or a little bit of everything. A dash of finely grated lemon zest or a tiny drizzle of extra honey brings even more freshness. Finish with a sprig of mint for that picture-perfect, café-style touch that’ll wow any guest (or just make your own afternoon snack feel special).
Side Dishes
While these jars easily stand on their own, they also play well with others. Pair them with a simple fruit salad, a cup of coffee, or even a crisp herbal tea. For a brunch spread, try serving alongside a platter of granola, overnight oats, or nutty biscotti for variety and crunch. They even work as a crowd-pleasing dessert after a light lunch.
Creative Ways to Present
If you want to take things up a notch, serve your High Protein Cheesecake Jars in mason jars, stemless wine glasses, or little teacups for something unexpected. Tie a ribbon or pop on a decorative lid for gifting, or create a DIY cheesecake jar bar with bowls of toppings so everyone can customize their own. The individual servings make them both elegant and portable, perfect for picnics, parties, or meal prep.
Make Ahead and Storage
Storing Leftovers
One of the best things about these High Protein Cheesecake Jars is how well they keep. Simply screw on the jar lid or cover tightly with plastic wrap and store in the refrigerator for up to three days. The crust holds up, the filling stays silky, and the flavors only get better.
Freezing
Want to make a big batch? These jars freeze surprisingly well! Assemble through Step 3 (before adding fresh fruit), cover tightly, and pop in the freezer. When you’re ready, thaw overnight in the fridge, then top with berries and mint. The texture will remain creamy and delicious, making for an ultra-convenient snack or dessert.
Reheating
No need for reheating—these cheesecakes are meant to be enjoyed cold! If you do freeze them, just remember to transfer to the fridge overnight so they gently come up to the perfect temperature. After that, just add toppings and dig in!
FAQs
Can I add protein powder for an extra boost?
Absolutely! A scoop of your favorite unflavored or vanilla protein powder mixes right into the cheesecake filling. It won’t mess with the texture and gives each jar an even bigger protein punch—ideal if you’re eating these before or after a workout.
Do High Protein Cheesecake Jars work with dairy-free alternatives?
Yes, you can substitute dairy-free yogurt and vegan cream cheese to create a plant-based version. Be sure to use a thick, unsweetened non-dairy yogurt for the creamiest results, and adjust sweetness to taste. The method stays the same!
How can I make the jars lower in sugar?
Swap the honey or maple syrup for your favorite low-calorie sweetener, such as stevia or monk fruit syrup. You could also use plain Greek yogurt instead of flavored varieties to keep things naturally lower in sugar.
What’s the best way to crush graham crackers?
You can pulse them in a food processor for ultra-fine crumbs, or go old-school and place them in a zip-top bag and crush with a rolling pin. Aim for a sandy texture—that’s the key to a beautiful, cohesive crust in these cheesecake jars.
Can I use other toppings besides berries?
Of course! Try sliced bananas, a sprinkle of dark chocolate chips, toasted coconut, chopped nuts, or an extra swirl of honey. These High Protein Cheesecake Jars are made to be personalized, so have fun and get creative.
Final Thoughts
The only thing better than tasting these High Protein Cheesecake Jars is watching friends and family light up with the first bite. They’re so easy to make, satisfy every cheesecake craving, and deliver a generous serving of protein all in one go. I hope you love them as much as I do—why not whip up a batch tonight? Your sweet tooth (and your body) will be so glad you did!
Print
High Protein Cheesecake Jars Recipe
- Total Time: 15 minutes plus chilling
- Yield: 4 jars 1x
- Diet: Non-Vegetarian
Description
Indulge in a guilt-free dessert with these High Protein Cheesecake Jars. Creamy and rich, these individual cheesecakes are made with Greek yogurt and reduced-fat cream cheese, offering a deliciously satisfying treat.
Ingredients
Cheesecake Filling:
- 1 cup low-fat Greek yogurt
- 8 ounces reduced-fat cream cheese, softened
- 1/4 cup honey or maple syrup
- 1 teaspoon vanilla extract
Graham Cracker Crust:
- 1/2 cup graham cracker crumbs
- 2 tablespoons melted butter
Toppings:
- Fresh berries for topping
- Optional mint leaves for garnish
Instructions
- Prepare the Graham Cracker Crust: Combine graham cracker crumbs and melted butter in a bowl, stirring until evenly coated. Press about 2 tablespoons of the mixture into the bottom of each jar to form the crust.
- Make the Cheesecake Filling: In another bowl, beat softened cream cheese until smooth. Fold in Greek yogurt, honey, and vanilla extract, mixing until creamy. Divide the mixture among the jars on top of the crust.
- Chill and Serve: Refrigerate the jars for at least 1 hour to set. Top with fresh berries and mint leaves before serving.
Notes
- Experiment with flavored Greek yogurt for variety.
- Add a scoop of protein powder for an extra protein boost.
- Store covered jars in the refrigerator for up to 3 days.
- Prep Time: 15 minutes
- Cook Time: 0 minutes
- Category: Dessert
- Method: No-Cook
- Cuisine: American
Nutrition
- Serving Size: 1 jar
- Calories: 280
- Sugar: 16g
- Sodium: 220mg
- Fat: 13g
- Saturated Fat: 7g
- Unsaturated Fat: 5g
- Trans Fat: 0g
- Carbohydrates: 28g
- Fiber: 1g
- Protein: 14g
- Cholesterol: 35mg


