
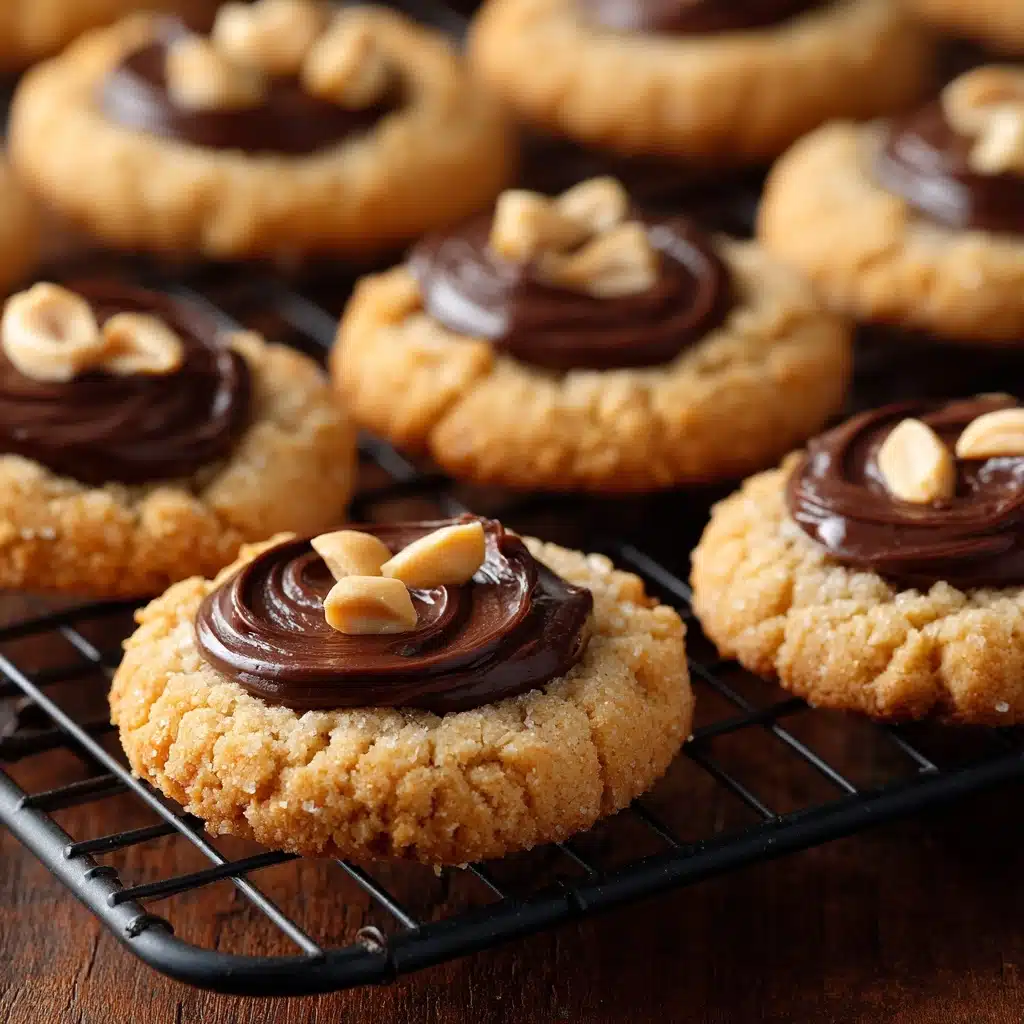
There’s just something undeniably charming about thumbprint cookies, especially when you upgrade them to Chocolate Hazelnut Cream Thumbprints. These treats blend buttery, nut-studded shortbread with a luscious, glossy chocolate hazelnut filling, making each bite a little celebration. Whether you’re baking for a special occasion or channeling a cozy afternoon, this recipe brings together everything you love about classic cookies and creamy chocolate hazelnut goodness all in one happy, bite-sized package.
Ingredients You’ll Need
The beauty of Chocolate Hazelnut Cream Thumbprints lies in their straightforward ingredient list. Every component plays an important role, from golden butter for richness, to fragrant hazelnuts for crunch, to that irresistible chocolate hazelnut swirl in the middle. Let’s break down what you’ll need and why:
- Unsalted butter (1 cup, softened): The creamy base for your dough, lending a tender, melt-in-your-mouth texture.
- Granulated sugar (½ cup): Adds classic sweetness and helps the cookies bake up with just the right crispness.
- Light brown sugar (¼ cup, packed): Brings subtle caramel notes and a hint of chewiness.
- Vanilla extract (1 teaspoon): Enhances all the flavors and provides a warm, inviting aroma.
- All-purpose flour (2 cups): The backbone of the cookies, making the dough sturdy and tender.
- Salt (½ teaspoon): Balances out the sweetness and lifts every flavor in the mix.
- Finely chopped hazelnuts (½ cup): Provide a nutty crunch throughout every bite.
- Chocolate hazelnut spread (½ cup, such as Nutella): The show-stopping filling that turns these cookies into Chocolate Hazelnut Cream Thumbprints.
- Heavy cream (2 tablespoons): Mixed with the spread for a creamier, silkier finish.
- Extra chopped hazelnuts for garnish (optional): Sprinkle on top for extra crunch and a beautiful presentation.
How to Make Chocolate Hazelnut Cream Thumbprints
Step 1: Prepare Your Baking Sheets and Oven
Start by preheating your oven to 350°F (175°C) and lining two baking sheets with parchment paper. This step ensures your cookies bake evenly and are super easy to remove, sparing you any sticky situations later on.
Step 2: Cream the Butter and Sugars
In a large mixing bowl, beat together the softened butter, granulated sugar, and brown sugar until the mixture is light and fluffy. This aerates the dough and sets the stage for perfectly tender cookies. Don’t rush this part; a few extra minutes of mixing here goes a long way!
Step 3: Add Vanilla, Flour, and Salt
Splash in your vanilla extract, then mix to combine. Gradually add the flour and salt, alternating between stirring and scraping down the bowl as needed. The dough should be soft and cohesive by the end, fragrant with the vanilla and ready for the nutty twist.
Step 4: Stir in Hazelnuts and Shape the Cookies
Gently fold in the chopped hazelnuts, distributing them evenly throughout the dough. Now, scoop out tablespoon-sized portions—about 1-inch balls—and roll them between your palms. Arrange them on your prepared baking sheets, leaving 2 inches between each to allow for spreading.
Step 5: Make Indentations
With clean thumbs or the back of a small spoon, press a gentle indentation into the center of each ball. Don’t worry about perfection: these little wells are ready to be filled with chocolate hazelnut bliss.
Step 6: Bake the Cookies
Slide the trays into your preheated oven and bake for 10 to 12 minutes, or until you see the edges just turning golden. If any centers have puffed, gently press them again right out of the oven. Let your cookies cool completely on a wire rack before you fill them.
Step 7: Mix and Pipe the Chocolate Hazelnut Cream
In a small bowl, stir together your chocolate hazelnut spread and heavy cream until it’s smooth and glossy. This creamy mixture brings that signature touch to your Chocolate Hazelnut Cream Thumbprints. Once the cookies are cool, either spoon or pipe the filling into each indentation.
Step 8: Garnish and Let Set
If you love a little extra crunch and color, sprinkle additional chopped hazelnuts on top of the creamy centers. Let the cookies sit at room temperature until the filling firms up a bit, and then dive right in!
How to Serve Chocolate Hazelnut Cream Thumbprints

Garnishes
Garnishing your Chocolate Hazelnut Cream Thumbprints is a simple way to jazz them up for any occasion. A few extra chopped hazelnuts add crunch and elegance, while a dusting of powdered sugar offers a delicate, festive finish. If you’re feeling extra, a drizzle of melted chocolate across the tops is hard to resist!
Side Dishes
Pair these cookies with a cup of freshly brewed coffee or espresso for a little afternoon pick-me-up. They’re also delightful with a tall glass of cold milk or served alongside a fruit platter, balancing out the sweetness with some juicy freshness.
Creative Ways to Present
Arrange your Chocolate Hazelnut Cream Thumbprints on a vintage cake stand or a pretty platter for a homey touch. Stack them in a glass jar tied with ribbon for a thoughtful homemade gift, or tuck them into cupcake liners for an elegant look at a dessert buffet.
Make Ahead and Storage
Storing Leftovers
Keep leftover cookies in an airtight container at room temperature for up to 4 days. They retain their crisp edges and creamy centers beautifully, so they’re always ready to enjoy with just a moment’s notice.
Freezing
If you want to prep ahead, freeze the baked cookies unfilled in a single layer, then transfer to a resealable freezer bag for up to 3 months. When you’re ready, thaw at room temperature and add the chocolate hazelnut filling just before serving for maximum freshness.
Reheating
Usually, these cookies are best enjoyed at room temperature, but if you love a slightly melty center, pop a filled cookie into the microwave for 5–10 seconds. The chocolate hazelnut cream will turn irresistibly gooey—just be cautious, as it can get hot quickly!
FAQs
Can I use a different nut instead of hazelnuts?
Absolutely! While hazelnuts give these cookies their signature flavor, chopped almonds or pecans make an equally delicious swap if that’s what you have on hand or if you have a nut preference.
What if I don’t have chocolate hazelnut spread?
If you’re out of chocolate hazelnut spread, you can use a combination of melted chocolate and a bit of butter or coconut oil for the filling, though the flavor will be slightly different. The cookies will still taste amazing!
How can I make the cookies gluten-free?
Replace the all-purpose flour with your favorite gluten-free baking blend. Just make sure it contains xanthan gum for structure, and check the labels on your chocolate hazelnut spread if you’re catering to strict dietary needs.
Can I make the dough ahead of time?
Definitely! You can make the dough, shape it into balls, then store them in the fridge for up to 24 hours or freeze for longer. When you’re ready to bake, add the indentations and pop them right into the oven, adding a minute or two to the bake time as needed.
Why did my cookies spread too much in the oven?
This can happen if the butter is too soft or melted, or if you didn’t chill the dough after shaping. To prevent spreading, you can refrigerate the shaped cookie balls for 10–15 minutes before baking. This helps them keep their cute, thumbprint shape.
Final Thoughts
There’s a certain delight in pulling a tray of warm, golden Chocolate Hazelnut Cream Thumbprints from the oven—your kitchen will smell incredible, and everyone will be asking for just one more. Whether you’re baking for a holiday, a gathering, or just because, give these cookies a try and see how quickly they become a favorite! Happy baking!
Print
Chocolate Hazelnut Cream Thumbprints Recipe
- Total Time: 32 minutes
- Yield: 24 cookies 1x
- Diet: Vegetarian
Description
Indulge in these delightful Chocolate Hazelnut Cream Thumbprint Cookies that are a perfect blend of buttery cookie base, rich chocolate hazelnut filling, and crunchy hazelnut garnish.
Ingredients
Cookies:
- 1 cup unsalted butter (softened)
- ½ cup granulated sugar
- ¼ cup light brown sugar (packed)
- 1 teaspoon vanilla extract
- 2 cups all-purpose flour
- ½ teaspoon salt
- ½ cup finely chopped hazelnuts
Chocolate Hazelnut Filling:
- ½ cup chocolate hazelnut spread (such as Nutella)
- 2 tablespoons heavy cream
Garnish:
- Extra chopped hazelnuts for garnish (optional)
Instructions
- Preheat the oven: Preheat the oven to 350°F (175°C) and line two baking sheets with parchment paper.
- Cream butter and sugars: In a large mixing bowl, cream together the butter, granulated sugar, and brown sugar until light and fluffy. Add vanilla extract and mix well.
- Add dry ingredients: Gradually add the flour and salt, mixing until a soft dough forms. Stir in the chopped hazelnuts.
- Shape and bake: Roll the dough into 1-inch balls, place on baking sheets, press an indentation, and bake for 10–12 minutes until lightly golden.
- Fill the cookies: Mix chocolate hazelnut spread and cream, fill the cooled cookies, garnish with hazelnuts, and let set before serving.
Notes
- Cookies can be stored at room temperature for up to 4 days.
- For a richer filling, warm the hazelnut spread before adding cream.
- Prep Time: 20 minutes
- Cook Time: 12 minutes
- Category: Dessert
- Method: Baking
- Cuisine: American
Nutrition
- Serving Size: 1 cookie
- Calories: 160
- Sugar: 8g
- Sodium: 60mg
- Fat: 10g
- Saturated Fat: 5g
- Unsaturated Fat: 4g
- Trans Fat: 0g
- Carbohydrates: 15g
- Fiber: 1g
- Protein: 2g
- Cholesterol: 20mg


