
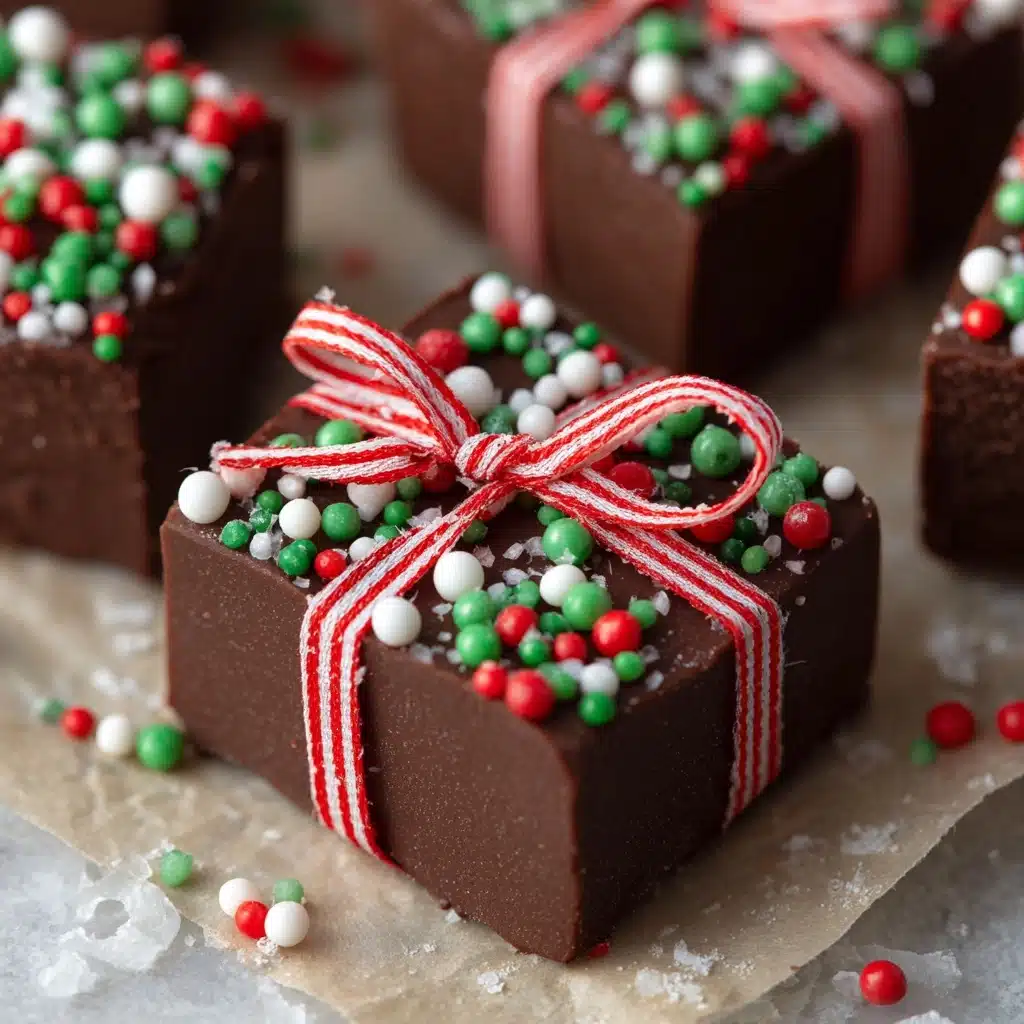
Nothing captures the sweet spirit of the holidays quite like a batch of rich, velvety Christmas Fudge. This delightful treat is a guaranteed crowd-pleaser, combining luscious chocolate, creamy sweetness, and a festive touch of color—all wrapped up in nostalgic holiday flavor. Perfect for gifting, sharing at parties, or just curling up with on a chilly December night, this recipe brings together everything I love about holiday treats: simplicity, indulgence, and pure joy in every bite.

Ingredients You’ll Need
The beauty of this Christmas Fudge is just how simple, yet essential, the ingredients are. Every element plays a key role in creating that irresistibly smooth texture and classic chocolatey flavor, while the optional mix-ins and toppings give you a chance to add your own personal, festive flourish.
- 3 cups semi-sweet chocolate chips: Provides the deep, classic chocolate flavor and rich, glossy finish.
- 1 (14 oz) can sweetened condensed milk: Creates a creamy, dreamy base and keeps the fudge soft yet sliceable.
- ¼ cup unsalted butter: Adds richness and silkiness, helping every bite melt in your mouth.
- 1 teaspoon vanilla extract: Enhances the chocolate flavor and gives the fudge that homemade warmth.
- ¼ teaspoon salt: Just a pinch balances the sweetness and makes all the flavors pop.
- ½ cup chopped walnuts or pecans (optional): Stir in for crunch and nutty flair—totally your call!
- Red and green sprinkles or crushed peppermint candies for topping (optional): Finish things with a jolly, festive touch for extra holiday magic.
How to Make Christmas Fudge
Step 1: Prep Your Pan
Start by lining an 8×8-inch square baking pan with parchment paper, leaving some overhang on the sides. This simple step makes unmolding your Christmas Fudge a breeze and keeps those gorgeous edges neat for slicing.
Step 2: Melt and Mix
In a medium saucepan set over low heat, combine the chocolate chips, sweetened condensed milk, and butter. Stir constantly with a spatula or wooden spoon—the low heat and patient stirring are key to keeping everything smooth and silky, without any risk of burning.
Step 3: Add Flavor and Crunch
Once the chocolate mixture is fully melted and smooth, remove the saucepan from the heat. Stir in the vanilla extract and salt, mixing well. If you’re adding chopped walnuts or pecans, fold them in now for delicious texture.
Step 4: Pour and Decorate
Pour the warm fudge mixture into your prepared pan and smooth it out with a spatula. Act quickly to add your festive toppings—red and green sprinkles or crushed peppermint candies—gently pressing them in before the fudge begins to set.
Step 5: Chill Until Perfect
Transfer the pan to the refrigerator and let your fudge chill for at least 2 hours, or until firm. This patience pays off: the cool time ensures your Christmas Fudge is perfectly sliceable and holds its dreamy shape.
Step 6: Slice and Enjoy
Once set, use the parchment overhang to lift the fudge out onto a cutting board. Grab a sharp knife and cut the chilled slab into neat squares—each one a tiny piece of chocolate holiday heaven.
How to Serve Christmas Fudge
Garnishes
A generous sprinkle of red and green sprinkles, a scattering of crushed peppermint, or even a dusting of powdered sugar adds instant festive cheer to your Christmas Fudge. For something extra fancy, drizzle with a bit of melted white chocolate or nestle each square in a mini cupcake liner for a professional finish.
Side Dishes
Pair these divine fudge squares with a mug of hot cocoa, warm coffee, or even spiced apple cider. The combination of creamy chocolate fudge and cozy winter drinks is truly unbeatable—turning snack time into a holiday celebration all its own.
Creative Ways to Present
For a stunning holiday gift, arrange pieces of Christmas Fudge in pretty tins or on festive plates wrapped in clear cellophane. Add a ribbon and a handwritten note for a heartfelt, homemade present. Or pile them high on a cookie platter for your holiday party (trust me, they’ll vanish fast!).
Make Ahead and Storage
Storing Leftovers
One of the best parts about Christmas Fudge is just how well it keeps: store leftovers in an airtight container in the refrigerator, where they stay fresh and delicious for up to two weeks. Stack layers with parchment between to prevent sticking, and your fudge will be ready for sweet snacking anytime.
Freezing
Yes, you can freeze fudge! Wrap individual pieces or the whole batch tightly in plastic wrap, then store in a freezer-safe container for up to three months. Thaw in the refrigerator before serving for best texture—great for staying ahead of that holiday rush.
Reheating
While Christmas Fudge truly shines when enjoyed chilled or at room temperature, if you prefer a softer bite, simply let it sit at room temp for a bit before serving. Avoid microwaving, as it can melt the fudge or make it too soft to slice neatly.
FAQs
Can I use different chocolate chips for this fudge?
Absolutely! While semi-sweet chocolate chips are traditional for Christmas Fudge, feel free to experiment with dark, milk, or even white chocolate chips. Each type Dessert.
How do I keep the fudge from sticking to the pan?
Lining your baking pan with parchment paper—not just on the bottom, but with extra overhang on the sides—ensures lifting the fudge out is effortless and mess-free. No more prying with spatulas or losing those clean, pretty edges!
Is this fudge gluten free?
Yes, all the main ingredients in this Christmas Fudge recipe are naturally gluten free. Just double-check any optional toppings (like sprinkles) to be sure they’re safe if you or someone you’re serving eats gluten-free.
Could I add other mix-ins?
Definitely! Try swirling in peanut butter, layering with crushed cookies, or folding in mini marshmallows for a rocky road effect. The base fudge is a blank canvas—get creative and make it your own unique Christmas masterpiece.
What’s the best way to cut the fudge for clean squares?
Wait until the fudge is fully chilled, then use a large, sharp knife. Wipe the blade clean between cuts for super-smooth edges. This attention to detail makes each piece of Christmas Fudge look bakery-perfect and gift-worthy!
Final Thoughts
If you’re looking for a fuss-free dessert that brings maximum holiday merriment and chocolate joy, you simply have to try making Christmas Fudge. It’s so easy, so decadent, and so fun to share—just one bite and it might become your favorite festive tradition, too!
Print
Christmas Fudge Recipe
- Total Time: 2 hours 15 minutes (including chilling)
- Yield: 36 squares 1x
- Diet: Vegetarian
Description
Indulge in the holiday spirit with this rich and creamy Christmas Fudge. Made with decadent chocolate, sweetened condensed milk, and a hint of vanilla, this festive treat is perfect for sharing with loved ones or as a homemade gift.
Ingredients
Main Ingredients:
- 3 cups semi-sweet chocolate chips
- 1 (14 oz) can sweetened condensed milk
- ¼ cup unsalted butter
- 1 teaspoon vanilla extract
- ¼ teaspoon salt
Optional Add-Ins:
- ½ cup chopped walnuts or pecans
- red and green sprinkles or crushed peppermint candies for topping
Instructions
- Prepare the Pan: Line an 8×8-inch square baking pan with parchment paper, leaving an overhang for easy removal.
- Melt the Ingredients: In a saucepan over low heat, melt chocolate chips, condensed milk, and butter until smooth.
- Finish the Fudge: Stir in vanilla, salt, and nuts if desired. Pour mixture into the pan, top with sprinkles or peppermint, and refrigerate until firm.
- Serve: Once set, cut into squares and enjoy!
Notes
- This fudge can be stored in the fridge for up to 2 weeks, making it a great make-ahead dessert.
- For a twist, try using white chocolate chips and peppermint extract for a different flavor profile.
- Prep Time: 10 minutes
- Cook Time: 5 minutes
- Category: Dessert
- Method: Stovetop
- Cuisine: American
Nutrition
- Serving Size: 1 square
- Calories: 130
- Sugar: 14g
- Sodium: 30mg
- Fat: 7g
- Saturated Fat: 4g
- Unsaturated Fat: 2g
- Trans Fat: 0g
- Carbohydrates: 16g
- Fiber: 1g
- Protein: 2g
- Cholesterol: 5mg


