
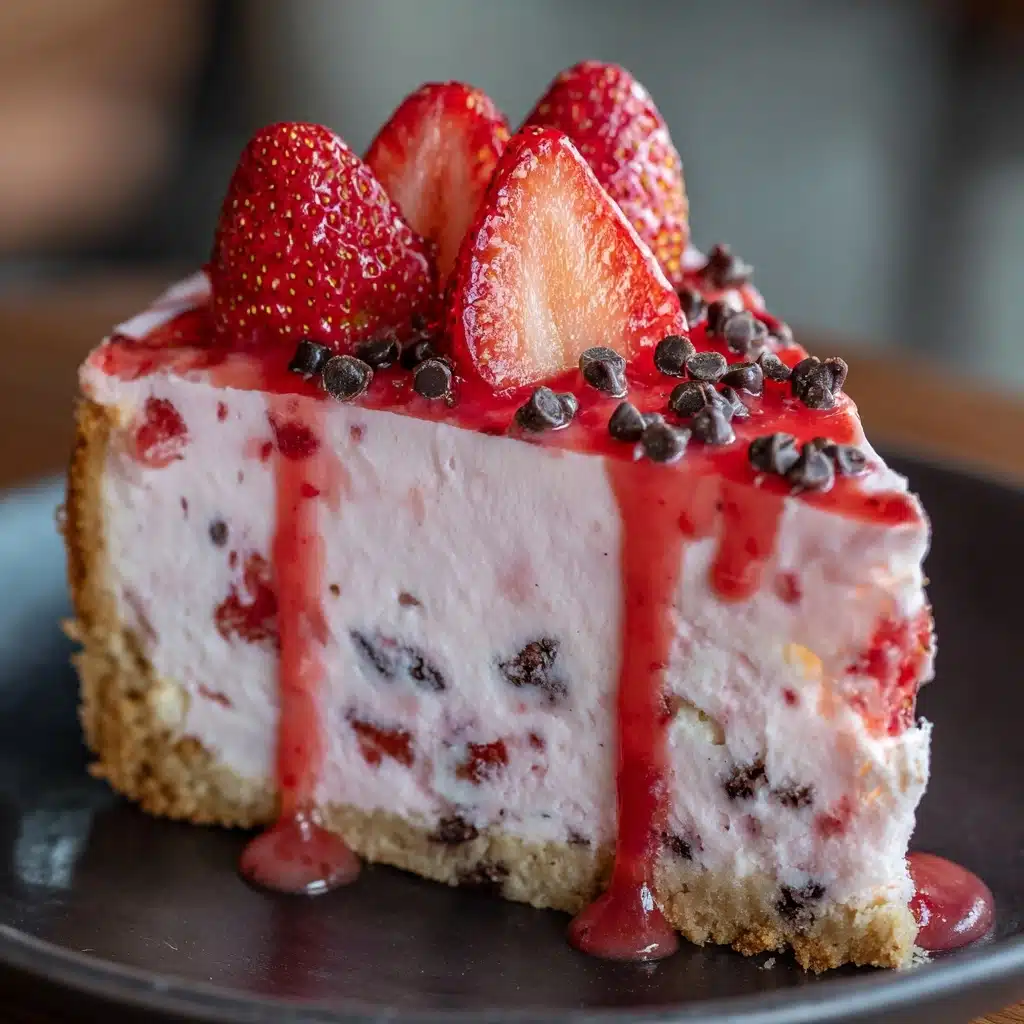
If you’re searching for a showstopping dessert that’s as creamy as it is dreamy, look no further than this Strawberry Dream Cheesecake. With its buttery graham cracker crust, cloud-like filling, and rivers of glistening strawberry topping, this cheesecake truly lives up to its name. Whether you’re making it for a birthday, a spring celebration, or just because strawberries are calling your name, this recipe will walk you through every step and deliver a luscious, crowd-pleasing treat every single time.

Ingredients You’ll Need
The magic of Strawberry Dream Cheesecake lies in how classic ingredients combine to create pure dessert bliss. Each part—crust, filling, and strawberry topping—plays a starring role. Here’s why these simple ingredients are the building blocks for a cheesecake that’s never boring.
- Graham cracker crumbs: The foundation for a crunchy, golden crust that anchors the creamy layers perfectly.
- Granulated sugar: Adds sweetness to both the crust and the filling, ensuring every bite is just right.
- Unsalted butter: Melted and mixed with crumbs for a crust that’s rich and flavorful.
- Cream cheese: The star of the filling—make sure it’s softened for the ultimate creamy texture.
- Vanilla extract: Rounds out the flavors in the cheesecake filling; the little things make a big difference!
- Large eggs: Each one adds structure and silkiness to the filling.
- Sour cream: Lends a tangy note and helps keep your cheesecake tender and smooth.
- Heavy cream: Contributes to that dreamy, almost mousse-like lightness.
- Fresh strawberries: The hero of your topping—choose fragrant, bright berries for best flavor and color.
- Lemon juice: Gives the strawberry topping that fresh, summery spark.
- Cornstarch: Thickens your strawberry topping so it’s perfectly spoonable.
- Water: Mixed with cornstarch to make a quick slurry for the topping.
How to Make Strawberry Dream Cheesecake
Step 1: Prepare the Graham Cracker Crust
Begin by preheating your oven to 325°F. In a medium bowl, combine the graham cracker crumbs, granulated sugar, and melted butter until the mixture resembles wet sand (the scent alone is so nostalgic!). Pour this mixture into the bottom of a 9-inch springform pan, pressing it down evenly—use the flat bottom of a measuring cup if you like. Bake this crust for 10 minutes, then set it aside to cool while you focus on building that dreamy filling.
Step 2: Make the Creamy Cheesecake Filling
Place your softened cream cheese in a large mixing bowl. Beat until completely smooth and lump free—it should look glossy and thick. Add the sugar and vanilla extract, mixing until just combined. Next, add the eggs one at a time, beating gently after each addition. Stir in the sour cream and heavy cream, just until the batter is cohesive. Don’t overmix! Pour this silky filling over your cooled crust.
Step 3: Bake to Perfection
Set your cheesecake on the center rack. If you want to avoid cracks (we all do!), place your springform pan in a larger baking dish and fill it with an inch of hot water—this acts as a gentle water bath. Bake the cheesecake for 55 to 65 minutes, or until the center is just set and trembles slightly if you tap the pan. Turn the oven off, crack the oven door a few inches, and let the cheesecake gradually cool inside for an hour.
Step 4: Chill and Rest
Once the hour is up, remove your cheesecake from the oven and let it come to room temperature. Then, transfer it to the fridge to chill for at least 4 hours (overnight is even better!). This time in the fridge is what transforms your filling into that perfect Strawberry Dream Cheesecake consistency—ultra-creamy, impossibly smooth, and ready for crowning glory.
Step 5: Prepare the Strawberry Topping
While your cheesecake is chilling, make the fresh strawberry topping. In a medium saucepan over medium heat, combine sliced strawberries, sugar, and lemon juice. Stir occasionally until the strawberries release their juices and begin to bubble, about 5-7 minutes. Mix cornstarch and water together, then stir it into the berries and cook for another minute or two, until the mixture thickens and becomes glossy. Remove from the heat and cool completely. Once both the topping and the cheesecake are chilled, spread the strawberry glaze over the cheesecake, and you’re ready for the big reveal.
How to Serve Strawberry Dream Cheesecake
Garnishes
For that Instagram-worthy Strawberry Dream Cheesecake, don’t be shy with the garnishes! Try a crown of fresh strawberry slices or a sprinkle of lemon zest for a burst of color. A few dollops of whipped cream piped around the edge make every slice feel festive. If you really want to impress, a scattering of edible flowers (like violets or nasturtiums) can take your cheesecake over the top.
Side Dishes
This cheesecake shines as the main event, but if you’re serving brunch or a tea party, pair it with light accompaniments. Fresh mint tea, a pitcher of sparkling lemonade, or a side bowl of mixed summer berries accent the lush creamy filling and brighten up every bite. A crunchy almond biscotti or shortbread cookie never goes amiss either!
Creative Ways to Present
There are endless ways to bring flair to your Strawberry Dream Cheesecake presentation. Try freezing leftover topping in ice cube trays and serving them with glasses of lemonade for an unexpected twist. For a picnic, spoon cheesecake filling and berries into small mason jars for portable parfaits. Or, swirl a little strawberry puree into the filling before baking and get marbled slices that look as dreamy as they taste.
Make Ahead and Storage
Storing Leftovers
Have extra Strawberry Dream Cheesecake? Lucky you! Simply cover the pan with plastic wrap or transfer individual slices to an airtight container. Refrigerated, your cheesecake will stay luscious and fresh for up to five days, making it the ideal dessert to bake ahead for gatherings.
Freezing
If you want to get ahead on party prep, this cheesecake freezes beautifully—just don’t add the strawberry topping before freezing. Wrap the whole cheesecake or slices tightly in plastic and foil, then freeze for up to two months. Thaw in the fridge overnight before adding your strawberry layer and serving.
Reheating
Cheesecake is best enjoyed chilled, but if your Strawberry Dream Cheesecake has been in the freezer, let it slowly defrost overnight in the refrigerator. Don’t try to speed things up in the microwave, or you’ll lose that velvet-smooth texture that makes this dessert so dreamy.
FAQs
Can I use frozen strawberries for the topping?
Yes, frozen strawberries work well in the topping if fresh ones aren’t available. Just thaw them completely and drain excess liquid before using, so your sauce isn’t too watery.
What can I do if my cheesecake cracks on top?
Cracks happen even to seasoned bakers, but don’t worry—your strawberry topping will cover any imperfections! If you want to prevent cracks in future, always use a water bath and avoid overbaking the cheesecake.
Can I make Strawberry Dream Cheesecake gluten free?
Absolutely! Simply swap regular graham crackers for your favorite gluten-free version in the crust. The rest of the ingredients are naturally gluten free, so you won’t miss a thing.
Is it possible to make this cheesecake in advance?
Definitely, and it’s often even tastier the next day! You can bake and chill the cheesecake 1-2 days in advance, storing the strawberry topping separately and adding it just before serving.
How do I get clean slices when serving?
For picture-perfect slices, run a large knife under hot water, wipe it dry, and slice. Wipe the blade clean between each cut for that bakery-style look!
Final Thoughts
There’s something magical about sharing a homemade dessert that everyone raves about, and Strawberry Dream Cheesecake is just that kind of recipe. Between the buttery crust, creamy filling, and jewel-bright strawberries, it’s a classic for a reason. Give it a try, share it generously, and don’t be surprised if it disappears in record time!
Print
Strawberry Dream Cheesecake Recipe
- Total Time: 6 hours
- Yield: 12 servings 1x
- Diet: Non-Vegetarian
Description
Indulge in the heavenly delight of Strawberry Dream Cheesecake, a creamy and fruity dessert that will captivate your taste buds with every bite. This luscious baked cheesecake features a buttery graham cracker crust, a velvety cream cheese filling, and a vibrant strawberry topping.
Ingredients
For the crust:
- 1 1/2 cups graham cracker crumbs
- 1/4 cup granulated sugar
- 6 tablespoons unsalted butter, melted
For the filling:
- 3 (8-ounce) blocks cream cheese, softened
- 1 cup granulated sugar
- 1 teaspoon vanilla extract
- 3 large eggs
- 1/2 cup sour cream
- 1/2 cup heavy cream
For the strawberry topping:
- 2 cups fresh strawberries, hulled and sliced
- 1/4 cup granulated sugar
- 1 tablespoon lemon juice
- 1 tablespoon cornstarch mixed with 1 tablespoon water
Instructions
- Preheat oven to 325°F: Combine graham cracker crumbs, sugar, and melted butter for the crust. Press into a springform pan and bake.
- Prepare the filling: Beat cream cheese until smooth, add sugar, vanilla, eggs, sour cream, and heavy cream. Pour over crust and bake.
- Cool and chill: Let the cheesecake cool in the oven, then chill in the refrigerator for at least 4 hours.
- Make the strawberry topping: Cook strawberries, sugar, and lemon juice until juicy. Add cornstarch mixture, thicken, cool, and spread over the cheesecake.
Notes
- Use a water bath while baking to prevent cracks.
- The topping can be prepared ahead and stored in the refrigerator.
- For a stronger strawberry flavor, blend part of the topping and swirl into the filling before baking.
- Prep Time: 25 minutes
- Cook Time: 1 hour 5 minutes
- Category: Dessert
- Method: Baking
- Cuisine: American
Nutrition
- Serving Size: 1 slice
- Calories: 430
- Sugar: 27 g
- Sodium: 280 mg
- Fat: 30 g
- Saturated Fat: 17 g
- Unsaturated Fat: 11 g
- Trans Fat: 0 g
- Carbohydrates: 34 g
- Fiber: 1 g
- Protein: 6 g
- Cholesterol: 115 mg


