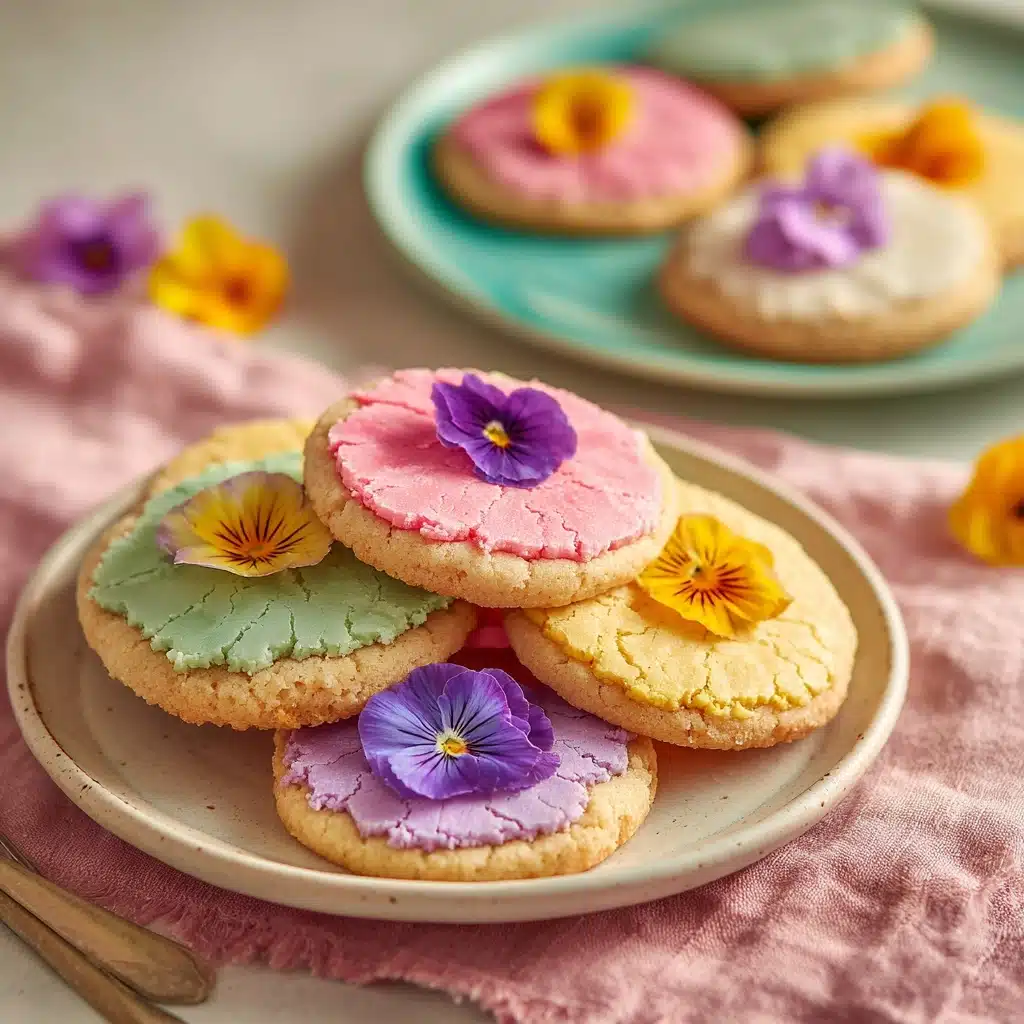
Welcome to cookie season’s most colorful treat: Spring Blossom Cookies! These cheerful, melt-in-your-mouth delights combine buttery sugar cookie dough with a sparkling coat of pastel sanding sugar and that all-important chocolate kiss on top. Every bite is soft, festive, and bursting with springtime vibes—perfect for holidays, showers, or just brightening up your afternoon cup of tea. If you’re in search of a charming, easy recipe that sparks joy and brings people together, look no further.

Ingredients You’ll Need
The magic of Spring Blossom Cookies lies in their simplicity. Each ingredient plays a starring role in shaping the cookie’s flavor, texture, and signature appearance, so don’t skip a thing!
- All-purpose flour: The foundation that gives each cookie its tender yet sturdy structure.
- Baking soda: Ensures a perfectly light and slightly chewy bite every time.
- Salt: Just a pinch balances sweetness and wakes up every flavor note.
- Unsalted butter (softened): Bringing buttery richness for that dreamy, melt-in-your-mouth texture.
- Granulated sugar: Adds crispness and the classic sweet cookie base.
- Light brown sugar (packed): Infuses a touch of caramel depth and extra moisture.
- Large egg: Holds the dough together and contributes to that irresistible chew.
- Vanilla extract: A splash of sweet aroma that ties all the flavors into a comforting whole.
- Milk: Helps the dough come together and keeps cookies soft.
- Pastel-colored sanding sugar or sprinkles: The secret to that gorgeous spring sparkle—mix and match your favorites!
- Chocolate kiss candies (unwrapped): The crowning jewel that makes Spring Blossom Cookies truly irresistible.
How to Make Spring Blossom Cookies
Step 1: Preheat and Prepare Your Baking Sheet
Let’s kick things off by preheating your oven to 350°F. Line a baking sheet with parchment paper—this keeps those cookies from sticking and makes clean-up a breeze, so you can focus on the fun part: baking and decorating!
Step 2: Whisk Together Dry Ingredients
In a medium bowl, whisk together flour, baking soda, and salt. This simple step ensures even distribution, so every cookie has the perfect rise and just the right hint of saltiness to balance that sweet, buttery dough.
Step 3: Cream Butter and Sugars
In a large bowl, beat the softened butter, granulated sugar, and light brown sugar until the mixture becomes pale and fluffy. Creaming really makes all the difference, creating a lighter texture and helping the sugars dissolve for extra-tender cookies.
Step 4: Add Egg, Vanilla, and Milk
Crack in your egg and pour in the vanilla extract and milk. Blend until everything is gloriously smooth and well combined. This step brings moisture and a beautiful aroma that will fill your kitchen even before they hit the oven.
Step 5: Combine Wet and Dry Ingredients
Gradually add the dry ingredient mix to the wet mixture, stirring just until a soft, cohesive dough forms. Don’t overmix—gentle folding preserves tenderness and keeps your Spring Blossom Cookies extra soft.
Step 6: Shape, Roll, and Decorate
Now for the fun part! Scoop tablespoon-sized bits of dough and roll each one into a neat ball. Roll each dough ball in pastel sanding sugar or sprinkles, coating generously for that classic springtime sparkle. Place them on the baking sheet about 2 inches apart.
Step 7: Bake, Press, and Cool
Bake for 8 to 10 minutes, just until the edges look set and a little golden. Go ahead and press a chocolate kiss candy into the center of each cookie the moment they come out of the oven. Let them cool for 5 minutes on the sheet to firm up, then transfer to a wire rack for that perfect finish.
How to Serve Spring Blossom Cookies

Garnishes
Once the Spring Blossom Cookies are cooled, try adding a final sprinkle of extra sanding sugar or a dusting of powdered sugar on top for a show-stopping sparkle. A few edible flowers scattered around the plate make your cookie tray look like a garden party centerpiece!
Side Dishes
These cookies shine with a pot of floral tea, a frothy iced matcha, or a refreshing lemonade, making every snack feel like a celebration. For a spring brunch, let them cozy up next to lemon bars or mini fruit tarts for a dessert spread that pops with color and flavor.
Creative Ways to Present
If you’re gifting or entertaining, arrange the cookies in a pastel tin, nestle each one in a mini cupcake liner, or stack them in mason jars tied with a ribbon. For a party, try creating a “blossom bouquet” by sticking cookies on skewers and displaying in a vase—guests will swoon!
Make Ahead and Storage
Storing Leftovers
Stored in an airtight container at room temperature, your Spring Blossom Cookies will stay soft and fresh for up to five days. Place parchment paper between layers to keep decorations intact and cookies picture-perfect.
Freezing
If you want to enjoy these delights beyond the spring season, freeze baked and cooled cookies in a single layer on a baking sheet, then transfer to a freezer bag. They’ll be just as delicious for up to three months. For best results, let them thaw in their container at room temperature to avoid condensation.
Reheating
To bring back that just-baked magic, warm the cookies in a 275°F oven for 4-5 minutes. The chocolate will become beautifully soft again, and the aroma will fill your kitchen with a whiff of spring. Just don’t microwave, as this can melt the chocolate kisses unevenly.
FAQs
Can I use other types of chocolate on top?
Absolutely! While classic chocolate kiss candies are the traditional choice for Spring Blossom Cookies, you can substitute with dark chocolate kisses, caramel-filled kisses, or even mini peanut butter cups for a fun twist.
What’s the best way to keep the cookies soft?
Seal the cookies in an airtight container, and if you like, add a slice of bread or apple. This old-school trick keeps moisture where it belongs—in your Spring Blossom Cookies—instead of disappearing into thin air.
Can I make the dough ahead of time?
Yes! Make the dough and store it tightly wrapped in the fridge for up to 48 hours. When you’re ready to bake, let it rest at room temperature for 15-20 minutes so it’s easy to shape and roll in sprinkles.
Are these cookies good for themed parties?
Definitely! Color-coordinate your sanding sugars or sprinkles to match holidays like Easter or birthdays. With their blooms of color and chocolatey centers, Spring Blossom Cookies turn any gathering into a celebration.
Can kids help with this recipe?
Kids will love rolling the dough balls in pastel sugar and gently pressing in the chocolate kisses. It’s a hands-on, creative project that yields deliciously sweet results (and lots of memories) every time.
Final Thoughts
There’s something truly magical about baking Spring Blossom Cookies and sharing them with friends and family. They’re the kind of treat that brings out smiles, laughter, and maybe a little kitchen dancing. Go ahead—gather your favorite sprinkles, unwrap those chocolates, and let the joy of spring blossom in your own home!
Print
Spring Blossom Cookies Recipe
- Total Time: 25 minutes
- Yield: 24 cookies 1x
- Diet: Vegetarian
Description
Spring Blossom Cookies are delightful treats perfect for Easter or any springtime celebration. These soft sugar cookies topped with colorful sanding sugar and a chocolate kiss candy are sure to be a hit with both kids and adults.
Ingredients
Cookie Dough:
- 1½ cups all-purpose flour
- ½ tsp baking soda
- ¼ tsp salt
- ½ cup unsalted butter (softened)
- ½ cup granulated sugar
- ½ cup packed light brown sugar
- 1 large egg
- 1 tsp vanilla extract
- 1 tbsp milk
Toppings:
- Pastel-colored sanding sugar or sprinkles
- 24 chocolate kiss candies (unwrapped)
Instructions
- Preheat oven and prepare baking sheet: Preheat oven to 350°F and line a baking sheet with parchment paper.
- Prepare dry ingredients: In a medium bowl, whisk together the flour, baking soda, and salt.
- Make cookie dough: In a large bowl, beat softened butter, granulated sugar, and brown sugar until fluffy. Add egg, vanilla extract, and milk, mix well. Gradually add dry ingredients to form a soft dough.
- Shape and bake cookies: Roll dough into 1-inch balls, coat with sanding sugar, place on baking sheet, bake for 8–10 minutes until golden. Press a chocolate kiss candy into each cookie.
- Cool and serve: Cool on baking sheet for 5 minutes, then transfer to a wire rack to cool completely.
Notes
- Use colored sugars or nonpareils for themed occasions.
- Cookies will be soft initially but will firm up as they cool.
- Store in an airtight container for up to 5 days.
- Prep Time: 15 minutes
- Cook Time: 10 minutes
- Category: Dessert
- Method: Baking
- Cuisine: American
Nutrition
- Serving Size: 1 cookie
- Calories: 130
- Sugar: 11g
- Sodium: 70mg
- Fat: 6g
- Saturated Fat: 3g
- Unsaturated Fat: 2g
- Trans Fat: 0g
- Carbohydrates: 17g
- Fiber: 0g
- Protein: 1g
- Cholesterol: 15mg


