
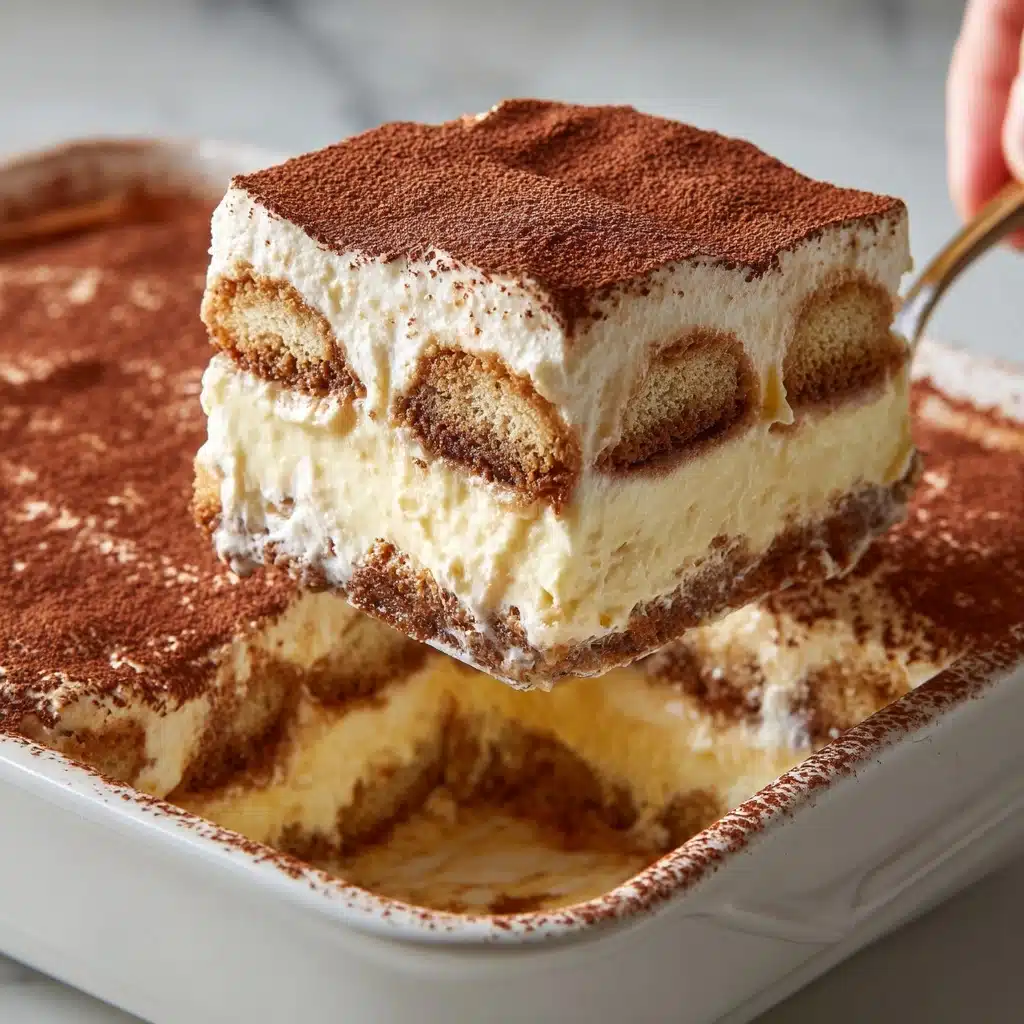
If you’re searching for the dreamiest, most timeless Italian dessert, let me tell you: Tiramisù is where pure delight lives. This legendary treat is all about layers of pillowy mascarpone, coffee-drenched ladyfingers, and whispers of cocoa, coming together in a decadent no-bake creation that just melts away on your tongue. Whether you’re new to homemade Tiramisù or a seasoned admirer looking for that perfect, reliable recipe, you’re about to fall in love all over again.
Ingredients You’ll Need
Tiramisù shines brightest with simple, quality ingredients. Each one is thoughtfully chosen to deliver that unmistakable creamy, coffee-kissed bite and the oh-so-delicate textures we crave. Don’t skip or substitute—their harmony is what makes this classic irresistible!
- Egg yolks: Use fresh, large egg yolks to give the cream its silky richness and beautiful color.
- Granulated sugar: Balances the subtle bitterness of the coffee and gives the mascarpone mixture its sweetness.
- Heavy cream: Brings cloud-like volume and stabilizes the creamy layers for a dreamy mouthfeel.
- Mascarpone cheese: The essential Italian cheese for authentic Tiramisù, make sure it’s softened for easy blending and ultimate smoothness.
- Brewed espresso or strong coffee: Brew this dark and robust, letting the cooled liquid infuse every ladyfinger with deep coffee flavor.
- Coffee liqueur (optional): Adds a sophisticated hint of warmth and complexity. Totally optional, but always welcome!
- Ladyfinger cookies (savoiardi): These delicate, crisp cookies are the structure behind every Tiramisù bite, soaking up coffee without falling apart.
- Unsweetened cocoa powder: A dusting adds a bittersweet contrast and classic finishing look.
- Dark chocolate shavings (optional): For an extra flourish, sprinkle on top for added texture and a touch of indulgence.
How to Make Tiramisù
Step 1: Whisk Egg Yolks and Sugar
Start off by combining the egg yolks and sugar in a large, heatproof bowl. Place the bowl over simmering water to create a gentle double boiler. Whisk constantly for about 5 to 7 minutes, watching as the mixture thickens and turns pale yellow. This step not only builds a glorious foundation for the cream but also ensures safety if you’re a little iffy about raw eggs. Remove from the heat and let the luscious base cool for a few minutes.
Step 2: Whip the Cream
In a separate bowl, beat the heavy cream until it holds stiff peaks. This is what gives Tiramisù its airy lift and billowy texture, so don’t rush this part! If you have a stand mixer, it makes quick work of this task, but a handheld mixer does the trick too. The key is to not overbeat, so keep an eye on it until it’s fluffy and perfectly whipped.
Step 3: Make the Mascarpone Mixture
Gently fold mascarpone cheese into your cooled egg mixture until smooth and without lumps—it’s the heart and soul of Tiramisù’s signature cream. Then, with an equally gentle hand, fold in the whipped cream. You’ll be rewarded with a decadent mixture that’s impossibly creamy, not runny, and ready to layer.
Step 4: Dip the Ladyfingers
Pour your cooled espresso (add coffee liqueur here if you’re feeling fancy) into a shallow dish. Quickly dip each ladyfinger, letting them soak just long enough to absorb that deep coffee flavor yet avoiding sogginess—this is the key to perfect Tiramisù texture. Arrange a layer of dipped ladyfingers in the base of a 9×9-inch dish.
Step 5: Assemble the Layers
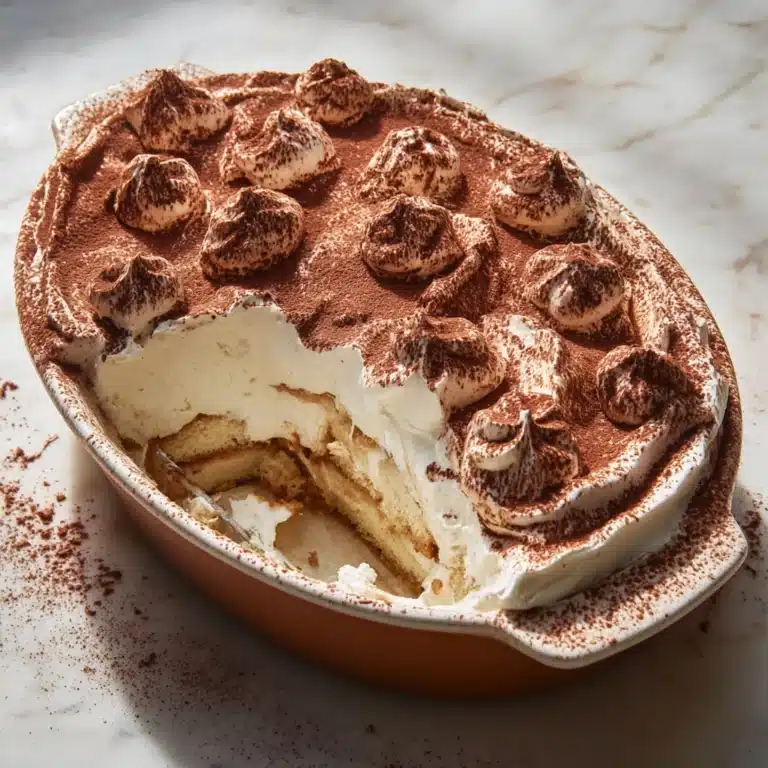
Spread half of that silky mascarpone mixture over the ladyfingers, smoothing it out gently for even coverage. Add a second layer of espresso-dipped ladyfingers, then top with the remaining mascarpone mixture. At this point, you’ll see those gorgeous layers and already know just how irresistible your Tiramisù will be!
Step 6: Chill and Finish
Cover your assembled Tiramisù and refrigerate for at least 4 hours—overnight is even better. This time allows the flavors to meld and the dessert to set firm enough to slice. Just before serving, dust the top generously with unsweetened cocoa powder and a sprinkle of dark chocolate shavings if you wish. Every bite will look (and taste) absolutely stunning!
How to Serve Tiramisù

Garnishes
Serve your Tiramisù with an eye-catching layer of cocoa powder sifted on top to create that rich, velvety finish everyone expects. For a show-stopping touch, artfully scatter chocolate shavings or even a few espresso beans. These simple additions make each slice feel a little extra special and add a delightful visual contrast.
Side Dishes
While Tiramisù shines on its own, you can balance its richness with a side of fresh berries or a light fruit salad. A demitasse of espresso or a small glass of amaro pairs beautifully, enhancing its flavors without overshadowing the main event. For a true Italian flair, offer a biscotti or two alongside—the contrast in texture is pure joy.
Creative Ways to Present
If you’re feeling playful, try serving Tiramisù in individual glasses or mason jars for a modern twist. For a dinner party, use vintage teacups or coupe glasses for elegance, or cut your chilled Tiramisù into neat squares and serve on a platter with a dusting of cocoa at the table. However you present it, this classic always attracts “oohs” and “ahhs.”
Make Ahead and Storage
Storing Leftovers
Have leftover Tiramisù? Lucky you! Simply cover the dish tightly with plastic wrap or transfer slices to an airtight container. Stored in the refrigerator, it will stay fresh and luscious for up to 3 days. The flavors deepen and the texture holds beautifully, making those leftover bites almost more magical.
Freezing
You can absolutely freeze Tiramisù if you need to prepare well in advance. Cut into portions, wrap each tightly, and place in a freezer-safe container—this helps maintain its creamy texture. Thaw overnight in the fridge before serving, and give it a fresh dusting of cocoa and chocolate to revive its showstopping appearance.
Reheating
Tiramisù is meant to be enjoyed chilled, so reheating isn’t needed. In fact, serving it cold is what keeps the layers set and the flavors harmonious. If you’ve frozen it, just move it to the refrigerator to thaw gently before serving—no microwave or oven time required!
FAQs
What’s the best coffee to use for Tiramisù?
Authentic Tiramisù truly shines with strong, freshly brewed espresso, but very strong brewed coffee works well if you don’t have an espresso machine. Just be sure it’s cooled before dipping the ladyfingers, so they don’t become soggy or fall apart.
Can I make Tiramisù without alcohol?
Absolutely! The coffee liqueur is completely optional. You’ll still have all that classic depth from the espresso, so feel free to skip or substitute with a splash of vanilla for a family-friendly treat.
Can I use store-bought whipped cream?
Whipping your own heavy cream makes a world of difference in both flavor and texture—store-bought whipped toppings tend to be too sweet and airy for authentic Tiramisù. If you want the very best result, go homemade!
Is it safe to use raw eggs in Tiramisù?
This recipe uses the double-boiler method to gently cook the egg yolks, making it safer to eat. If you’re still concerned, you can use pasteurized eggs, which you’ll find at most supermarkets.
How far in advance can I make Tiramisù?
Tiramisù is actually better when made in advance, as it gives time for the flavors to meld. You can prepare it up to 24 hours ahead and store it in the fridge until you’re ready to serve—a perfect make-ahead dessert!
Final Thoughts
There’s a world of joy in making and sharing Tiramisù. I promise, every creamy, coffee-soaked bite is worth every minute, and the smiles it brings will make you the hero of any gathering. Treat yourself and your loved ones to this Italian classic—you’ll never look at dessert the same way again!
Print
Tiramisù Recipe
- Total Time: 30 minutes (plus chilling)
- Yield: 8 servings 1x
- Diet: Vegetarian
Description
Indulge in the classic Italian dessert with this easy tiramisù recipe. Layers of coffee-soaked ladyfingers and creamy mascarpone cheese, dusted with cocoa powder, create a decadent treat perfect for any occasion.
Ingredients
Egg Mixture:
- 6 large egg yolks
- 3/4 cup granulated sugar
Cream Mixture:
- 1 cup heavy cream
- 8 ounces mascarpone cheese, softened
Assembly:
- 1 1/2 cups brewed espresso or strong coffee, cooled
- 3 tablespoons coffee liqueur (optional)
- 24 ladyfinger cookies (savoiardi)
- Unsweetened cocoa powder for dusting
- Dark chocolate shavings for garnish (optional)
Instructions
- Egg Mixture: In a large heatproof bowl, whisk together the egg yolks and granulated sugar. Place over a pot of simmering water, whisking constantly for 5-7 minutes until thickened. Remove from heat and cool slightly.
- Cream Mixture: Beat heavy cream until stiff peaks form. Fold mascarpone into cooled egg mixture, then fold in whipped cream.
- Assembly: Dip ladyfingers in coffee mixture and layer in dish. Spread half the mascarpone mixture, repeat layers, and refrigerate for at least 4 hours.
- Serving: Dust with cocoa powder and garnish with chocolate shavings before serving.
Notes
- Use fresh eggs or pasteurized eggs for safety.
- For added flavor, include a splash of vanilla extract in the mascarpone mixture.
- Prep Time: 30 minutes
- Cook Time: 0 minutes
- Category: Dessert
- Method: No-Cook
- Cuisine: Italian
Nutrition
- Serving Size: 1 slice
- Calories: 380
- Sugar: 20g
- Sodium: 50mg
- Fat: 25g
- Saturated Fat: 15g
- Unsaturated Fat: 9g
- Trans Fat: 0g
- Carbohydrates: 33g
- Fiber: 1g
- Protein: 7g
- Cholesterol: 220mg


