
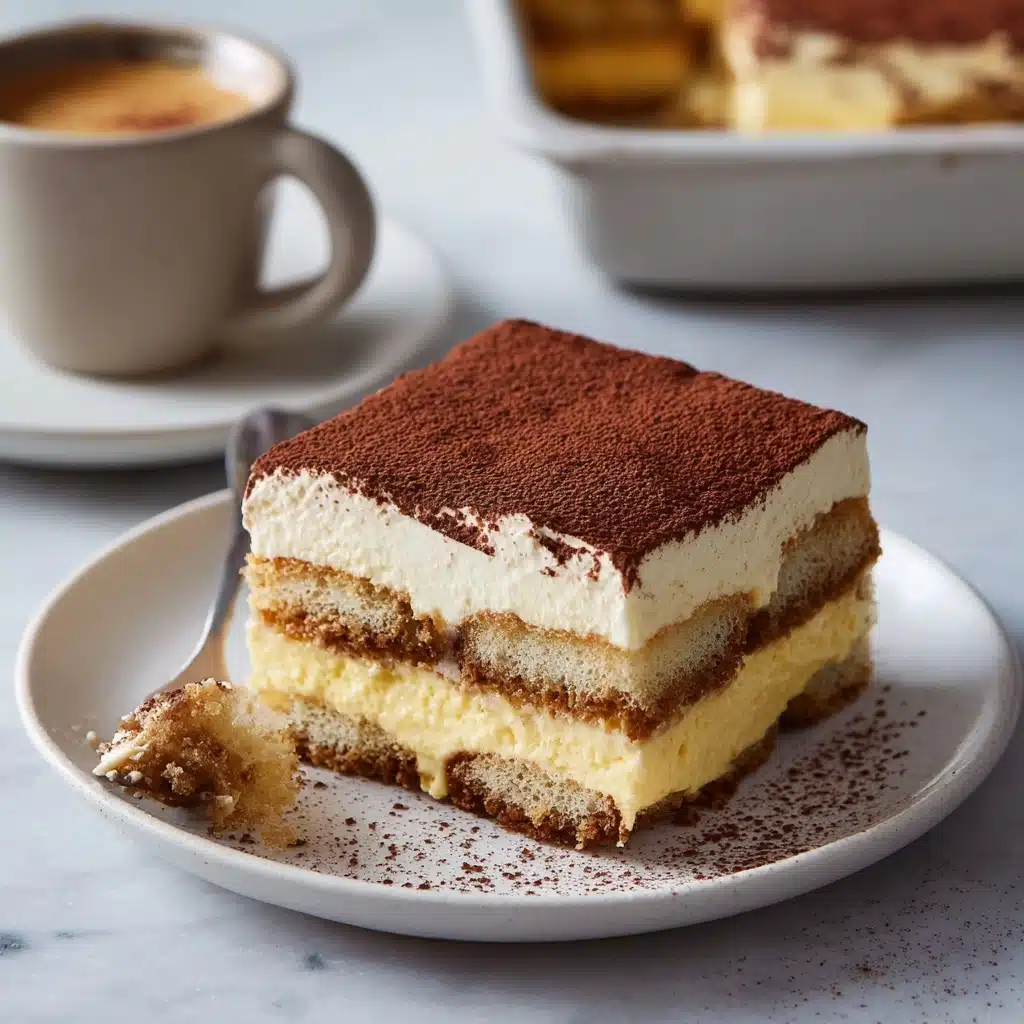
If you’ve ever dreamt of bringing a little slice of Italy into your home, Tiramisu is absolutely the way to do it. This iconic dessert weaves together creamy mascarpone, coffee-soaked ladyfingers, fluffy whipped cream, and a dusting of cocoa—all without turning on the oven! The moment you take that first bite, you’ll be swept away by cozy memories and café atmospheres, whether it’s for a special celebration or just a Wednesday night treat. Tiramisu is not only a showstopper on any dessert table but also surprisingly simple to create, making it dangerous knowledge for anyone with a sweet tooth.
Ingredients You’ll Need
This Tiramisu recipe glows with authenticity while relying on a handful of essential ingredients that are easy to find. Each one brings a special nuance to the dessert, from silky mascarpone to bold espresso. Let’s break down what you’ll need, along with a little tip or insight for each star player.
- 6 large egg yolks: These give the classic richness and make the custard irresistibly creamy. Pasteurized eggs are a safe choice.
- 3/4 cup granulated sugar: Provides just the right sweetness, balancing the deep notes of coffee and chocolate.
- 1 cup heavy whipping cream: Whips up light and airy, giving that signature Tiramisu fluff.
- 8 ounces mascarpone cheese: The heart and soul of authentic Tiramisu—extra smooth and luxuriously creamy.
- 1 teaspoon vanilla extract: Adds a gentle warmth and depth to the filling.
- 1 1/2 cups strong brewed coffee, cooled: The backbone of flavor; use espresso or really robust coffee for best results.
- 3 tablespoons coffee liqueur (optional): Creates that grown-up complexity (but skip if you prefer alcohol-free or are serving kids).
- 24 ladyfinger cookies: These sponge-like cookies soak up the coffee without getting mushy—don’t over-dip!
- 2 tablespoons unsweetened cocoa powder: A final blanket of cocoa for that iconic finish.
- Dark chocolate shavings for garnish (optional): Adds an elegant touch and an extra flash of chocolate flavor.
How to Make Tiramisu
Step 1: Whisk the Egg Yolks and Sugar
In a large heatproof bowl, combine your egg yolks and sugar. Then, set the bowl over a pot of gently simmering water to create a double boiler. Whisk continually for about 5 to 8 minutes, until the mixture turns pale, thick, and feels a bit warm to the touch. This extra step ensures your Tiramisu filling is silky and safe to eat. Let it cool for a few minutes after removing from the heat.
Step 2: Whip the Cream
Grab a cold mixing bowl and beat your heavy whipping cream with an electric mixer until stiff peaks form. You’re looking for a cloud-like texture that will keep the Tiramisu light and luscious. Be careful not to overwhip—stop when the cream holds its shape.
Step 3: Make the Mascarpone Mixture
Add the mascarpone cheese and vanilla extract right into the slightly cooled egg yolk mixture. Gently fold everything together, treating the mascarpone like you would a delicate cake batter. It should be smooth, creamy, and streak-free for that classic Tiramisu texture.
Step 4: Fold in the Whipped Cream
Carefully fold the whipped cream into the mascarpone mixture. Work in batches and use a light hand to keep as much air in the filling as possible. This step is crucial—those airy bubbles are what make each bite of Tiramisu so memorable.
Step 5: Dip and Layer the Ladyfingers
Mix your cooled coffee and coffee liqueur in a shallow dish. Quickly dip each ladyfinger into the mixture, just long enough to soak up some flavor but not so much that they become soggy. Arrange half of them closely together in the bottom of a 9×9-inch dish to create the first layer. Don’t worry if a few break—nobody will know!
Step 6: Build the Layers
Spread half of your mascarpone filling evenly over the first layer of soaked ladyfingers, using a spatula for a smooth finish. Repeat the dipping process with the rest of the ladyfingers to form a second layer, then top with the remaining mascarpone mixture. Smooth the top with care—this will be your dessert’s “face.”
Step 7: Chill and Finish
Cover the dish with plastic wrap and slide it into the refrigerator for at least 4 hours, or ideally overnight. This waiting period is worth every minute, as it allows the flavors to meld and the Tiramisu to firm up perfectly. When you’re ready to serve, give it a generous dusting of unsweetened cocoa powder and, if you’re feeling fancy, some dark chocolate shavings.
How to Serve Tiramisu

Garnishes
A flourish of cocoa powder is all you truly need to finish your Tiramisu, but a few dark chocolate shavings can never hurt! You can use a vegetable peeler to make curls from a chocolate bar, or try a sprinkle of finely chopped chocolate for extra crunch. Some like to add chocolate-covered coffee beans or even a sprinkle of cinnamon for a twist.
Side Dishes
Tiramisu is delightfully rich and pairs beautifully with simple accompaniments. Try serving it alongside a bowl of fresh mixed berries, which brighten the flavors and add a welcome burst of color. A shot of espresso or a glass of dessert wine (think Vin Santo or Moscato) makes for an utterly Italian experience.
Creative Ways to Present
Turn individual Tiramisu portions into a dinner party highlight by assembling them in glasses or small jars—guests will swoon over their own personal dessert! For a picnic, make mini Tiramisu cups in lidded containers. Or use a springform pan if you’re aiming for a cake-like look, releasing the set dessert and slicing wedges to dazzle your family and friends.
Make Ahead and Storage
Storing Leftovers
If you’re lucky enough to have leftover Tiramisu, cover the baking dish tightly with plastic wrap or transfer portions into an airtight container. Store in the fridge, where it will keep fresh and fabulous for up to 3 days—just don’t leave it out on the counter for extended periods.
Freezing
You can absolutely freeze Tiramisu if needed. Wrap the dish well with two layers of plastic wrap and one of aluminum foil, or store individual servings in freezer-safe containers. Thaw overnight in the fridge before enjoying again; keep in mind the texture may change just slightly but the flavors remain divine.
Reheating
Tiramisu is meant to be served cold, so there’s no need to reheat! Simply remove from the refrigerator about 15 minutes prior to serving for the perfect cool-yet-creamy bite. Avoid microwaving, as this can ruin its beautiful texture.
FAQs
Can I make Tiramisu without alcohol?
Absolutely! Simply skip the coffee liqueur and stick to brewed coffee or even use decaf if you’re sensitive to caffeine. The dessert will still be every bit as delicious and crowd-pleasing.
What can I use instead of mascarpone?
If mascarpone is hard to find, a mix of full-fat cream cheese and a splash of heavy cream can substitute in a pinch. It won’t be quite as authentic, but it does give you a similar creamy texture.
How long should Tiramisu chill?
For best results, let your Tiramisu chill at least 4 hours—overnight is even better! The extra time allows the flavors to develop and the layers to come together for that signature forkful.
Are raw eggs safe to use?
Using a double boiler to cook the eggs gently reduces risk, but if you’re concerned, opt for pasteurized eggs for peace of mind. It’s a fantastic way to keep things both safe and traditional.
Can Tiramisu be made gluten-free?
Yes! Swap the regular ladyfingers for gluten-free ones, which are now widely available in many supermarkets or online. All other components of classic Tiramisu are naturally gluten-free.
Final Thoughts
I hope you dive right in and treat yourself to this classic Tiramisu—there’s something so rewarding about making (and eating!) this dreamy Italian dessert from scratch. Whether you keep it traditional or add your own spin, you’re guaranteed smiles all around. Buon appetito, my friend!
Print
Tiramisu Recipe
- Total Time: 4 hours 30 minutes (including chilling)
- Yield: 8 servings 1x
- Diet: Vegetarian
Description
Indulge in the classic Italian dessert with this creamy and rich tiramisu recipe. Layers of coffee-soaked ladyfingers and mascarpone cheese mixture, topped with cocoa powder and chocolate shavings, create a decadent treat perfect for any occasion.
Ingredients
Egg Mixture:
- 6 large egg yolks
- 3/4 cup granulated sugar
Cream Mixture:
- 1 cup heavy whipping cream
- 8 ounces mascarpone cheese
- 1 teaspoon vanilla extract
Assembly:
- 1 1/2 cups strong brewed coffee, cooled
- 3 tablespoons coffee liqueur (optional)
- 24 ladyfinger cookies
- 2 tablespoons unsweetened cocoa powder
- Dark chocolate shavings for garnish (optional)
Instructions
- Egg Mixture: In a large heatproof bowl, whisk together the egg yolks and sugar. Place over simmering water, whisking until pale and thickened. Remove from heat and cool slightly.
- Cream Mixture: Whip cream until stiff peaks form. Fold in mascarpone and vanilla. Combine with egg mixture.
- Assembly: Dip ladyfingers in coffee mixture, layer in dish. Spread mascarpone mixture over ladyfingers. Repeat layering. Refrigerate for at least 4 hours.
- Serving: Dust with cocoa powder and garnish with chocolate shavings before serving.
Notes
- Use pasteurized eggs if concerned about raw eggs.
- For alcohol-free version, omit coffee liqueur and use decaf coffee if preferred.
- Prep Time: 30 minutes
- Cook Time: 0 minutes
- Category: Dessert
- Method: No-Bake
- Cuisine: Italian
Nutrition
- Serving Size: 1 slice
- Calories: 410
- Sugar: 20g
- Sodium: 70mg
- Fat: 27g
- Saturated Fat: 16g
- Unsaturated Fat: 10g
- Trans Fat: 0g
- Carbohydrates: 32g
- Fiber: 1g
- Protein: 7g
- Cholesterol: 230mg


