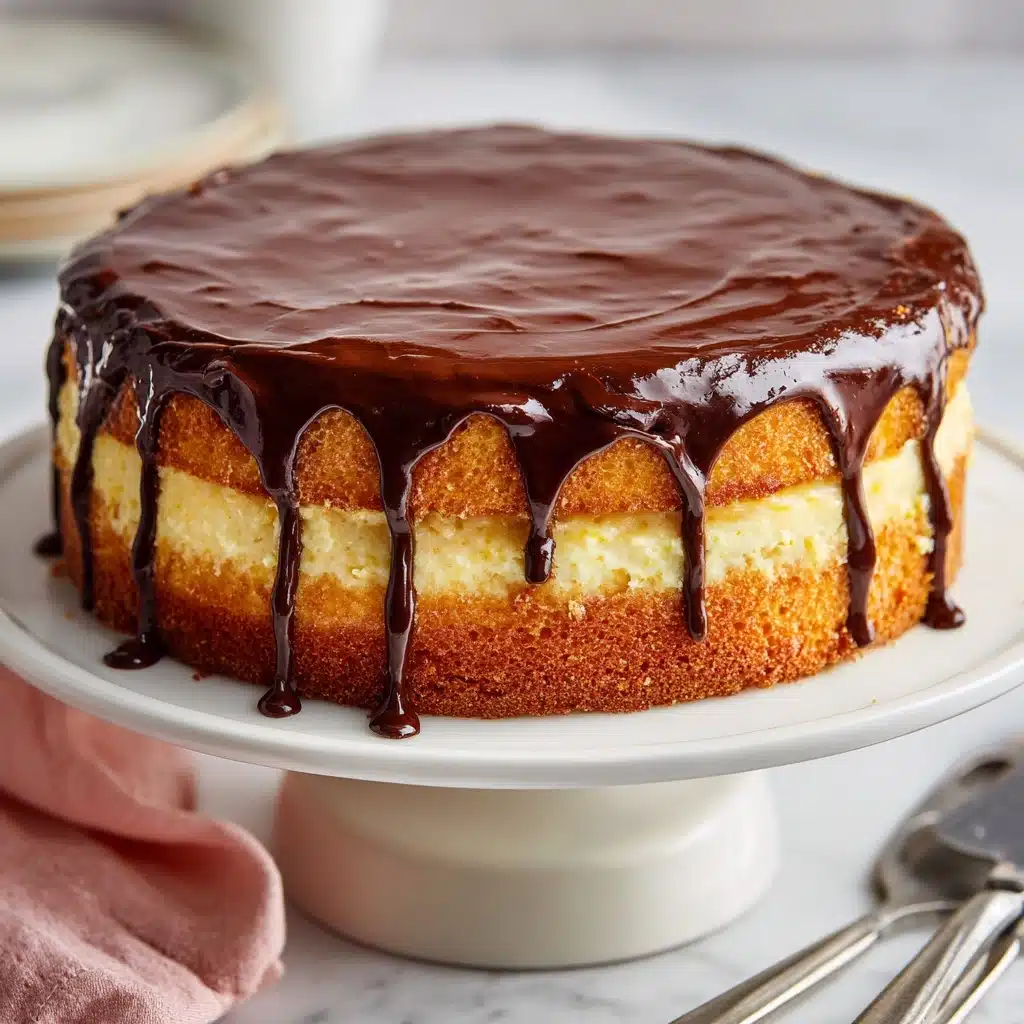
There’s a reason Boston Cream Pie has remained a beloved American classic for generations! It’s pure dessert nostalgia: tender yellow cake, dreamy pastry cream, and a decadent chocolate glaze cascading over the top. Every bite is creamy, chocolatey heaven, and while the layered look is elegant, the recipe itself is refreshingly approachable. Whether you’re baking for a celebration or just a cozy night in, this Boston Cream Pie is a showstopper bound to become your new favorite go-to indulgence.
Ingredients You’ll Need
The secret behind every unforgettable Boston Cream Pie is using simple ingredients—each one plays a starring role in the final flavor, texture, and gorgeous layered look. Let’s go through what makes each part of this classic so special!
- All-purpose flour: Gives the cake its sturdy, yet light and tender crumb—don’t substitute with cake flour here!
- Baking powder: Lends the cake those perfectly airy, high-rise layers.
- Salt: A pinch balances the sweetness and enhances the rich vanilla flavor.
- Unsalted butter (softened): Adds melt-in-your-mouth richness—softening first helps the cake mix up extra fluffy.
- Granulated sugar: The key to sweetness throughout both the cake and pastry cream.
- Large eggs: Structure and moisture—the dual role eggs play helps bind and tenderize the cake.
- Vanilla extract: Infuses the cake and custard with warm, inviting aroma—use pure vanilla if possible for the best flavor.
- Whole milk: Key for both tender cake texture and silky creamy filling.
- For pastry cream: egg yolks, cornstarch, butter: Egg yolks make the custard lush, cornstarch thickens, and the butter whips everything into dreamy smoothness.
- Semi-sweet chocolate: Delivers bold chocolate flavor for the signature glossy glaze—get a good-quality bar if you can!
- Heavy cream: Makes the chocolate topping silky and pourable.
- Light corn syrup (optional): Just a drizzle provides extra shine to the glaze, but you can skip it if you prefer.
How to Make Boston Cream Pie
Step 1: Prep and Preheat
Start by preheating your oven to 350°F (175°C). Prepare two 8-inch round cake pans by greasing and flouring them—this ensures your cakes release easily after baking and keep their beautiful shape. Gather all your ingredients, and take a deep breath. You’re about to create a Boston Cream Pie that would make any baker proud!
Step 2: Mixing the Cake Batter
In a medium bowl, whisk together the flour, baking powder, and salt. In a larger bowl, cream the softened butter and sugar until the mixture looks pale and fluffy—this step is key for a tender, light crumb. Beat in the eggs one at a time, then mix in the vanilla extract. With your mixer on low, add the flour mixture in three parts, alternating with the milk and beginning and ending with the dry ingredients. You’ll be left with a smooth, velvety batter that’s ready for its bake.
Step 3: Baking the Layers
Divide your cake batter evenly between the two pans and smooth out the tops with a spatula for an even rise. Bake for 20 to 25 minutes; your kitchen will smell absolutely amazing as the layers gently golden up. The cakes are ready when a toothpick inserted in the center comes out clean or with just a couple of crumbs. Let the cakes cool in their pans for 10 minutes, then gently turn them out onto wire racks to cool completely. Patience here guarantees that perfect layered look when assembling your Boston Cream Pie later.
Step 4: Making Pastry Cream
While the cakes cool, get started on the pastry cream. Gently heat the milk in a medium saucepan until it’s steaming but not boiling. In a mixing bowl, whisk the sugar, egg yolks, and cornstarch until thick and pale. Gradually stream in the hot milk, whisking all the while to avoid scrambling the eggs—this step will make your pastry cream incredibly smooth. Pour the mixture back into the saucepan and cook, whisking constantly, until it thickens and bubbles—just 2 to 3 minutes should do the trick. Remove from heat, then whisk in the butter and vanilla for that silky finish. Transfer to a bowl and press plastic wrap directly onto the surface to prevent a skin from forming. Chill until cold (best if you can wait an hour or two!).
Step 5: Prepare the Chocolate Glaze
The grand finale! Add the chopped chocolate to a heatproof bowl. Heat the heavy cream and, if using, the corn syrup until just simmering, then pour it over the chocolate. Wait two whole minutes—this allows the chocolate to melt gently—then stir until the mixture becomes glossy and perfectly pourable. This luscious glaze is what gives Boston Cream Pie its instantly recognizable, irresistible look.
Step 6: Assemble Your Boston Cream Pie
Now, the satisfying part—putting it all together. Place one cake layer on your serving plate. Spread the chilled pastry cream evenly over the top, right to the edges. Gently set the second cake layer atop the cream. Pour the warm chocolate glaze over the top layer, letting it drip in natural rivulets down the sides—it’s okay if things get a little messy here, that’s half the fun! Refrigerate the assembled pie for at least 30 minutes to help the layers set. The hardest part? Waiting to dig in!
How to Serve Boston Cream Pie

Garnishes
The classic finish is to let the chocolate glaze shine on its own, but you can always add a light dusting of powdered sugar around the edges, a few curls of dark chocolate, or even a cluster of fresh raspberries for a pop of color and brightness. These little touches make your Boston Cream Pie even more eye-catching when it hits the table.
Side Dishes
Since Boston Cream Pie is rich on its own, serve it with light sides. Think a cup of hot coffee, a small pitcher of vanilla bean–infused whipped cream, or fresh fruit. Strawberries, blueberries, or sliced bananas make wonderful, refreshing partners that balance the sweet, creamy flavors.
Creative Ways to Present
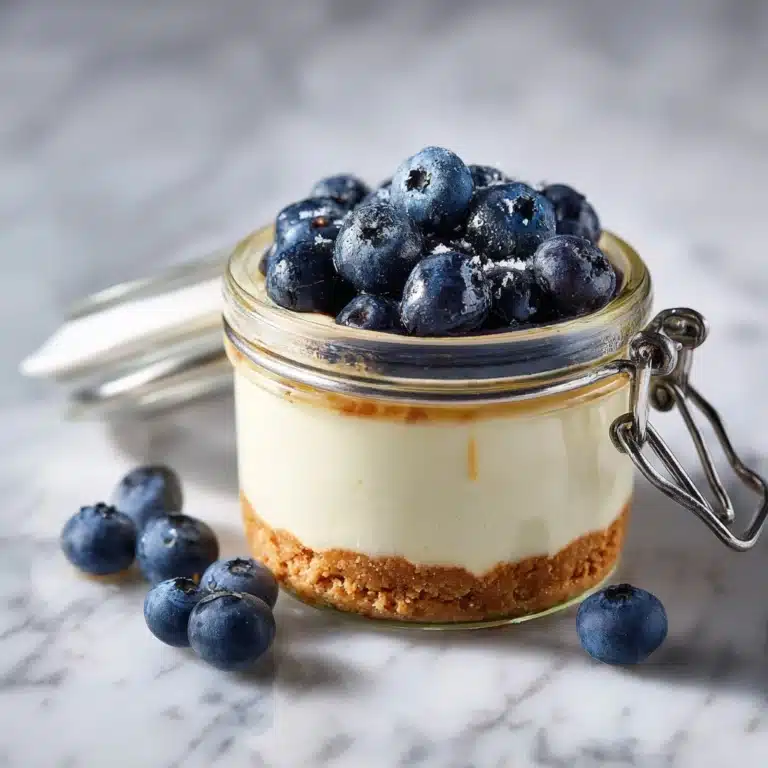
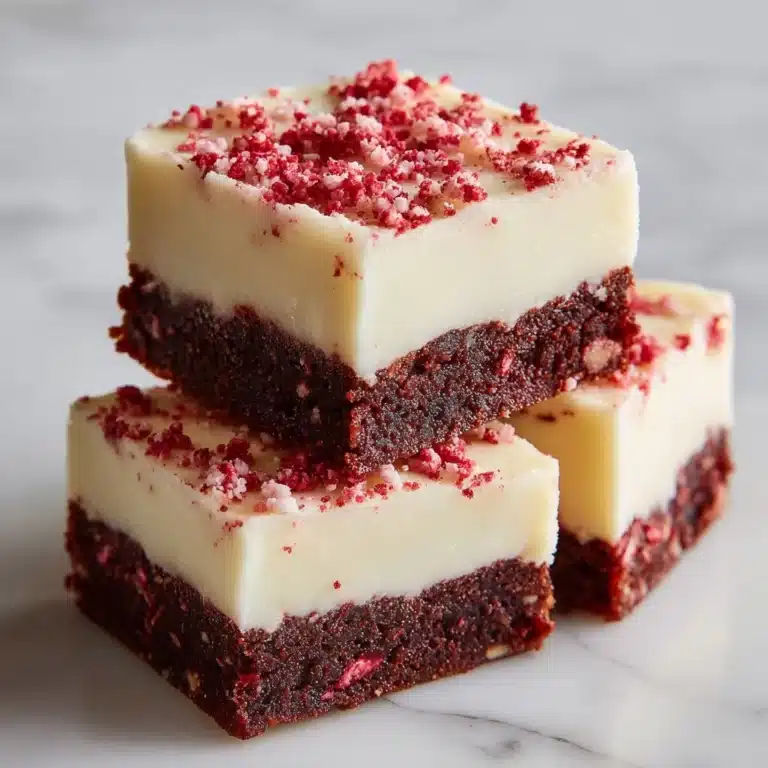
Want to wow your guests? Slice and serve Boston Cream Pie “cake bar” style on individual plates, or cut the whole pie into mini squares for a dessert buffet. For a modern twist, assemble in small jars for personal trifles—layer cake cubes, pastry cream, and chocolate glaze for a grab-and-go treat that looks as good as it tastes.
Make Ahead and Storage
Storing Leftovers
For the freshest experience, cover leftover Boston Cream Pie tightly and refrigerate. The pastry cream keeps the cake moist, but it’s best enjoyed within two days of making for peak flavor and texture. Store in an airtight container so it doesn’t absorb any fridge odors.
Freezing
If you’re hoping to freeze Boston Cream Pie, it’s best to freeze the cake layers and pastry cream separately. Wrap the layers well, and store the cream in a freezer-safe container. Assemble and glaze after thawing for the best texture. While the chocolate glaze can be made ahead, freshly poured looks and tastes best!
Reheating
You won’t need to reheat the entire Boston Cream Pie, but if you love that touch of warmth, a quick 10 seconds in the microwave (per slice) brings out the chocolate’s fudgy aroma. Just remember, this dessert shines served chilled or at cool room temperature—too much heat and the pastry cream may soften too much.
FAQs
Why is it called Boston Cream Pie if it’s a cake?
It’s a fun bit of history! In the nineteenth century, “pie” and “cake” were often used interchangeably, especially for layered desserts baked in pie tins. Boston Cream Pie was invented at the Parker House Hotel in Boston, and the name just stuck—charmingly old-fashioned, just like the dessert itself.
Can I make Boston Cream Pie in advance?
Absolutely—Boston Cream Pie is actually a great dessert to make ahead. The assembled pie improves as it sits, letting the flavors meld and the pastry cream firm up. Just keep it refrigerated and enjoy within two days.
Is it possible to use store-bought pastry cream or custard?
Yes, if you’re short on time, store-bought pastry cream or even a good vanilla pudding can stand in. But homemade pastry cream is what truly sets Boston Cream Pie apart—its rich, eggy flavor and silky texture are worth the minimal extra effort!
Can I substitute the chocolate glaze with another topping?
While the classic chocolate glaze is the signature of Boston Cream Pie, you can certainly play around with dark or white chocolate, or even a dusting of cocoa powder. Just know you might miss a bit of that authentic shine and flavor everyone loves.
What if I only have one cake pan?
No problem! Simply bake the layers one after another, letting the pan cool completely and washing it between uses. Or, bake as a single thicker layer and slice it in half once it cools. The most important part is keeping the cake tender—take your time and enjoy the process!
Final Thoughts
There’s nothing quite like slicing into a homemade Boston Cream Pie and seeing those perfect layers of cake, cream, and glossy chocolate. Whether it’s your first time or your fiftieth, this dessert never fails to surprise and delight. Treat yourself and your loved ones—it’s a piece of American baking history you’ll want to make again and again!
Print
Boston Cream Pie Recipe
- Total Time: 55 minutes (plus chilling time)
- Yield: 8 servings 1x
- Diet: Vegetarian
Description
Indulge in the classic and delicious Boston Cream Pie, a delightful dessert consisting of fluffy cake layers sandwiched with rich pastry cream and topped with a glossy chocolate glaze. This recipe will guide you through creating this iconic treat that’s sure to impress.
Ingredients
Cake:
- 1 1/2 cups all-purpose flour
- 1 1/2 teaspoons baking powder
- 1/4 teaspoon salt
- 1/2 cup unsalted butter, softened
- 1 cup granulated sugar
- 2 large eggs
- 1 teaspoon vanilla extract
- 1/2 cup whole milk
Pastry Cream:
- 1 1/2 cups whole milk
- 1/3 cup granulated sugar
- 4 large egg yolks
- 2 tablespoons cornstarch
- 2 tablespoons unsalted butter
- 1 teaspoon vanilla extract
Chocolate Glaze:
- 4 ounces semi-sweet chocolate, chopped
- 1/2 cup heavy cream
- 1 tablespoon light corn syrup (optional for shine)
Instructions
- Preheat the oven: Preheat the oven to 350°F (175°C) and prepare cake pans.
- Make the cake: Mix dry ingredients, cream butter and sugar, add eggs and vanilla, alternate dry ingredients with milk, divide and bake.
- Prepare pastry cream: Heat milk, whisk sugar, yolks, cornstarch, combine, thicken, add butter and vanilla, chill.
- Create chocolate glaze: Melt chocolate, heat cream and corn syrup, pour over chocolate, stir until smooth.
- Assemble the pie: Layer cake, spread pastry cream, top with second cake layer, pour over glaze, chill before serving.
Notes
- Use high-quality chocolate for the best glaze results.
- Keep the pie chilled and consume within two days for freshness.
- Prep Time: 30 minutes
- Cook Time: 25 minutes
- Category: Dessert
- Method: Baking
- Cuisine: American
Nutrition
- Serving Size: 1 slice
- Calories: 420
- Sugar: 28g
- Sodium: 110mg
- Fat: 23g
- Saturated Fat: 14g
- Unsaturated Fat: 7g
- Trans Fat: 0g
- Carbohydrates: 48g
- Fiber: 1g
- Protein: 6g
- Cholesterol: 145mg