
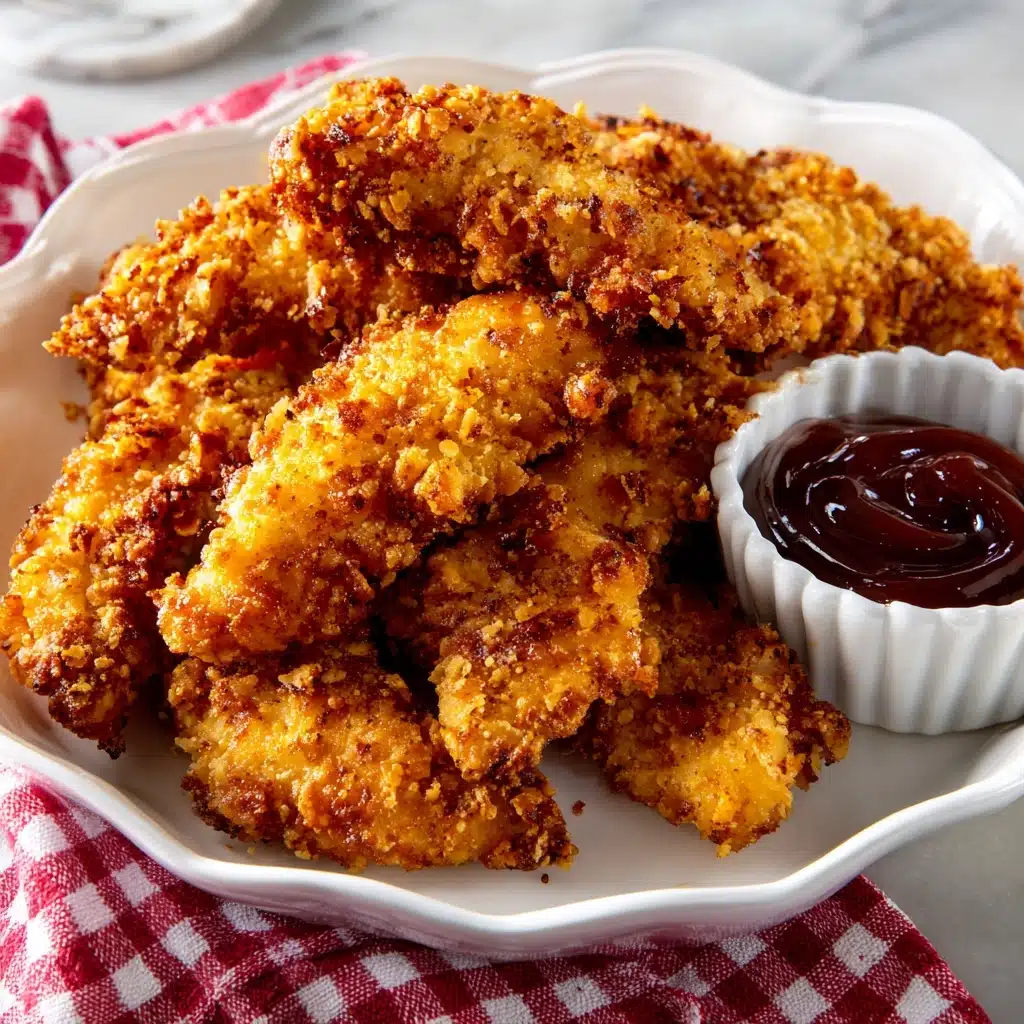
If you’re searching for the ultimate comfort food that never fails to win over kids and adults alike, look no further than these homemade Chicken Strips. Ultra-crispy on the outside, tender and juicy inside, they deliver everything you love about your favorite restaurant-style chicken tenders, but right from your own kitchen. With a golden, crunchy crust and flavorful seasoning in every bite, this feel-good, kid-friendly classic is sure to steal the show at weeknight dinners, game-day snacks, or casual parties.
Ingredients You’ll Need
You’ll be amazed at how just a handful of simple ingredients come together to make exceptionally tasty Chicken Strips. Each component is there for a reason: building flavor, creating crispiness, or ensuring juiciness. Don’t skip or swap anything if you want that perfect color, crunch, and flavor every time!
- Chicken breasts: Use boneless, skinless pieces for easy cutting and super tender results.
- All-purpose flour: This ensures the coating sticks and provides the first layer of crispiness.
- Garlic powder: Adds savory, aromatic depth without overpowering the chicken.
- Paprika: Brings a lovely hint of color and a subtle smoky warmth.
- Salt: Enhances every other flavor—don’t skip it!
- Black pepper: For just the right touch of gentle heat and balance.
- Large eggs: The crucial binder that helps breadcrumbs adhere smoothly.
- Milk: Loosens up the eggs for an even, silky coating on every strip.
- Panko breadcrumbs: Japanese-style breadcrumbs ensure an extra-light, super-crunchy crust.
- Grated Parmesan cheese (optional): If you love a salty, cheesy twist, this ingredient delivers!
- Vegetable oil: Perfect for frying—the neutral flavor won’t overpower your Chicken Strips.
How to Make Chicken Strips
Step 1: Prep the Chicken
Start by cutting the chicken breasts into even strips, about 1-inch wide. Uniform sizes help everything cook at the same pace, preventing any chewy or undercooked bites. Patting the pieces dry before breading ensures crispier results.
Step 2: Ready Your Dredging Stations
Line up three shallow bowls. In the first, mix the flour with garlic powder, paprika, salt, and pepper—this savory blend packs every Chicken Strip with flavor from the start. In the second bowl, whisk the eggs and milk until smooth. In the third, combine your panko breadcrumbs and Parmesan if you’re using it for that irresistible cheesy edge.
Step 3: Bread the Chicken Strips
Dredge each chicken strip first in the seasoned flour, shaking off excess. Next, dip it right into the egg mixture, allowing excess to drip away for an even coating. Finally, press the strip into the panko mixture until fully coated—this is where the magic happens for maximum crunch.
Step 4: Fry to Golden Perfection
Pour about half an inch of vegetable oil into a large skillet and heat it over medium-high. When shimmering (a breadcrumb should sizzle on contact), add Chicken Strips in batches. Fry 3–4 minutes per side, flipping once, until each piece is golden and cooked through. Drain on a paper towel-lined plate to soak up extra oil while staying crisp.
Step 5: Serve and Enjoy!
Enjoy your homemade Chicken Strips immediately while they’re hot and crunchy. Sprinkle with a pinch of salt straight from the skillet and serve with your favorite dipping sauces for the full experience.
How to Serve Chicken Strips

Garnishes
Top your Chicken Strips with a scattering of fresh chopped parsley, a dusting of extra Parmesan, or even a little squeeze of lemon. These simple touches add color, freshness, and a hint of sophistication without any extra fuss.
Side Dishes
These crispy Chicken Strips play well with anything: from classic French fries and creamy coleslaw to a fresh garden salad for a lighter meal. Kids especially love pairing them with mac and cheese, while adults might opt for roasted veggies or a tangy potato salad.
Creative Ways to Present
Arrange Chicken Strips upright in a tall mason jar or paper cone for a party-ready snack, tuck them into warm tortillas for easy chicken strip tacos, or slice and sprinkle over salads for extra protein and crunch. You can even offer a “dipping bar” with a variety of sauces for a crowd-pleasing appetizer spread!
Make Ahead and Storage
Storing Leftovers
Keep any uneaten Chicken Strips in an airtight container in the refrigerator for up to 3 days. Let them cool to room temperature before storing to avoid sogginess. They make fantastic next-day lunchbox additions or satisfying nibbles when hunger strikes.
Freezing
Freeze fully cooked and cooled Chicken Strips on a parchment-lined baking sheet in a single layer until firm, then transfer to a freezer bag for up to 2 months. This method keeps them from sticking together and makes reheating a breeze whenever a crispy craving hits.
Reheating
For best results, reheat Chicken Strips in a 375°F oven for about 10 minutes or until sizzling and crisp. Skip the microwave if possible—it tends to make the coating soggy. If you have an air fryer, that’s a game-changing way to restore lost crunch!
FAQs
Can I bake Chicken Strips instead of frying?
Absolutely! For a lighter option, bake your coated Chicken Strips on a wire rack over a baking sheet at 400°F for 18–20 minutes, flipping halfway through. You’ll still get great crunch without the extra oil.
What’s the best dipping sauce for Chicken Strips?
It’s all about personal taste! Classic choices like honey mustard, ranch, spicy sriracha mayo, or barbecue sauce are always a hit. You can even try a blue cheese dip or make your own homemade aioli for something different.
Can I use chicken thighs instead of breasts?
Yes, boneless skinless thighs make deliciously juicy Chicken Strips, though they may take a minute or two longer to cook through. The result is even more flavor with the same crispy coating.
How do I keep the breading from falling off?
Pat your chicken dry first, then press firmly when coating with panko. Let the breaded Chicken Strips rest for 5–10 minutes before frying—this helps the layers set and stick together beautifully.
Is it possible to make these gluten-free?
Definitely! Substitute your favorite gluten-free flour and gluten-free panko breadcrumbs. The instructions stay exactly the same—and your Chicken Strips will turn out just as golden and irresistible.
Final Thoughts
If you’re ready to rediscover just how incredible homemade Chicken Strips can be, this easy recipe is the answer. Gather your family, get your dipping sauces ready, and bring some homemade joy to the table—you truly can’t go wrong.
Print
Chicken Strips Recipe
- Total Time: 30 minutes
- Yield: 4 servings 1x
- Diet: Non-Vegetarian
Description
Learn how to make delicious and crispy homemade chicken strips with this easy recipe. Perfect for a quick and satisfying meal, these chicken strips are sure to be a hit with both kids and adults.
Ingredients
Chicken Strips:
- 1 1/2 pounds boneless, skinless chicken breasts (cut into strips)
- 1 cup all-purpose flour
- 1 teaspoon garlic powder
- 1 teaspoon paprika
- 1/2 teaspoon salt
- 1/2 teaspoon black pepper
Coating:
- 2 large eggs
- 2 tablespoons milk
- 2 cups panko breadcrumbs
- 1/4 cup grated Parmesan cheese (optional)
- vegetable oil for frying
Instructions
- Cut the Chicken: Cut the chicken breasts into even strips.
- Prepare Coating: In a shallow bowl, combine flour, garlic powder, paprika, salt, and black pepper. In another bowl, whisk together eggs and milk. In a third bowl, mix panko breadcrumbs and Parmesan cheese.
- Coat Chicken: Dredge each chicken strip in flour, then dip in egg mixture, and coat in breadcrumbs.
- Fry: Heat oil in a skillet and fry chicken strips until golden brown and cooked through.
- Serve: Drain excess oil on a paper towel-lined plate. Serve warm with dipping sauces.
Notes
- For a lighter version, bake the chicken strips at 400°F on a wire rack for 18-20 minutes.
- Leftovers can be stored in the fridge for up to 3 days.
- Prep Time: 15 minutes
- Cook Time: 15 minutes
- Category: Main Course
- Method: Frying
- Cuisine: American
Nutrition
- Serving Size: 3-4 strips
- Calories: 420
- Sugar: 1g
- Sodium: 470mg
- Fat: 18g
- Saturated Fat: 3g
- Unsaturated Fat: 12g
- Trans Fat: 0g
- Carbohydrates: 30g
- Fiber: 1g
- Protein: 36g
- Cholesterol: 145mg


