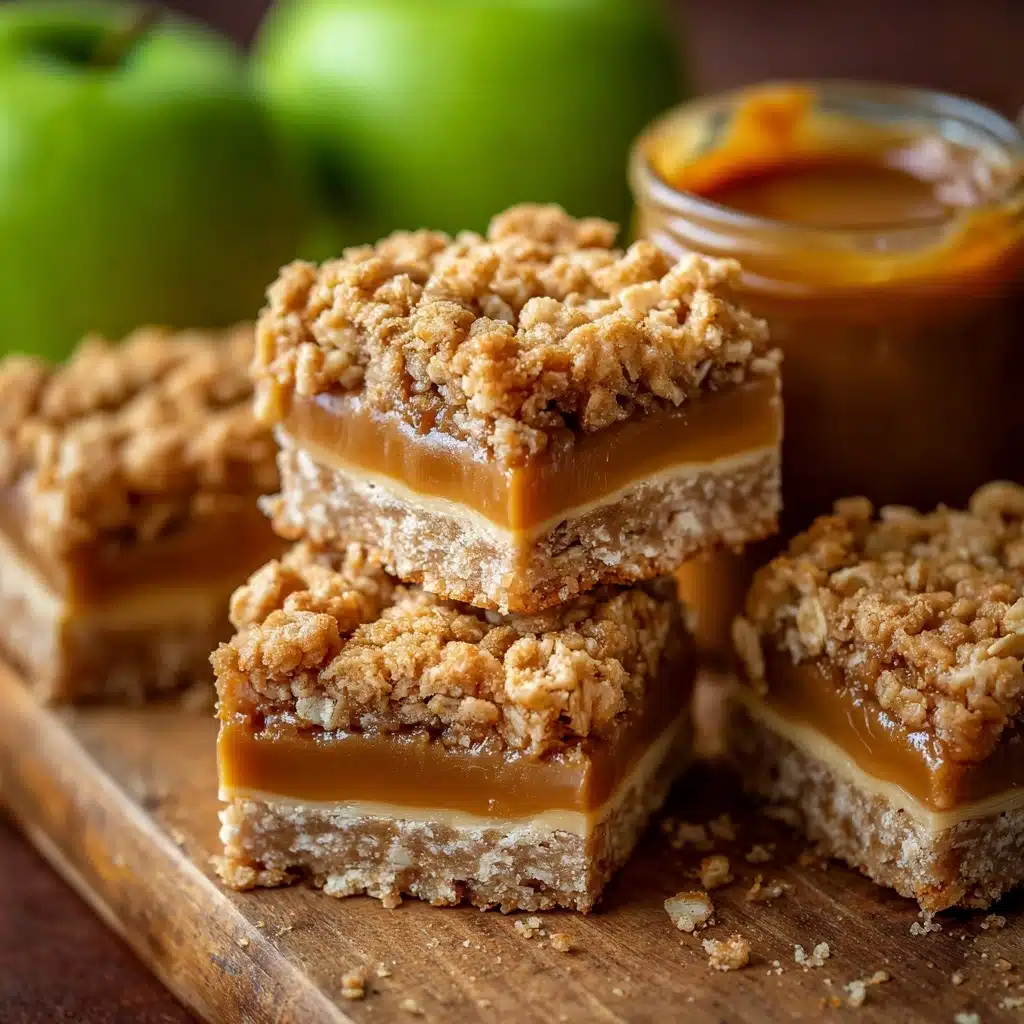
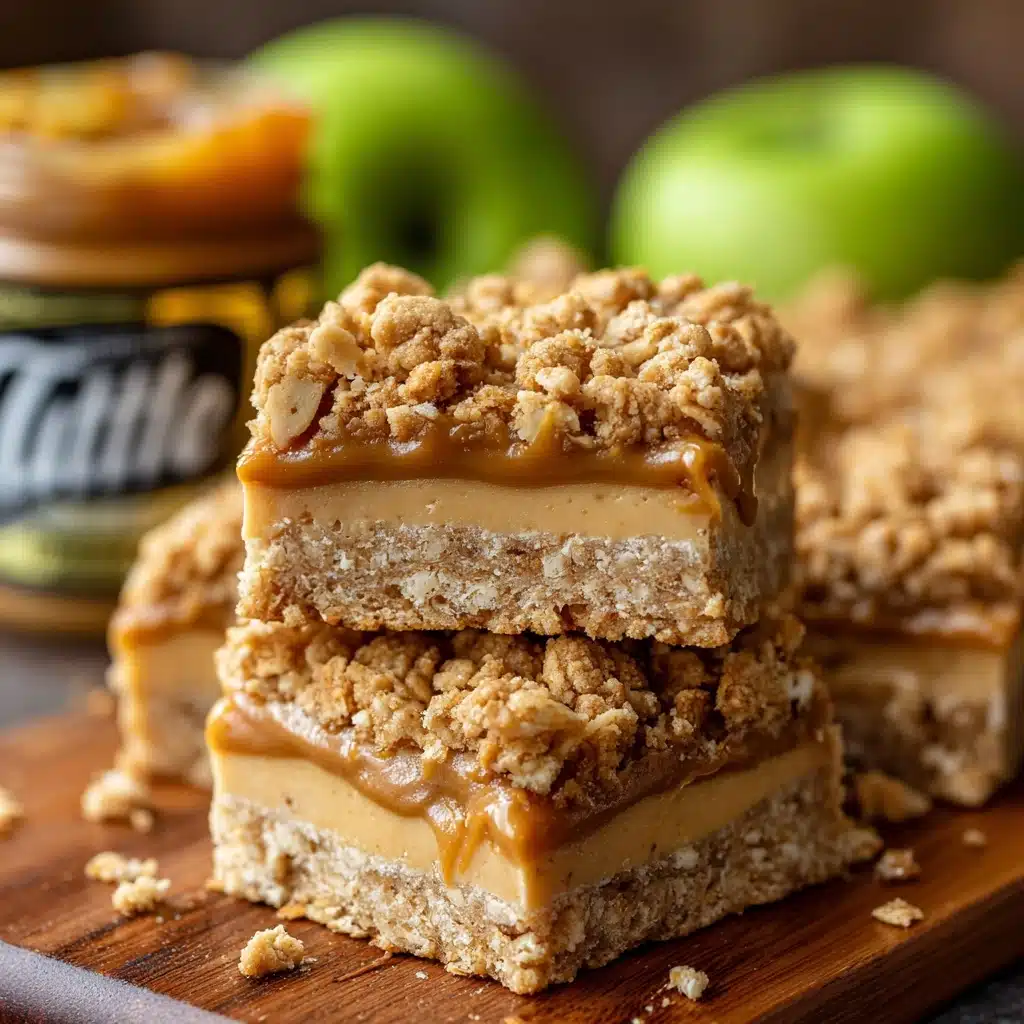
If there’s one treat that embodies the magic of fall baking, it’s these Dulce de Leche Apple Pie Bars. Picture buttery, golden crust hugging a spiced apple filling, ribbons of rich dulce de leche, and a crumbly oat topping, all sliced into perfectly portable squares. This recipe fuses classic apple pie comfort with the divine sweetness of caramel, making it a crowd-pleaser for potlucks, parties, or cozy family nights in. Whether you love classic apple desserts or can’t resist the call of caramel, these bars are sure to become a seasonal favorite you’ll crave all year long.
Ingredients You’ll Need
What truly makes Dulce de Leche Apple Pie Bars special is how a handful of everyday ingredients transforms into something extraordinary. Each element plays its part, creating layers of flavor, gorgeous color, and that dreamy texture you’ll talk about all week.
- All-purpose flour: The sturdy foundation for both the crust and crumb, giving the bars a tender bite.
- Granulated sugar: Sweetens the base without overpowering, keeping the flavor balanced and bright.
- Salt: Just a pinch heightens all the flavors and balances sweetness beautifully.
- Unsalted butter, cold and cubed: Essential for a tender, flaky crust and a crumbly topping—straight from the fridge is key!
- Apples (Granny Smith or Honeycrisp): These baking apples hold their shape and bring a wonderful tart-sweet punch to every bite.
- Brown sugar: Adds rich, caramel undertones to the apple filling for extra warmth and depth.
- Ground cinnamon: Brings classic cozy apple pie flavor you can’t have fall baking without.
- Ground nutmeg: Just a touch adds a subtle spice that complements cinnamon and brings the apples to life.
- Vanilla extract: Rounds out the sweetness and delivers a wonderfully fragrant aroma.
- Dulce de leche: The show-stopper; this creamy caramel sauce adds layers of decadence that set these bars apart.
- Old-fashioned rolled oats: For the crisp, toasty finish you expect from the best pie crumb toppings.
How to Make Dulce de Leche Apple Pie Bars
Step 1: Prep Your Pan and Oven
Start by preheating your oven to 350°F (175°C) and lining a 9×13-inch baking pan with parchment paper. Be sure to leave enough parchment overhang on the sides—this nifty trick makes lifting and slicing your Dulce de Leche Apple Pie Bars a total breeze later.
Step 2: Make the Buttery Crust
In a large bowl, combine the flour, granulated sugar, and salt. Cut in the cold, cubed butter using a pastry cutter or sturdy fork until the mixture resembles coarse crumbs. This step is crucial for that irresistible melt-in-your-mouth texture in each bar. Press about two-thirds of this mixture firmly into the bottom of your prepared pan to create the crust, smoothing it into an even layer. Bake for 12 to 15 minutes, or until it’s lightly golden—a sign you’re on the right track!
Step 3: Toss the Apple Filling
While your crust gets golden, toss together the diced apples, a sprinkle of flour, brown sugar, cinnamon, nutmeg, and a splash of vanilla extract. Every cube of apple will get kissed with sweet spice and all those cozy pie flavors. Give it a good stir to make sure the apples are well coated and ready for their starring role.
Step 4: Assemble the Layers
Once your crust is out of the oven, evenly spread the spiced apple mixture over it—don’t be afraid to load those apples on! Now, take your jar of dulce de leche and drizzle it generously over the apples. That creamy caramel drizzle is what takes these bars from simply delicious to utterly dreamy.
Step 5: Create the Crumb Topping and Bake
Add the rolled oats to the remaining crust mixture, stirring until the oats are well incorporated for some welcome crunch. Sprinkle this crumb topping all over the apples and dulce de leche, making sure to cover every corner. Bake the assembled bars for another 30 to 35 minutes, until the topping is golden brown and the apples are tender—your kitchen will smell amazing!
Step 6: Cool and Slice
Patience here pays off! Let the Dulce de Leche Apple Pie Bars cool completely in the pan before using the parchment overhang to lift them out. This helps the layers set and makes slicing into neat squares easy (and satisfying!). Now you’re ready to wow your friends and family—or just treat yourself!
How to Serve Dulce de Leche Apple Pie Bars

Garnishes
For the finishing touch, try a warm drizzle of extra dulce de leche over each bar, or a scoop of vanilla ice cream on the side for a timeless pairing. A light dusting of powdered sugar or a sprinkle of cinnamon right before serving adds a lovely, bakery-style flourish to your Dulce de Leche Apple Pie Bars.
Side Dishes
These bars shine alongside a hot cup of spiced chai or fresh apple cider, making for the ultimate cozy snack or autumn dessert spread. If you’d like something lighter, a crisp arugula salad with walnuts and sharp cheese makes a delightful counterpoint to the sweetness.
Creative Ways to Present
Get festive by stacking the bars on a rustic wooden board with a pile of apple slices or cinnamon sticks for that fall market feel. For parties, cut the bars into smaller pieces and serve them in colorful cupcake liners, or package them in parchment for delightful edible gifts.
Make Ahead and Storage
Storing Leftovers
Keep any leftover Dulce de Leche Apple Pie Bars in an airtight container at room temperature for up to three days, or pop them in the fridge for up to a week. The flavors deepen as they sit, making them an excellent treat for snacking all week long.
Freezing
If you’re planning ahead or want to savor these bars over a longer stretch, stash cut, cooled squares in a freezer-safe bag or container. Place parchment between layers to prevent sticking, and freeze for up to two months. Just thaw at room temperature for a convenient, ready-made dessert.
Reheating
For that just-baked warmth, simply pop a bar or two in the microwave for 10-15 seconds, or reheat in a 300°F oven for about 5 minutes. The dulce de leche becomes extra gooey and the apples even more aromatic—absolutely irresistible!
FAQs
Can I use a different type Dessert
Absolutely! While Granny Smith and Honeycrisp are classics for their tart, firm texture, feel free to experiment with Pink Lady or Fuji apples for a sweeter twist. Just aim for apples that hold their shape when baked.
Can I make Dulce de Leche Apple Pie Bars gluten-free?
Yes! Substitute your favorite gluten-free all-purpose flour blend for the regular flour, and use certified gluten-free oats. You’ll get bars that are just as tender and delicious, without the gluten.
What’s the best way to slice the bars cleanly?
For neat squares, let the bars cool completely, then use a sharp knife wiped clean between each slice. A little patience makes all the difference for tidy, bakery-worthy squares.
Do I have to use store-bought dulce de leche?
No need! If you prefer homemade, you can simmer a can of sweetened condensed milk until caramelized, or make your own from scratch. Either way, homemade or store-bought, Dulce de Leche Apple Pie Bars will turn out fantastic.
Can these bars be made dairy-free?
Yes—with some adjustments! Use plant-based butter in the crust and crumb, and substitute a coconut or oat milk caramel for the dulce de leche. You’ll still capture those rich, indulgent flavors.
Final Thoughts
Trust me when I say, these Dulce de Leche Apple Pie Bars are pure magic in every bite. Whether you bake them for a special gathering or as a sweet treat to brighten a rainy day, they’re destined to win hearts. Give them a try—you might just find your new favorite fall dessert!
Print
Dulce de Leche Apple Pie Bars Recipe
- Total Time: 1 hour 5 minutes
- Yield: 12 bars 1x
- Diet: Vegetarian
Description
Indulge in the delicious combination of sweet dulce de leche and tart apples with these irresistible Dulce de Leche Apple Pie Bars. Perfect for a fall dessert or any time you’re craving a caramel apple treat!
Ingredients
Crust:
- 2 cups all-purpose flour
- 1/2 cup granulated sugar
- 1/4 teaspoon salt
- 1 cup unsalted butter, cold and cubed
Apple Filling:
- 4 large apples (such as Granny Smith or Honeycrisp), peeled, cored, and diced
- 2 tablespoons all-purpose flour
- 1/2 cup brown sugar
- 1 teaspoon ground cinnamon
- 1/4 teaspoon ground nutmeg
- 1 teaspoon vanilla extract
Topping:
- 1 cup dulce de leche
- 1/2 cup old-fashioned rolled oats
Instructions
- Preheat the Oven: Preheat your oven to 350°F (175°C) and line a 9×13-inch baking pan with parchment paper.
- Prepare the Crust: In a bowl, mix 2 cups flour, granulated sugar, and salt. Cut in the cold butter until crumbly. Press 2/3 of the mixture into the pan and bake.
- Make the Apple Filling: Toss diced apples with flour, brown sugar, cinnamon, nutmeg, and vanilla. Spread over the baked crust.
- Add Dulce de Leche: Drizzle dulce de leche over the apples.
- Add Topping: Mix oats with the remaining crust mixture and sprinkle over the apples. Bake until golden.
- Cool and Serve: Let the bars cool in the pan, then cut into squares before serving.
Notes
- For extra caramel flavor, warm additional dulce de leche and drizzle over the bars before serving.
- Store bars in an airtight container at room temperature for up to 3 days or refrigerate for up to a week.
- Prep Time: 20 minutes
- Cook Time: 45 minutes
- Category: Dessert
- Method: Baking
- Cuisine: American
Nutrition
- Serving Size: 1 bar
- Calories: 320
- Sugar: 23g
- Sodium: 70mg
- Fat: 15g
- Saturated Fat: 9g
- Unsaturated Fat: 5g
- Trans Fat: 0g
- Carbohydrates: 46g
- Fiber: 2g
- Protein: 3g
- Cholesterol: 35mg


