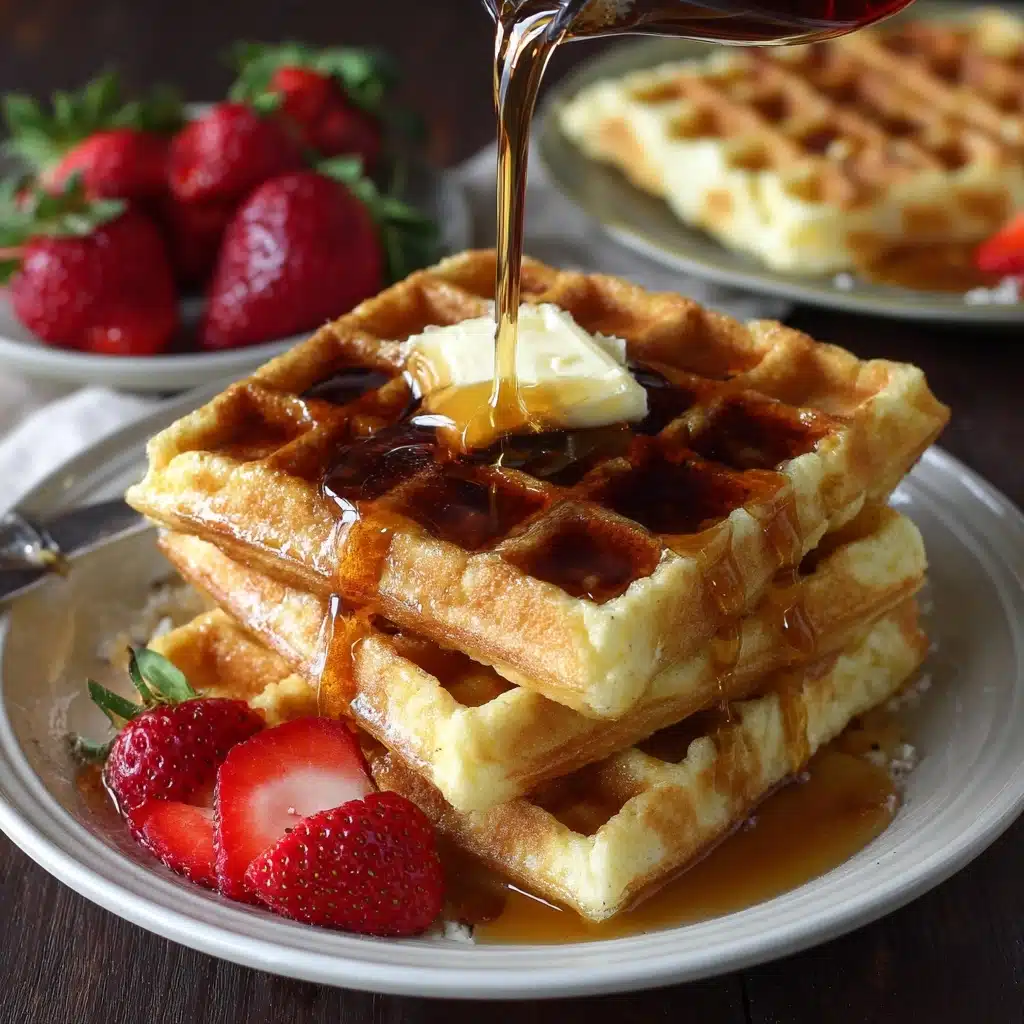
These Dairy Free Waffles are about to become the brightest star of your breakfast table. Lightly crisp on the outside, with a pillowy soft center and a hint of coconut and vanilla, they have all the cozy comfort you expect from waffles but without a hint of dairy. This simple recipe is so flexible, you can use whatever plant-based milk or oil you have on hand—making it perfect for busy weekdays, weekend brunches, or anytime you want to treat yourself to a golden stack of homemade happiness.

Ingredients You’ll Need
Even though the ingredient list for these Dairy Free Waffles is short and sweet, each component plays a special role. From perfect browning to that classic waffle texture, you’ll be amazed how easy it is to get amazing flavor with a few pantry staples.
- All-purpose flour: This gives your waffles structure and their signature fluffy crumb.
- Sugar: Just a touch adds subtle sweetness and helps the waffles brown beautifully.
- Baking powder: The secret behind those irresistible, airy pockets inside every bite.
- Salt: A pinch wakes up all the other flavors and balances the sweetness.
- Unsweetened almond milk (or other plant-based milk): Keeps the batter moist while bringing a gentle, nutty flavor—oat, soy, or coconut milk also work perfectly.
- Melted coconut oil (or other neutral oil): Infuses richness, acts as a binder, and helps create those crispy edges; use avocado or canola oil if you prefer something more neutral.
- Eggs: Essential for binding everything together and giving waffles that tender bite.
- Vanilla extract: Adds warmth and a delicious, aromatic sweetness to every waffle.
- Non-dairy cooking spray or oil: For greasing your waffle iron so the waffles slip right out and develop a golden crust.
How to Make Dairy Free Waffles
Step 1: Preheat the Waffle Iron
Start by preheating your waffle iron according to the manufacturer’s directions. Getting your iron nice and hot is the key to achieving Dairy Free Waffles that are crisp on the outside and soft within.
Step 2: Mix the Dry Ingredients
In a large bowl, whisk together the flour, sugar, baking powder, and salt. This ensures everything is evenly distributed—so no surprise pockets of baking powder or too-salty bites!
Step 3: Combine the Wet Ingredients
In a separate bowl, mix together the unsweetened almond milk, melted coconut oil, eggs, and vanilla extract. This step helps prevent the coconut oil from solidifying and ensures the flavor is blended smoothly throughout the batter.
Step 4: Bring It All Together
Pour the wet ingredients into the dry and stir just until everything comes together. Don’t worry if the batter is a little lumpy—overmixing can make your Dairy Free Waffles tough rather than tender.
Step 5: Cook to Golden Perfection
Lightly grease your hot waffle iron with non-dairy spray or oil. Pour in enough batter to just cover the grids (don’t overfill!), close the lid, and cook until the waffles are golden and crisp, usually 4 to 5 minutes. Resist the urge to peek too soon—let the iron do its magic. Remove the waffles and repeat with the rest of the batter.
How to Serve Dairy Free Waffles

Garnishes
No stack of Dairy Free Waffles is complete without tasty toppings! Classic pure maple syrup, a dollop of coconut yogurt, or a handful of fresh berries each add their own sparkle. Finish with a dust of powdered sugar or toasted nuts for extra flair.
Side Dishes
For a winning breakfast spread, serve your waffles alongside vegan sausage links, fruit salad, or crispy hash browns. The variety of flavors and textures means there’s something for everyone at the table.
Creative Ways to Present
Take your Dairy Free Waffles up a notch by turning them into waffle sandwiches—layer with sliced bananas and almond butter or tuck in some dairy free ice cream for the ultimate brunch dessert. You can even cut them into sticks for dunking into chocolate sauce or fruit compote at a weekend brunch party.
Make Ahead and Storage
Storing Leftovers
If you have leftover Dairy Free Waffles, let them cool completely on a wire rack to preserve their crispness. Store them in an airtight container in the fridge for up to 3 days.
Freezing
Want waffles on demand? These freeze beautifully. Wrap each cooled waffle in parchment paper, stack them in a freezer bag, and freeze for up to 2 months. This way, you always have a quick breakfast ready—just heat and eat!
Reheating
For the best texture, reheat Dairy Free Waffles in a toaster or toaster oven until hot and crispy. Avoid the microwave if possible, which can make them soggy. From frozen, just pop them in the toaster for an extra minute or two.
FAQs
Can I make these waffles gluten free as well as dairy free?
Absolutely! Simply substitute your favorite gluten free all-purpose flour blend for the regular flour, and follow the recipe as written. The texture will be a bit different, but still delicious.
What plant-based milk works best?
Almond milk is my go-to for its mild flavor, but oat milk and soy milk also work beautifully. Coconut milk gives a richer taste, so pick your favorite or whatever you have on hand.
Can I make the batter ahead of time?
Waffle batter is best cooked right away, but you can mix the dry and wet ingredients separately and keep them in the fridge overnight. Combine everything in the morning for super fresh Dairy Free Waffles.
What can I use as an egg substitute?
If you prefer these fully vegan, you can use flax eggs (1 tablespoon flaxseed meal plus 3 tablespoons water per egg, mixed and rested for 5 minutes). The waffles will be a little less fluffy, but still lovely and satisfying.
Why are my waffles sticking to the iron?
Make sure your iron is thoroughly preheated and well greased with a non-dairy spray or oil each time. Also, be patient—if you try to open the iron before the waffles are done, they’re more likely to stick.
Final Thoughts
Whipping up a batch of Dairy Free Waffles is one of the most delightful ways to treat yourself or loved ones to a golden, homemade breakfast. They’re versatile, crowd-pleasing, and truly delicious. Grab your favorite toppings, fire up the waffle iron, and discover just how irresistible dairy free can be!
Print
Dairy Free Waffles Recipe
- Total Time: 30 minutes
- Yield: 4 servings 1x
- Diet: Vegetarian
Description
These Dairy-Free Waffles are a delicious and fluffy breakfast treat perfect for those with dairy sensitivities or preferences. Easy to make and customizable with your favorite toppings, these waffles are a fantastic morning indulgence.
Ingredients
Dry Ingredients:
- 1 3/4 cups all-purpose flour
- 2 tablespoons sugar
- 1 tablespoon baking powder
- 1/2 teaspoon salt
Wet Ingredients:
- 1 3/4 cups unsweetened almond milk (or other plant-based milk)
- 1/3 cup melted coconut oil (or other neutral oil)
- 2 large eggs
- 1 teaspoon vanilla extract
- Non-dairy cooking spray or oil for the waffle iron
Instructions
- Preheat Waffle Iron: Preheat your waffle iron according to manufacturer instructions.
- Mix Dry Ingredients: Whisk together flour, sugar, baking powder, and salt in a large bowl.
- Combine Wet Ingredients: In a separate bowl, mix almond milk, melted coconut oil, eggs, and vanilla.
- Combine and Cook: Pour wet ingredients into dry, stir until just combined. Grease waffle iron, pour batter, and cook until golden brown.
- Serve: Enjoy warm waffles with desired toppings.
Notes
- You can use oat milk, soy milk, or coconut milk as alternatives to almond milk.
- For extra fluffiness, beat egg whites to soft peaks before adding to the batter.
- Prep Time: 10 minutes
- Cook Time: 20 minutes
- Category: Breakfast
- Method: Waffle Iron
- Cuisine: American
Nutrition
- Serving Size: 1 waffle
- Calories: 280
- Sugar: 4g
- Sodium: 360mg
- Fat: 13g
- Saturated Fat: 8g
- Unsaturated Fat: 4g
- Trans Fat: 0g
- Carbohydrates: 34g
- Fiber: 1g
- Protein: 6g
- Cholesterol: 55mg


