
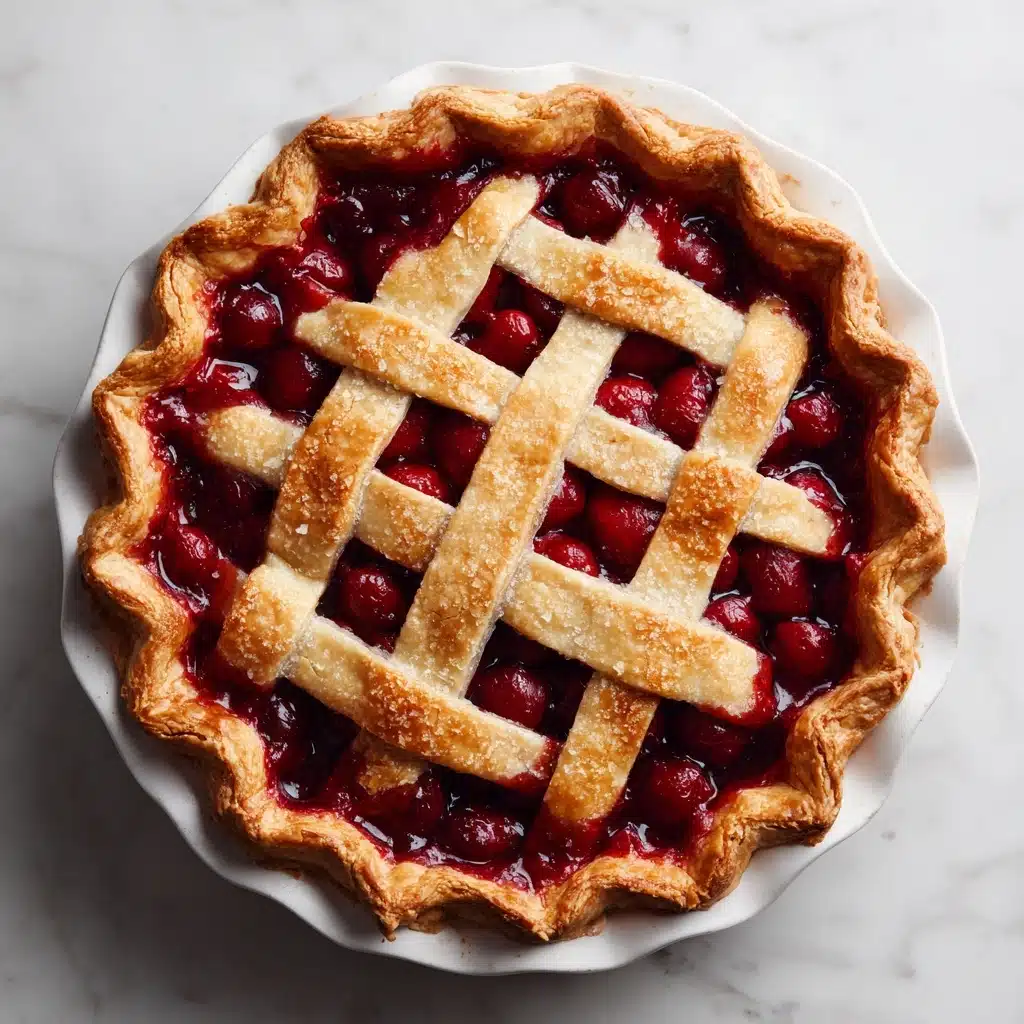
There is nothing quite as irresistibly comforting as a slice of homemade Cherry Pie. Bursting with juicy cherries enveloped in a flaky, golden crust, this classic dessert captures the essence of summer and the warmth of tradition. Whether you’re bringing it to a family gathering or simply want to enjoy a special treat on a quiet afternoon, this Cherry Pie recipe will quickly become one you return to time and time again. The tartness of the cherries, brightness of lemon, hint of almond, and buttery pastry all meld beautifully, making every bite impossible to resist.

Ingredients You’ll Need
You’ll be amazed at how just a handful of simple, quality ingredients transform into a show-stopping Cherry Pie. Each ingredient is carefully chosen to balance flavors and create that perfect mouthwatering texture, ensuring every bite leaves you craving more.
- Cherries (4 cups, fresh or frozen, pitted): The heart of the pie! Sweet, tart, and vibrant cherries set the tone for the entire dessert.
- Granulated Sugar (1 cup): Brings out the natural sweetness of the cherries and helps thicken the filling.
- Cornstarch (1/4 cup): Ensures a luscious, sliceable filling that doesn’t run all over your plate.
- Lemon Juice (1 tablespoon): Stirs in brightness, cutting the sweetness and making the cherry flavor pop.
- Almond Extract (1/2 teaspoon): A secret weapon that adds a whisper of nutty depth to complement the fruit.
- Ground Cinnamon (1/4 teaspoon): Lends a gentle spice that rounds out the flavor beautifully.
- Salt (1/8 teaspoon): Just a pinch balances the sweetness and heightens all the other flavors.
- Unsalted Butter (2 tablespoons, small pieces): Creates a rich, glossy finish to the cherry filling as it melts.
- Refrigerated Pie Crusts (1 package or homemade): No fuss and perfectly flaky, these are the vessel for your cherry symphony.
- Egg (1, beaten): Brushed on top for that enviable golden sheen.
- Coarse Sugar (1 tablespoon, optional): A sprinkle for a sparkling finish and just a bit of crunch.
How to Make Cherry Pie
Step 1: Prepare the Cherry Filling
Starting with the filling, combine your pitted cherries (keep them frozen if you’re using frozen ones to prevent a watery mess!), granulated sugar, cornstarch, lemon juice, almond extract, cinnamon, and salt in a large bowl. Gently stir everything together until each cherry is coated and gleaming—this mixture will bake into that ruby-red goodness Cherry Pie is known for.
Step 2: Assemble the Crust
Roll out one sheet of your refrigerated pie crust and nestle it into a standard 9-inch pie dish, pressing gently into the edges. Spoon the cherry filling into the crust, spreading it out evenly. Dot the top of the filling with those little butter pieces; they’ll melt into the pie as it bakes, enriching the flavor and texture.
Step 3: Top Your Pie
Now for the fun part: laying on the top crust! Roll out your second crust and either drape it whole over the filling (make sure to cut a few steam vents) or cut it into strips to create that beautiful lattice pattern. Seal and crimp the edges to keep all the cherry goodness inside.
Step 4: Add the Finishing Touches
Lightly brush the top of your pie with the beaten egg for a glossy finish, then take it up a notch by sprinkling coarse sugar over the crust. This little sparkle will create a crunchy, bakery-style top once baked.
Step 5: Bake to Perfection
Place your assembled pie into a 400°F (200°C) preheated oven. Bake for 40 to 50 minutes until the crust is a deep golden brown and you can see the juicy filling bubbling through the vents or lattice. If the edges seem to get too dark, tent them with foil for the last bit of baking. Most importantly, let your Cherry Pie cool completely before slicing—this gives the filling time to set, making serving so much easier!
How to Serve Cherry Pie
Garnishes
A dollop of softly whipped cream, a scoop of velvety vanilla ice cream, or even a dusting of powdered sugar can take every slice of Cherry Pie up a notch. A few fresh cherries with their stems still on also add a beautiful pop of color when serving at a party.
Side Dishes
Keep things classic by serving your Cherry Pie alongside a mug of hot coffee or a glass of cold milk. For a creamy contrast, offer a platter of fresh berries, or pair with a tangy lemon sorbet to refresh the palate after each bite.
Creative Ways to Present
Thinking outside the pie plate? Try cutting Cherry Pie into generous bars and serving on a wooden board for a rustic look. Dress up individual slices on pretty plates with a drizzle of cherry sauce, or bake mini cherry pies in ramekins for personal desserts at dinner parties.
Make Ahead and Storage
Storing Leftovers
Leftover Cherry Pie is a gift that keeps on giving! Simply wrap your cooled pie loosely with foil or plastic wrap and tuck it in the fridge, where it will stay fresh for up to four days. The flavors deepen overnight, making the pie even more delicious the next day.
Freezing
You can easily freeze Cherry Pie for later enjoyment. Once cooled completely, wrap it tightly in plastic wrap and then foil, or place in an airtight container. It keeps beautifully in the freezer for up to three months. When you’re ready, thaw in the fridge overnight before reheating.
Reheating
To enjoy your Cherry Pie warm, pop a slice (or the entire pie) into a 325°F (163°C) oven for about 15 to 20 minutes. This helps revive the crispness of the crust and makes that filling wonderfully gooey again. If you’re in a hurry, a few seconds in the microwave will do just fine for individual slices.
FAQs
Can I use canned cherry pie filling instead of fresh or frozen cherries?
You can, but nothing beats the vibrant flavor and juicy texture of a homemade Cherry Pie made with fresh or frozen cherries. Canned filling tends to be sweeter and lacks that natural tartness, but it works in a pinch if you’re pressed for time.
How do I prevent the bottom crust from getting soggy?
For a crisp bottom crust, make sure not to thaw frozen cherries before using, and bake your Cherry Pie on the lower rack of your oven to help the crust set up quickly. If you really want to go the extra mile, lightly brush the crust with egg white before adding the filling.
Can I make the pie gluten-free?
Yes! Swap in your favorite gluten-free pie crust, and double-check that your cornstarch and all added extracts or spices are certified gluten-free. The cherry filling itself is naturally gluten-free, making this a great treat for everyone at your table.
Is it necessary to let the pie cool before slicing?
Absolutely—resist the urge to dive in right away! Cooling the Cherry Pie allows the filling to thicken properly so you’ll get beautiful, clean slices instead of runny pie. Patience pays off, I promise.
Can I use other fruits in this recipe?
Definitely! This versatile filling works well with blueberries, blackberries, or a blend for a mixed fruit pie. Just keep in mind that softer fruits may need a little extra thickening agent like cornstarch.
Final Thoughts
Baking a Cherry Pie from scratch is far more than making dessert—it’s creating smiles, sharing joy, and building memories around the table. There’s pure magic in that sticky-sweet filling and flaky crust, and after one bite, you’ll see why this pie is a beloved classic for so many. So bring out your rolling pin, gather your cherries, and treat yourself and your loved ones to the legendary Cherry Pie experience!
Print
Cherry Pie Recipe
- Total Time: 1 hour 10 minutes
- Yield: 8 servings 1x
- Diet: Vegetarian
Description
Indulge in the sweet and tangy flavors of this classic Cherry Pie. With a buttery crust and a juicy cherry filling, this homemade dessert is perfect for any occasion.
Ingredients
Filling:
- 4 cups fresh or frozen pitted cherries
- 1 cup granulated sugar
- 1/4 cup cornstarch
- 1 tablespoon lemon juice
- 1/2 teaspoon almond extract
- 1/4 teaspoon ground cinnamon
- 1/8 teaspoon salt
- 2 tablespoons unsalted butter (cut into small pieces)
Crust:
- 1 package refrigerated pie crusts (or homemade)
- 1 egg (beaten, for egg wash)
- 1 tablespoon coarse sugar for sprinkling (optional)
Instructions
- Preheat Oven: Preheat your oven to 400°F (200°C).
- Prepare Filling: In a large bowl, mix cherries, sugar, cornstarch, lemon juice, almond extract, cinnamon, and salt.
- Assemble Pie: Roll out one pie crust into a dish, add filling, dot with butter, top with second crust, seal edges, and vent if needed.
- Bake: Brush top with egg wash, sprinkle sugar, and bake for 40-50 minutes until golden and bubbly.
- Cool and Serve: Let the pie cool before slicing.
Notes
- If using frozen cherries, do not thaw before mixing.
- Enhance flavor with a splash of vanilla extract.
- Serve with whipped cream or vanilla ice cream.
- Prep Time: 20 minutes
- Cook Time: 50 minutes
- Category: Dessert
- Method: Baking
- Cuisine: American
Nutrition
- Serving Size: 1 slice
- Calories: 340
- Sugar: 27g
- Sodium: 190mg
- Fat: 15g
- Saturated Fat: 7g
- Unsaturated Fat: 7g
- Trans Fat: 0g
- Carbohydrates: 50g
- Fiber: 2g
- Protein: 3g
- Cholesterol: 40mg


