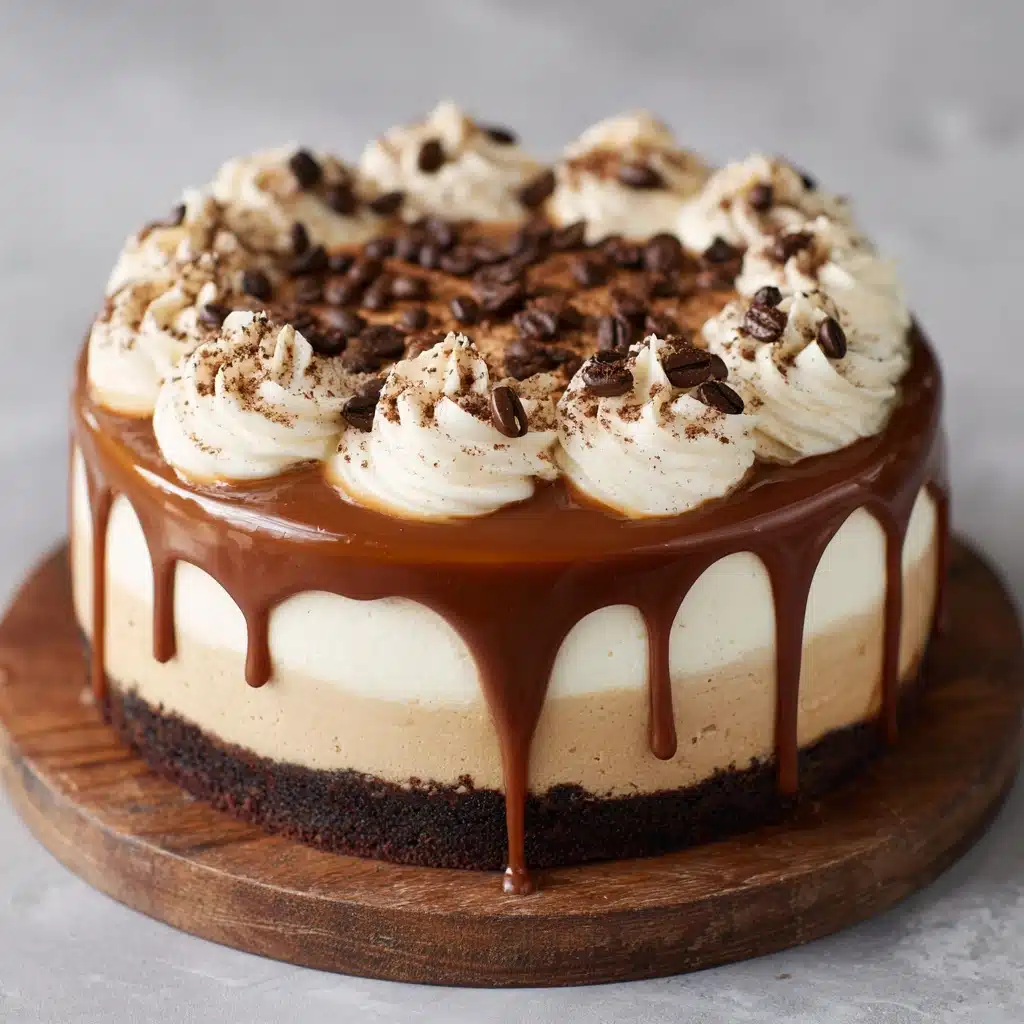
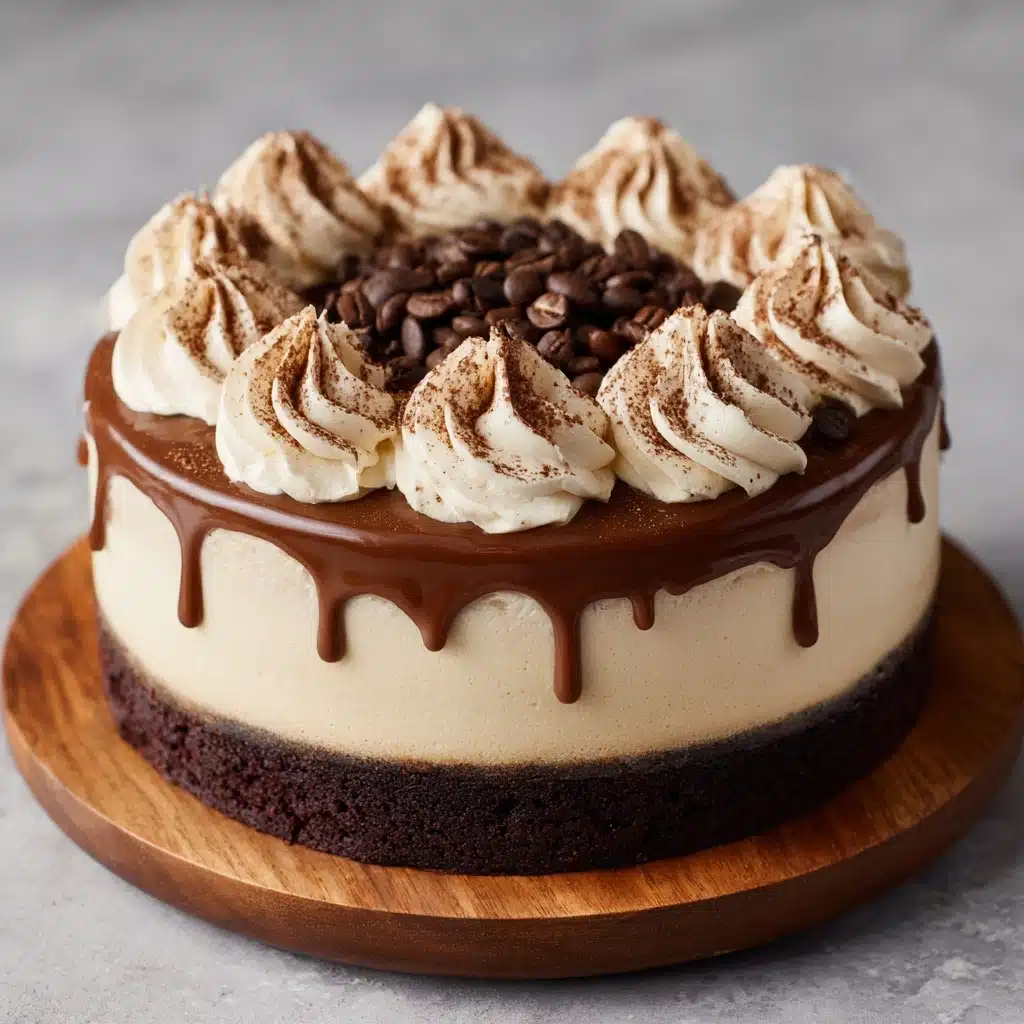
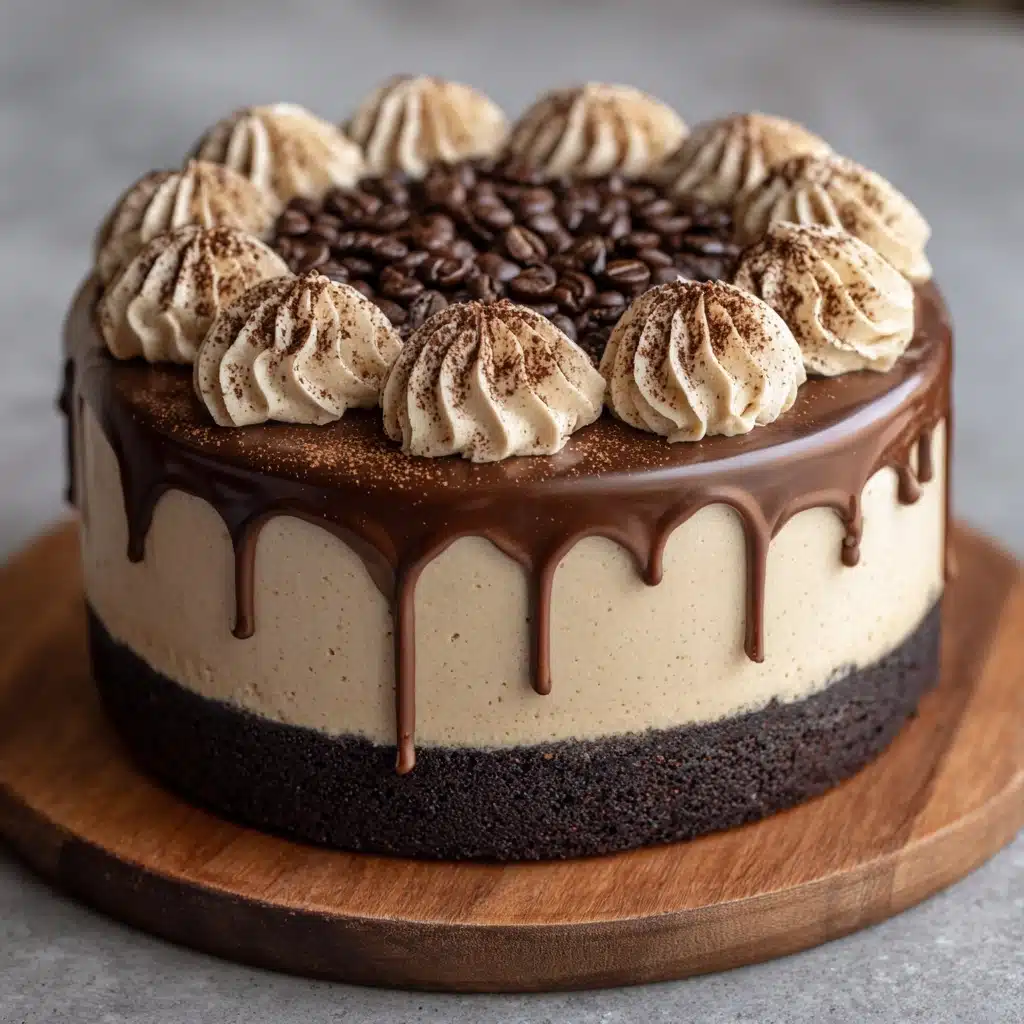
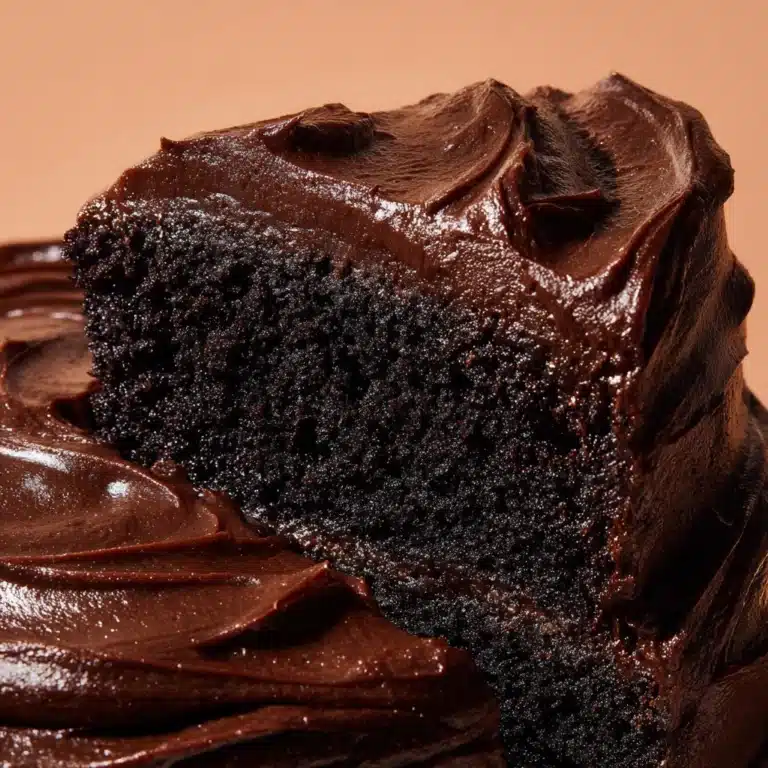
If you’re dreaming of the ultimate summer treat that delivers the bold kick of coffee, the fudgey crunch of cookies, and the creamy decadence of homemade ice cream cake, this Coffee Ice Cream Cake is about to become your new obsession. With layers of rich coffee ice cream stacked atop a buttery Oreo crust, finished with clouds of vanilla whipped cream and chocolate drizzle, every bite feels like a celebration. The best part? It’s astonishingly easy to make, with zero need to turn on your oven. Let’s dive into this winning combination and see how simple it is to bring a little café bliss right to your kitchen.
Ingredients You’ll Need
With just a handful of accessible ingredients, this Coffee Ice Cream Cake proves that you don’t need to fuss with fancy elements to create pure magic. Each component in this dessert brings something special—crunch, creaminess, a shot of caffeine, or a swirl of chocolate. Here’s what you’ll gather for your masterpiece:
- Coffee ice cream: The star of the show—choose a brand rich in natural coffee flavor, and let it soften slightly for easy spreading.
- Chocolate sandwich cookies (like Oreos): These lend a classic crunch and the perfect bittersweet base for the cake.
- Unsalted butter: Helps bind those crushed cookies into a solid, sliceable crust.
- Heavy whipping cream: For billowy, homemade whipped cream that tastes far better than any store-bought alternative.
- Powdered sugar: Adds just the right touch of sweetness to your fresh whipped topping.
- Vanilla extract: Enhances the whipped cream with a warm, aromatic note.
- Chocolate syrup (optional): Drizzling on top adds a lusciously fudgy finish, totally worth the extra step.
- Chocolate shavings or espresso beans (optional): Perfect for a beautiful garnish and a little texture on the top.
How to Make Coffee Ice Cream Cake
Step 1: Prep Your Pan
Start by lining the bottom of a 9-inch springform pan with parchment paper. This little step makes it so much easier to get those clean, show-stopping slices once your Coffee Ice Cream Cake is ready to serve.
Step 2: Create the Cookie Crust
In a medium bowl, combine the crushed chocolate sandwich cookies and melted butter. Stir until all the cookie crumbs are evenly coated. Press the mixture firmly into the bottom of your prepared pan, making sure it’s even and compact. Slide the pan into the freezer for 15 minutes so your crust sets up perfectly.
Step 3: Add the First Layer of Ice Cream
Scoop out and spread half of your softened coffee ice cream over the chilled crust. Smooth it with a spatula for an even layer. Pop the pan back into the freezer for 20 minutes to give this layer time to firm up before the next step.
Step 4: Layer More Coffee Goodness
Now, layer the rest of your softened coffee ice cream over the chilled first layer, smoothing the top yet again. This double layer makes sure every slice is absolute heaven. Cover tightly and freeze the pan for at least 4 hours (overnight is even better!) to let everything lock together.
Step 5: Whip Up the Creamy Topping
While your cake sets, use a stand mixer or hand mixer to whip the heavy cream with powdered sugar and vanilla extract. Beat until you get stiff peaks—that’s when the whipped cream holds its shape beautifully. If you crave a bigger coffee punch, try whisking in a tablespoon of instant espresso powder!
Step 6: Decorate and Serve
Once the Coffee Ice Cream Cake is firm, unclasp the springform pan and lift out your creation. Frost the top with that dreamy whipped cream, then drizzle on chocolate syrup. Garnish with chocolate shavings or espresso beans if you’re feeling extra fancy. Slice and serve immediately, or keep it frozen until guests arrive.
How to Serve Coffee Ice Cream Cake
Garnishes
For an eye-catching finish, go big on garnishes. A scattering of chocolate shavings or a handful of whole espresso beans make every slice look bakery-quality. You can even dust a bit of cocoa powder or add a delicate swirl of extra chocolate syrup for a touch of café drama.
Side Dishes
This Coffee Ice Cream Cake pairs beautifully with fresh berries—think raspberries, strawberries, or blackberries—for a tart contrast to the creamy richness. Serving strong black coffee or a scoop of vanilla ice cream on the side is also a winning move for coffee fans and sweet tooths alike.
Creative Ways to Present
Looking to impress? Try cutting the Coffee Ice Cream Cake into petite squares for a dessert platter, or use a drizzle bottle to artfully zigzag chocolate syrup on each plate. Individual ramekins lined with a mini crust and layered the same way also make adorable personal servings for parties or picnics.
Make Ahead and Storage
Storing Leftovers
If you find yourself with extra Coffee Ice Cream Cake (lucky you!), just cover it tightly with plastic wrap or place it in an airtight container. Return it promptly to the freezer, where it’ll stay fabulous for up to a week without losing any of its flavor or texture.
Freezing
This cake is meant for the freezer, and it’s the perfect make-ahead dessert for gatherings. Simply assemble everything up through the decorating stage, then keep it well covered in the coldest part of your freezer. For best freshness, enjoy within seven days—if it lasts that long!
Reheating
No reheating necessary here! Whenever you’re ready to serve, let the Coffee Ice Cream Cake stand at room temperature for 5 to 10 minutes to soften slightly. This makes it easier to slice and brings out all those creamy, rich flavors without any melting mishaps.
FAQs
Can I use a different flavor of ice cream?
Absolutely! While coffee ice cream is the heart of this cake, mocha, espresso, or even chocolate ice cream are all great options. Mix and match to suit your taste buds or whatever you have on hand.
What’s the best way to crush the cookies for the crust?
You can blitz the cookies in a food processor for fine crumbs, or place them in a sealed zip-top bag and crush with a rolling pin for bigger, chunkier pieces. Both ways work—just be sure they’re well incorporated with the melted butter.
How can I make this Coffee Ice Cream Cake gluten-free?
Simply swap the standard chocolate sandwich cookies for a gluten-free variety. Most popular brands now offer a gluten-free version, so everyone at your table can dig in without worry.
Can I make this cake ahead of time?
That’s one of its superpowers! The Coffee Ice Cream Cake actually gets better as it chills, making it a dream dessert for prep-ahead occasions. Just keep it tightly wrapped in the freezer until you’re ready to decorate and serve.
How do I get clean, neat slices?
The key is using a sharp knife run under hot water before each cut, then wiped dry. This will glide easily through the cold layers, helping you get those perfect slices every time.
Final Thoughts
If you’re searching for a no-fail crowd-pleaser that’s as sophisticated as it is comforting, give this Coffee Ice Cream Cake a try. It’s pure bliss in every layer—cool, creamy, crunchy, and caffeinated—and I can’t wait for you to fall in love with it as much as I have!
Print
Coffee Ice Cream Cake Recipe
- Total Time: 4 hours 25 minutes (includes freezing time)
- Yield: 12 slices 1x
- Diet: Vegetarian
Description
Indulge in the rich and creamy goodness of this Coffee Ice Cream Cake. A no-bake dessert with layers of coffee ice cream on a chocolate cookie crust, topped with whipped cream and optional chocolate drizzle. Perfect for summer gatherings or a sweet treat anytime.
Ingredients
Coffee Ice Cream Layer:
- 1 1/2 quarts coffee ice cream, softened
Oreo Crust:
- 1 package (14.3 oz) chocolate sandwich cookies (such as Oreos), crushed
- 1/3 cup unsalted butter, melted
Whipped Cream Topping:
- 1 cup heavy whipping cream
- 2 tbsp powdered sugar
- 1/2 tsp vanilla extract
- 1/4 cup chocolate syrup (optional)
- Chocolate shavings or espresso beans for garnish (optional)
Instructions
- Prepare the Crust: Line a 9-inch springform pan with parchment paper. Mix crushed cookies and melted butter, press into the pan, and freeze.
- Layer the Ice Cream: Spread half of the softened ice cream over the crust, freeze, then repeat with the remaining ice cream.
- Whip the Cream: Beat heavy cream with sugar and vanilla until stiff peaks form.
- Finish the Cake: Remove cake from pan, top with whipped cream, drizzle with chocolate syrup, and garnish.
- Serve: Slice and enjoy immediately or freeze until serving.
Notes
- For extra coffee flavor, add 1 tablespoon of instant espresso powder to the whipped cream.
- You can use mocha or espresso-flavored ice cream for variation.
- Prep Time: 25 minutes
- Cook Time: 0 minutes
- Category: Dessert
- Method: Freezing
- Cuisine: American
Nutrition
- Serving Size: 1 slice
- Calories: 360
- Sugar: 24g
- Sodium: 220mg
- Fat: 22g
- Saturated Fat: 12g
- Unsaturated Fat: 8g
- Trans Fat: 0g
- Carbohydrates: 36g
- Fiber: 1g
- Protein: 4g
- Cholesterol: 55mg


