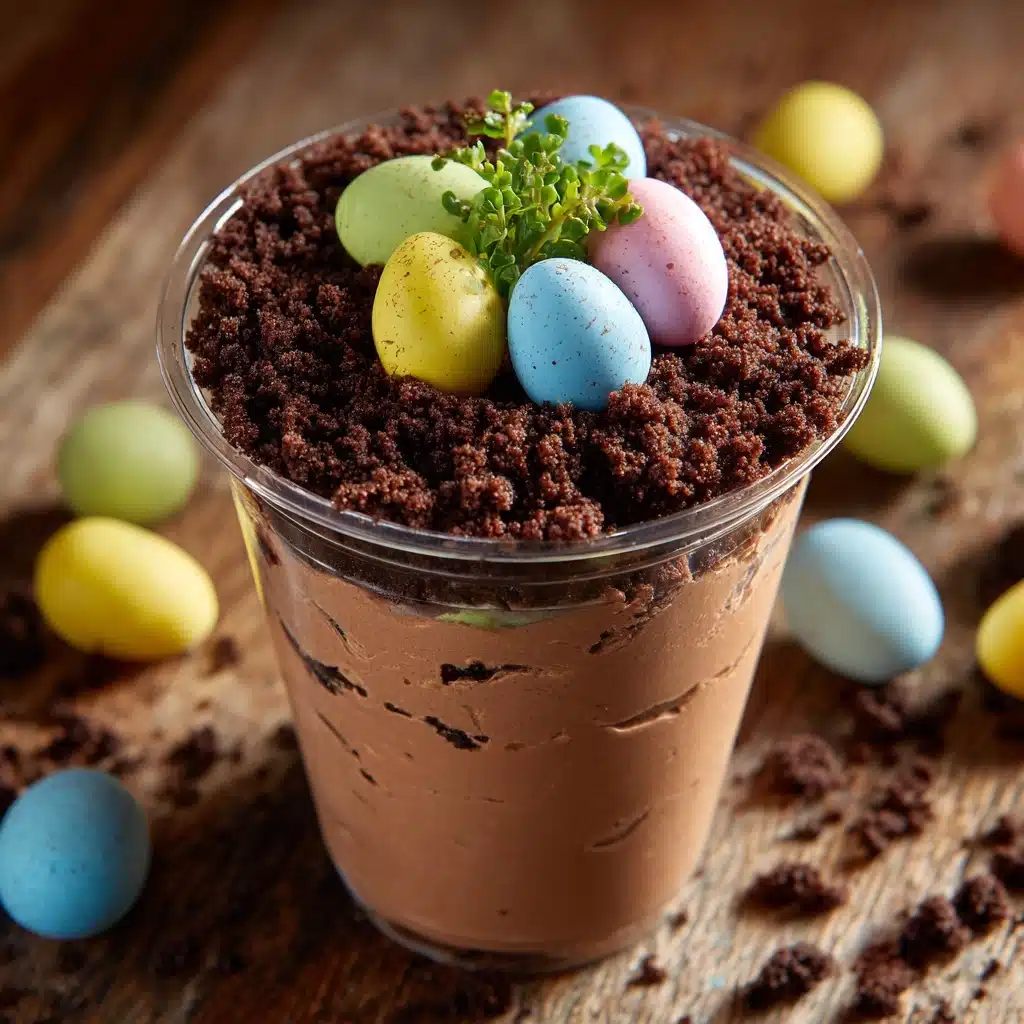
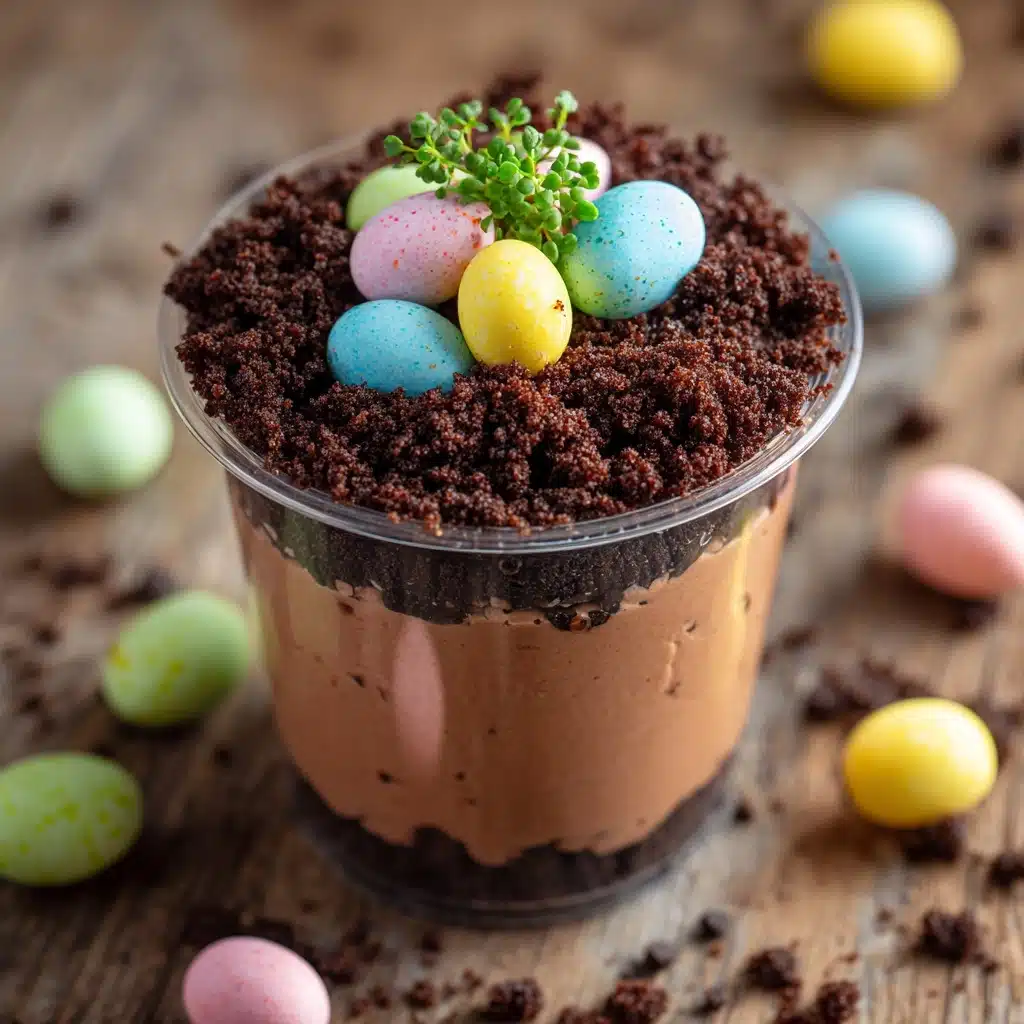
If you want to bring a burst of happy color and playful nostalgia to your holiday table, look no further than Easter Dirt Cups. This no-bake dessert layers luscious chocolate pudding, whipped topping, crushed cookies, and vibrant coconut “grass,” all topped with Easter candies for a treat that’s as adorable as it is delicious. These cups are pure joy in a glass—everyone from little kids to chocolate-loving adults will adore them, and best of all, they come together in just minutes without turning on the oven.
Ingredients You’ll Need
Ingredients You’ll Need
Every part of Easter Dirt Cups brings something special to both the look and the flavor! These simple staples are transformed into a whimsical springtime dessert thanks to just a little creativity and a lot of fun toppings.
- Instant Chocolate Pudding Mix (3.9 oz): This gives the dessert its rich, silky chocolate base—make sure to use instant pudding so it sets up quickly.
- Cold Milk (2 cups): An essential partner for the pudding mix, cold milk ensures your pudding thickens beautifully and tastes creamy.
- Whipped Topping (8 oz, thawed): Folding this in gives a dreamy, airy texture that perfectly balances the rich pudding.
- Chocolate Sandwich Cookies (20, crushed): These cookies mimic delicious “dirt” and add a wonderful cookie crunch to every bite.
- Shredded Sweetened Coconut (1 cup): A handful of coconut, once colored, turns into fun edible grass for your Easter scene.
- Green Food Coloring: Just a drop or two will bring your coconut grass to life, making your dirt cups look extra festive.
- Mini Chocolate Eggs or Jelly Beans (12): These make the cutest “Easter eggs,” adding pops of color and sweet surprise.
- Marshmallow Peeps or Bunny Candies (6): The iconic Easter topper—each one turns a dirt cup into a showstopper centerpiece.
- Small Plastic Cups (6): Clear cups showcase all those gorgeous layers—plus, they make serving and cleanup incredibly easy!
How to Make Easter Dirt Cups
Step 1: Make the Chocolate Pudding Mixture
Start by grabbing a medium mixing bowl and whisking together the instant chocolate pudding mix and cold milk. Whisk for about 2 minutes, until you see the pudding thicken up nicely—a little arm workout, but so worth it! Once it’s thick and smooth, gently fold in the thawed whipped topping with a spatula. This helps the filling become irresistibly light and creamy without losing that deep chocolate flavor we all love.
Step 2: Crush the Cookies
Place your chocolate sandwich cookies into a sturdy zip-top bag and crush them with a rolling pin until you have fine, dirt-like crumbs—kids especially love pitching in for this step! Don’t worry if there are a few slightly larger bits; those just add extra crunch in your Easter Dirt Cups.
Step 3: Color the Coconut
In a small bowl, add the shredded sweetened coconut and a couple drops of green food coloring. Toss and stir until the coconut is evenly coated and turns into a patch of bright, edible grass. If you want a deeper green, just add another drop or two and mix again until you hit your perfect shade.
Step 4: Assemble the Cups
Set out your clear plastic cups for easy assembly. Start by spooning a layer of crushed cookies into the bottom of each cup. Next, add a layer of the pudding mixture. Repeat these layers until the cups are nearly full, finishing with a final layer of cookie crumbs on top—this is where that signature “dirt” look shines!
Step 5: Add the Festive Toppings
Time for the fun part! Sprinkle a generous handful of the green coconut grass over each cup, then nestle in a couple of mini chocolate eggs or jelly beans. Finally, crown each cup with a marshmallow Peep or cute bunny candy. The result: Easter Dirt Cups that double as edible centerpieces.
Step 6: Chill Before Serving
Pop the finished cups into the refrigerator for at least one hour. Chilling not only helps the flavors meld and the pudding set, but also keeps the toppings perfectly fresh. Trust us, the anticipation is half the fun!
How to Serve Easter Dirt Cups
Garnishes
If you want to go all-out, don’t hesitate to sprinkle a few extra chocolate shavings, pastel sprinkles, or even edible glitter on top. The more playful the cup, the more smiles you’ll see around the table—each garnish is like a little invitation to dive in.
Side Dishes
Easter Dirt Cups shine as a dessert, so keep sides simple. Fresh strawberries, fruit salad, or a crisp platter of spring veggies can balance out the sweetness, and they make a pretty, colorful spread alongside your cups. For larger gatherings, serve with bite-sized lemon bars or carrot cake squares to build a whole dessert buffet.
Creative Ways to Present
Beyond the classic clear cups, try using mini mason jars or individual flower pots for an extra-cute touch. You can even set up a “decorate your own” station at family gatherings or kids’ parties—lay out all the toppings and let everyone customize their Easter Dirt Cups exactly how they like.
Make Ahead and Storage
Storing Leftovers
If you have a few cups left after the party (though don’t be surprised if they disappear!), cover each one with plastic wrap and refrigerate. They’ll stay fresh and tasty for up to three days, so you can enjoy a sweet Easter treat all week long.
Freezing
While you can technically freeze assembled Easter Dirt Cups, the texture of the pudding and whipped topping does change after thawing—it gets less creamy and more watery. If you must freeze, do so before adding any toppings, and let them thaw completely in the fridge before decorating and serving.
Reheating
No reheating needed for this crowd-pleaser! Just let the cups rest at room temperature for 10-15 minutes if they’re extra chilly, which brings out the chocolate flavors and softens the toppings to perfection.
FAQs
Can I make Easter Dirt Cups ahead of time?
Absolutely! Assemble the cups (minus the Peeps or bunny candies to keep them fresh) up to 24 hours in advance. Add the marshmallow toppers right before serving so they stay soft and adorable.
Can I use homemade whipped cream instead of whipped topping?
Yes, homemade whipped cream works beautifully. Just make sure it’s whipped to soft peaks and gently folded in so your pudding stays wonderfully light and airy.
Are there gluten-free options for Easter Dirt Cups?
Definitely—simply swap in gluten-free chocolate sandwich cookies and confirm that your pudding mix is gluten-free. The rest of the ingredients are naturally gluten-free, making this an easy adaptation for guests with dietary restrictions.
What are some alternative toppings I can use?
Anything goes! Try chocolate rocks, crushed toffee, mini marshmallows, or candy-coated sunflower seeds. For a fresh twist, you can even add sliced strawberries or raspberries on top of the coconut “grass.”
How can I make these cups more nutritious for kids?
You can experiment with sugar-free pudding mixes and lower-sugar whipped topping. Swapping in Greek yogurt for part of the whipped topping also adds protein, and topping with fresh fruit boosts nutrients without sacrificing the playful look.
Final Thoughts
Whether you’re making these for a holiday brunch, a school treat, or just a fun rainy-day project, Easter Dirt Cups always serve up smiles. Don’t be surprised if they become a highly requested tradition in your family—give them a try, and let the playful spirit of spring take over your dessert table!
Print
Easter Dirt Cups Recipe
- Total Time: 20 minutes
- Yield: 6 servings 1x
- Diet: Vegetarian
Description
These Easter Dirt Cups are a fun and festive dessert perfect for the holiday season. Layers of chocolate pudding, whipped topping, cookie crumbs, and coconut grass topped with mini eggs and marshmallow Peeps make for a delightful treat that kids and adults will enjoy.
Ingredients
Chocolate Pudding Mixture:
- 1 (3.9 oz) package instant chocolate pudding mix
- 2 cups cold milk
Whipped Topping Layer:
- 1 (8 oz) tub whipped topping (thawed)
Cookie Crumb Layer:
- 20 chocolate sandwich cookies (crushed)
Coconut Grass:
- 1 cup shredded sweetened coconut
- Green food coloring
Decorations:
- 12 mini chocolate eggs or jelly beans
- 6 marshmallow Peeps or bunny candies
Additional:
- 6 small plastic cups
Instructions
- Prepare Pudding Mixture: In a medium bowl, whisk together the chocolate pudding mix and cold milk until thickened.
- Add Whipped Topping: Gently fold in the whipped topping until smooth.
- Crush Cookies: Crush the chocolate sandwich cookies into fine crumbs using a zip-top bag and a rolling pin.
- Color Coconut: Mix shredded coconut with green food coloring until it resembles grass.
- Assemble Cups: Layer cookie crumbs, pudding mixture, and repeat until cups are full. Top with coconut, mini eggs, and marshmallow Peeps. Refrigerate before serving.
Notes
- Use clear plastic cups for a fun visual effect.
- For a gluten-free version, use gluten-free sandwich cookies and pudding mix.
- Prep Time: 20 minutes
- Cook Time: 0 minutes
- Category: Dessert
- Method: No-Bake
- Cuisine: American
Nutrition
- Serving Size: 1 cup
- Calories: 310
- Sugar: 27g
- Sodium: 300mg
- Fat: 14g
- Saturated Fat: 7g
- Unsaturated Fat: 5g
- Trans Fat: 0g
- Carbohydrates: 43g
- Fiber: 2g
- Protein: 3g
- Cholesterol: 10mg


