
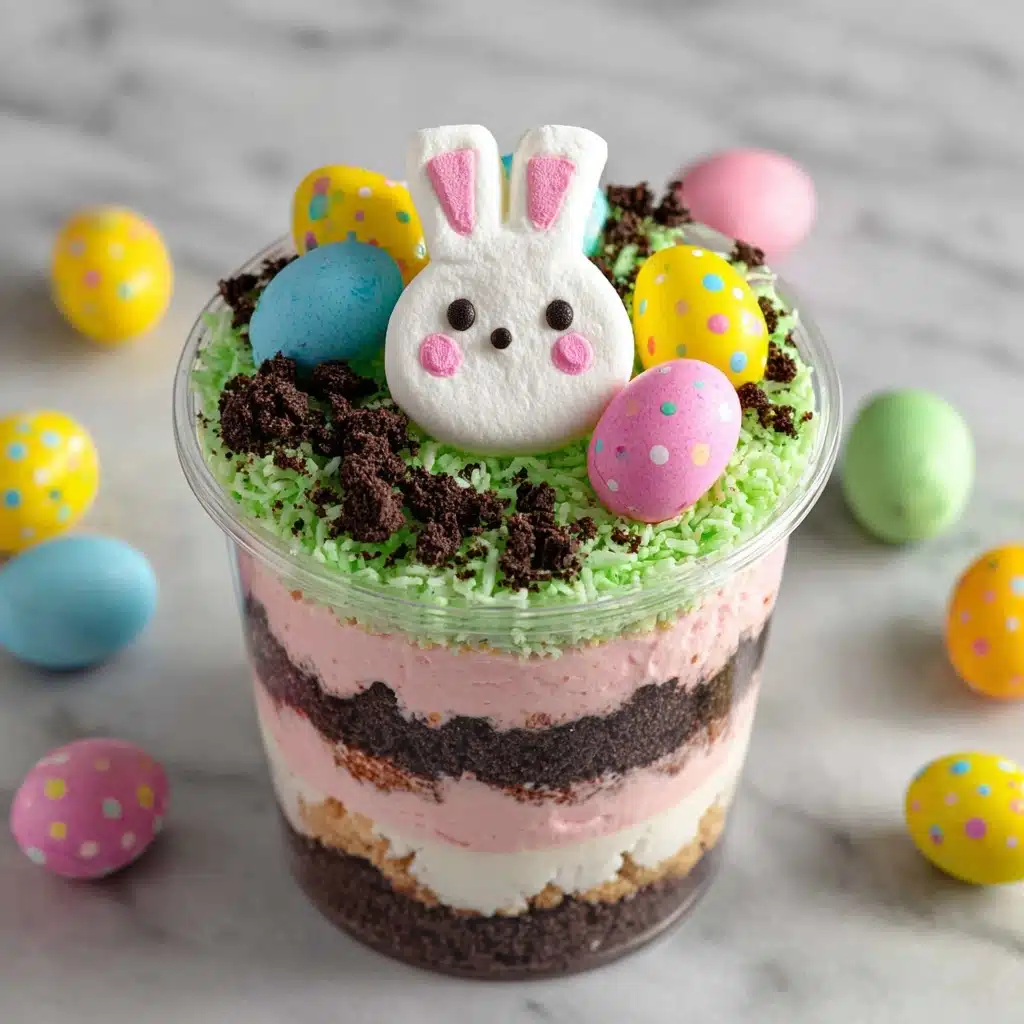
If you’re looking for a whimsical, crowd-pleasing sweet to brighten up your spring celebrations, this Easter Dirt Cups Recipe is just the treat you’ve been waiting for! Imagine rich layers of chocolate pudding, fluffy whipped topping, and delightfully crunchy cookie “dirt,” all topped with edible coconut grass and colorful Easter candies. Every bite is packed with creamy, chocolatey goodness and playful charm, making it the ultimate no-bake dessert for both kids and grown-ups. It’s quick to create, fun to decorate, and guaranteed to steal the show at any Easter get-together.

Ingredients You’ll Need
-
Pudding Mixture:
- 1 package (3.9 ounces) instant chocolate pudding mix
- 2 cups cold milk
- 1 container (8 ounces) whipped topping, thawed
Assembly:
- 15 chocolate sandwich cookies (like Oreos), crushed
- 1/2 cup shredded sweetened coconut
- Green food coloring
- 12–16 Easter candies (such as candy eggs, Peeps, or bunny gummies)
- Clear plastic cups (6–8 count)
How to Make Easter Dirt Cups Recipe
Step 1: Mix the Chocolate Pudding
Grab a large mixing bowl and whisk together the instant pudding mix and cold milk for about two minutes. You’re looking for a smooth, velvety pudding that starts to thicken up as you whisk. This forms the dreamy chocolate base of your Easter Dirt Cups Recipe, so don’t rush it—a little patience here ensures perfect texture!
Step 2: Add Whipped Topping
Once your pudding is mostly set, gently fold in the thawed whipped topping. This makes the pudding lighter, fluffier, and irresistibly creamy. Make sure to mix just until blended, so you keep that beautiful airy texture without deflating it.
Step 3: Tint the Coconut “Grass”
In a small bowl, add your shredded coconut and 2–3 drops of green food coloring. Toss with a fork until all the coconut turns a springy shade of green, mimicking those perfect grassy tufts you see in Easter baskets. This step takes just a minute and adds an ultra-festive touch.
Step 4: Crush the Cookies
Place the chocolate sandwich cookies in a zip-top bag and crush them using a rolling pin or the bottom of a sturdy cup. You can make the crumbs as fine or chunky as you like—chunky bits add extra fun! These crumbs are the “dirt” in your Easter Dirt Cups Recipe.
Step 5: Layer and Assemble
Time to build your dirt cups! Start by adding about a tablespoon of crushed cookies to the bottom of each clear cup. Layer in a generous scoop of the pudding mixture, then sprinkle with more crushed cookies, repeating the process until the cups are nearly full. Finish with a final layer of “dirt” on top.
Step 6: Top with Grass and Candies
Sprinkle a layer of your green coconut grass over the top of each cup. Nestle your favorite Easter candies—think mini chocolate eggs, marshmallow Peeps, or gummy bunnies—into the grass for a playful, colorful finale that will wow your guests both young and old.
Step 7: Chill and Serve
Pop the assembled cups in the refrigerator for at least 30 minutes before serving. This helps the flavors meld and gives each cup a chilled, creamy texture that makes every spoonful extra refreshing. Then bring them out, admire your handiwork, and watch the smiles appear!
How to Serve Easter Dirt Cups Recipe
Garnishes
A big part of the fun with this Easter Dirt Cups Recipe comes from going wild with garnishes on top! Besides the green coconut grass and Easter candies, you could add a drizzle of chocolate syrup, a sprinkle of pastel sprinkles, or even a little edible glitter. Hand everyone a spoon and let them dig in for a burst of color and flavor in each bite.
Side Dishes
Because these cups are on the sweet and creamy side, pair them with light, fresh sides—think a platter of fruit, a citrusy salad, or dainty sugar cookies. If you’re serving them at a party buffet, set them alongside savory snacks to balance out all the sugary goodness for a perfectly well-rounded dessert lineup.
Creative Ways to Present
For a show-stopping display, try assembling your Easter Dirt Cups Recipe in mini mason jars, colorful pastel bowls, or even little terracotta pots for a garden-inspired look! You can tie decorative ribbons around the cups or place personalized name tags for each guest for an added touch of springtime magic.
Make Ahead and Storage
Storing Leftovers
Cover any leftover Easter Dirt Cups Recipe tightly with plastic wrap or lids and store them in the refrigerator. The pudding and cookies tend to soften and meld together overnight, which actually makes them even creamier—perfect for enjoying the next day!
Freezing
While you can technically freeze Easter Dirt Cups Recipe, the texture after thawing may not be quite as smooth or creamy due to the whipped topping and pudding. If you do want to try, freeze without the coconut grass or candies, and add those just before serving for best results.
Reheating
Luckily, reheating isn’t required for this no-bake dessert! Just grab a chilled cup straight from the fridge and enjoy. If the coconut or candies have lost their color or crispness, simply add fresh decorations right before serving.
FAQs
Can I make Easter Dirt Cups Recipe the night before?
Absolutely! These cups hold up beautifully overnight if stored in the refrigerator. In fact, making them ahead allows the flavors to develop and the pudding to set perfectly—just leave off the coconut grass and candies until right before serving for the freshest look.
Can I use homemade whipped cream instead of whipped topping?
Definitely! Homemade whipped cream brings a lovely fresh flavor to your Easter Dirt Cups Recipe. Just whip heavy cream with a little sugar until it holds soft peaks and use it in place of store-bought whipped topping.
What other cookie options can I use?
If you don’t have chocolate sandwich cookies, try using chocolate graham crackers, chocolate wafer cookies, or even brownies crumbled up! Each will put its own spin on the flavor and texture of the final dessert.
Is there a way to make these cups gluten free?
Yes, you can easily make gluten free Easter Dirt Cups Recipe by swapping the regular cookies for your favorite gluten free chocolate sandwich cookies. Double-check that your pudding mix and candies are also gluten free, and you’re all set!
How long can I store leftovers in the fridge?
Stored tightly covered in the refrigerator, your Easter Dirt Cups Recipe will stay fresh and tasty for up to 3 days. The cookies may get a bit softer, but many people love this ultra-creamy, pudding-cake-like texture!
Final Thoughts
Whether you make them for a holiday brunch or just as a memorable after-dinner treat, this Easter Dirt Cups Recipe promises fun, flavor, and a dash of nostalgia in every single cup. There’s something about digging in with a spoon and discovering all those delicious layers that brings out the kid in everyone. Give them a try this spring—you might just start a new family tradition!
Print
Easter Dirt Cups Recipe
- Total Time: 20 minutes
- Yield: 6–8 servings 1x
- Diet: Vegetarian
Description
These Easter Dirt Cups are a fun and festive dessert perfect for the holiday season. Layers of chocolate pudding, crushed cookies, and creamy whipped topping are topped with green coconut ‘grass’ and colorful Easter candies.
Ingredients
Pudding Mixture:
- 1 package (3.9 ounces) instant chocolate pudding mix
- 2 cups cold milk
- 1 container (8 ounces) whipped topping, thawed
Assembly:
- 15 chocolate sandwich cookies (like Oreos), crushed
- 1/2 cup shredded sweetened coconut
- Green food coloring
- 12–16 Easter candies (such as candy eggs, Peeps, or bunny gummies)
- Clear plastic cups (6–8 count)
Instructions
- Prepare Pudding Mixture: In a large bowl, whisk the pudding mix with the cold milk for 2 minutes until it begins to set. Fold in the whipped topping until smooth and creamy.
- Tint Coconut: In a separate bowl, add a few drops of green food coloring to the shredded coconut and mix until evenly tinted to resemble grass.
- Assemble Cups: Layer about 1 tablespoon of crushed cookies into the bottom of each cup. Add a layer of pudding mixture, then repeat with more crushed cookies and pudding until the cups are almost full. Top with a final layer of crushed cookies. Sprinkle green coconut ‘grass’ on top and decorate with Easter candies.
- Chill: Chill in the refrigerator for at least 30 minutes before serving.
Notes
- You can swap chocolate pudding for vanilla or use pastel-colored candies for a more festive look.
- Make these a day ahead and store covered in the fridge.
- Prep Time: 20 minutes
- Cook Time: 0 minutes
- Category: Dessert
- Method: No-Bake
- Cuisine: American
Nutrition
- Serving Size: 1 cup
- Calories: 280
- Sugar: 24g
- Sodium: 270mg
- Fat: 12g
- Saturated Fat: 6g
- Unsaturated Fat: 4g
- Trans Fat: 0g
- Carbohydrates: 39g
- Fiber: 1g
- Protein: 3g
- Cholesterol: 5mg


