If you’ve never experienced the delightful tang and satisfying crunch of fermented carrots, you are in for a true treat! This recipe transforms simple carrots into a vibrant, probiotic-packed snack that’s as nourishing as it is delicious. Not only do they brighten up any plate with their sunny color, but the complex flavor from the fermentation process gives carrot sticks an exciting edge over any regular pickle. Gather your jar and a handful of pantry staples—let’s start your own batch of fermented carrots and open the door to gut-friendly snacking!

Ingredients You’ll Need
Making fermented carrots is truly about celebrating the beauty of minimalism. Each ingredient plays an important role, from the sweet crunch of the carrots to the herbal scent of dill and the subtle punch of garlic. Don’t let the short ingredient list fool you—these simple items join forces to create something magical.
- Carrots (4 medium, peeled and cut into sticks): Choose fresh, firm carrots for the best texture and gorgeous color in your finished ferment.
- Water (2 cups, non-chlorinated): Go with filtered or dechlorinated water, since chlorine can hinder the fermentation and flavor development.
- Sea salt (1 tablespoon): This is the powerhouse that drives fermentation—don’t swap with table salt, as it could contain additives.
- Garlic clove (1, peeled): It infuses the carrots with a lovely aromatic backbone, making each bite more exciting.
- Whole peppercorns (1 teaspoon, optional): These add subtle pops of spice throughout the jar for a more complex flavor profile.
- Fresh dill sprig (1, optional): A classic pairing, dill brings a beautiful hint of freshness reminiscent of the best deli pickles.
How to Make Fermented Carrots
Step 1: Prep Your Jar and Vegetables
Start by making sure your jar is squeaky clean—either run it through the dishwasher or wash with hot, soapy water and rinse well. Peel the carrots and cut them into even sticks, sized to fit upright in your jar. This ensures they get evenly fermented and look extra pretty!
Step 2: Pack the Jar with Flavor
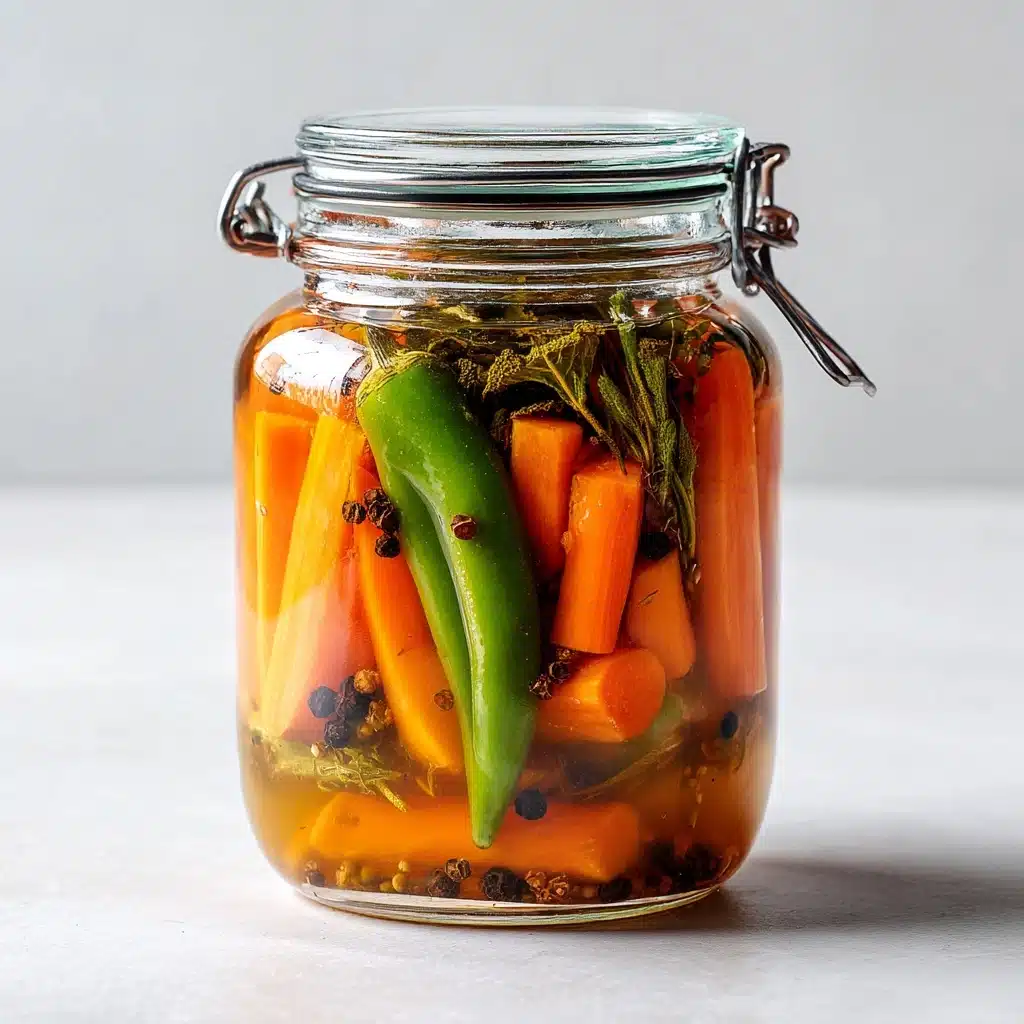
Tightly pack the carrot sticks upright into the jar, nestling in the peeled garlic clove, peppercorns, and fresh dill if using. Try to keep the carrots as snug as possible; this helps them stay submerged in brine and ferment evenly. The aromatic add-ins are optional but highly recommended for a burst of flavor in every bite.
Step 3: Create the Brine
In a separate mixing bowl, dissolve the sea salt thoroughly into the non-chlorinated water. This saline solution is what coaxes the natural bacteria to work their magic, preserving the carrots and giving them that signature tang.
Step 4: Submerge and Secure
Pour the brine over the packed carrots, making sure everything is fully submerged—this is key to a safe and successful ferment. If you have a fermentation weight, use it; otherwise, a small glass or even a clean cabbage leaf can help keep those carrots tucked under the brine line.
Step 5: Cover and Ferment
Loosely cover the jar with a lid or a clean cloth secured with a rubber band so wild yeasts can escape but dust can’t get in. Let your jar rest at room temperature, away from direct sunlight. Ferment for 5 to 7 days, starting to taste after day 3. Once your carrots are tart and tangy enough for your liking, seal with a tight lid and move them to the fridge. That’s it—you’ve made your own fantastic fermented carrots!
How to Serve Fermented Carrots
Garnishes
A sprinkle of fresh chopped herbs or a little zest of lemon over your fermented carrots is all it takes to make them pop on a snack board. For an extra dash of drama, try dusting with smoked paprika or sesame seeds just before serving.
Side Dishes
Fermented carrots are right at home on a platter with hummus, olives, and pita chips, or piled beside grilled meats and sandwiches. Their crisp, tangy snap cuts through rich and hearty mains beautifully, making them ideal for everything from picnics to lunchboxes.
Creative Ways to Present
For an eye-catching twist, chop or slice your fermented carrots into thin coins as a colorful topping for tacos, salads, or grain bowls. You can even skewer them with cubes of cheese and fresh herbs for probiotic-packed hors d’oeuvres that are sure to surprise and delight.
Make Ahead and Storage
Storing Leftovers
Fermented carrots keep beautifully in the fridge for several weeks, sometimes even months, so there’s no rush to finish them quickly. Always use a clean fork to pull out what you need, and ensure they remain submerged in brine to stay fresh and safe.
Freezing
It’s best not to freeze fermented carrots, as freezing can seriously alter their crispness and potentially damage the good bacteria you worked so hard to cultivate. Enjoy them from the fridge for the optimal texture and health benefits.
Reheating
Heating will destroy most of the beneficial probiotics, so these are best eaten cold or at room temperature. If you want to add them to a cooked dish, stir them in just before serving to preserve their vibrant crunch and gut-friendly benefits.
FAQs
Why are my fermented carrots cloudy?
Cloudiness in the brine is actually a great sign—proof that wild fermentation is at work! As long as there is no slimy texture or pink mold, your carrots are fermenting exactly as they should be.
How can I tell if my fermented carrots have gone bad?
White film (kahm yeast) on the brine is normal and harmless, but anything fuzzy, pink, or foul-smelling means the batch should be discarded. Always trust your senses when checking ferments.
Can I add other vegetables to the jar?
Absolutely! Sliced radishes, cauliflower florets, or strips of bell pepper complement the flavors of fermented carrots and make for a beautiful, mixed ferment. Just keep the same basic method and proportions.
My carrots are floating—how do I keep them submerged?
Use a fermentation weight, a smaller glass jar, or even fold up a cleaned cabbage leaf over the top to help keep all the vegetables under the brine, which is essential to prevent spoilage.
Do fermented carrots need to be refrigerated after fermenting?
Yes, once they have reached your desired tanginess, storing them in the refrigerator slows down further fermentation, keeping the flavor and texture just right for many weeks.
Final Thoughts
Give these fermented carrots a try and you’ll be amazed at the flavor you can coax out of the humblest of vegetables. Homemade fermentation is equal parts fun science experiment and kitchen magic, and you’ll love having a crunchy, probiotic-rich snack on hand at all times!
Print
Fermented Carrots Recipe
- Total Time: 15 minutes prep + 5–7 days fermentation
- Yield: 1 quart 1x
- Diet: Vegan
Description
Learn how to make delicious fermented carrots at home with this easy recipe. These probiotic-rich carrots are a fantastic addition to your meals and great for your gut health.
Ingredients
Carrots:
- 4 medium carrots (peeled and cut into sticks)
Brine:
- 2 cups non-chlorinated water
- 1 tablespoon sea salt
Additional:
- 1 garlic clove (peeled)
- 1 teaspoon whole peppercorns (optional)
- 1 sprig fresh dill (optional)
Instructions
- Pack the Jar: Pack the carrot sticks, garlic, peppercorns, and dill (if using) tightly into a clean jar.
- Prepare Brine: Dissolve sea salt in water to create a brine. Pour the brine over the carrots, ensuring they are submerged.
- Fermentation: Use a weight to keep carrots under the brine. Cover with a loose lid or cloth secured with a rubber band. Ferment at room temperature for 5–7 days.
- Taste Test: Check daily after day 3 for desired tanginess. Once ready, seal and refrigerate.
Notes
- Keep carrots submerged to prevent mold.
- Fermentation time may vary with room temperature.
- Use filtered water for best results.
- Prep Time: 15 minutes
- Cook Time: 0 minutes
- Category: Side Dish
- Method: Fermenting
- Cuisine: Eastern European
Nutrition
- Serving Size: 1/4 cup
- Calories: 20
- Sugar: 2g
- Sodium: 240mg
- Fat: 0g
- Saturated Fat: 0g
- Unsaturated Fat: 0g
- Trans Fat: 0g
- Carbohydrates: 4g
- Fiber: 1g
- Protein: 0g
- Cholesterol: 0mg
