
If you’ve ever wanted a tangy, crunchy snack that delivers a punch of flavor, Fermented Okra is your new best friend. This Southern-inspired treat transforms humble okra pods into a probiotic powerhouse, popping with subtle heat, fragrant garlic, and a fizz of fermentation. Each pod is brimming with zippy taste and gut-loving bacteria—perfect for curious cooks, snacking enthusiasts, or anyone eager to try bold flavors with simple technique. Let me show you how to fall head over heels with Fermented Okra!
Ingredients You’ll Need
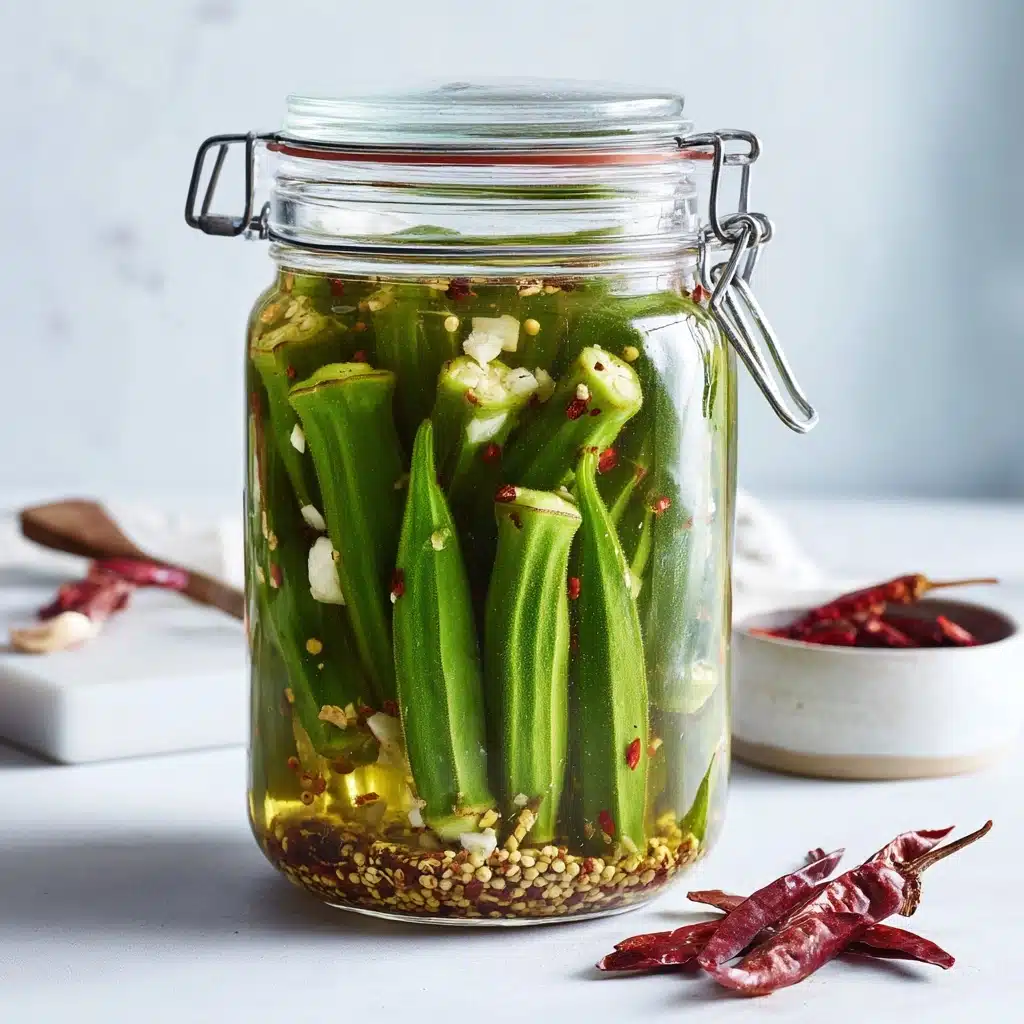
The magic of Fermented Okra starts with a handful of approachable, pantry-friendly ingredients, each bringing its own special contribution. Crisp, fresh okra forms the base, while the salt and spices coax out irresistible flavors and a delightful crunch. Here’s what you’ll need for this vibrant ferment:
- Fresh okra pods: Choose small or medium pods for the best texture and most satisfying crunch.
- Garlic cloves: Smashed cloves add an earthy depth and mellow bite.
- Mustard seeds (optional): Sprinkle these in for a bit of tangy zest and a pretty golden color.
- Chili flakes (optional): For those who love a little heat, these flakes bring gentle fire and gorgeous color flecks.
- Sea salt (non-iodized): This preserves and flavors the okra—you’ll want pure, non-iodized salt for a healthy ferment.
- Filtered water: Clean, chlorine-free water ensures your fermentation takes off perfectly.
How to Make Fermented Okra
Step 1: Prep Your Okra and Jar
Start by giving your okra pods a good wash and a gentle trim, removing just the tough stem ends. Line them up like little green soldiers, packing them vertically and snugly into a quart-sized glass jar. You want the okra to fit tightly, but don’t smash or bruise the pods.
Step 2: Add Garlic and Spices
Now, let’s sneak in bold flavor! Tuck your smashed garlic cloves, plus the optional mustard seeds and chili flakes, around the okra inside the jar. These aromatics will infuse the brine and the okra with their distinct personalities—garlicky, spicy, and gently aromatic.
Step 3: Make the Brine
In a separate bowl or measuring cup, dissolve the sea salt completely in the filtered water. This salty bath is key for safe fermentation: it encourages good bacteria to thrive and keeps the okra crisp. Once dissolved, you’re ready for the next step.
Step 4: Submerge and Weigh Down
Pour the prepared brine gently over the okra, covering every pod. The key to perfect Fermented Okra is keeping everything submerged. If you have a fermentation weight, press it on top; if not, use a small zip-top bag filled with extra brine—you want the okra fully under the liquid, no floaters allowed!
Step 5: Cover and Ferment
Cover your jar with a clean cloth secured by a rubber band, or use a loose lid—this lets gases escape but keeps dust out. Place the jar out of direct sunlight at room temperature. Over the next 5 to 7 days, peek and sniff daily. Bubbles, tangy aroma, and even a little fizz mean magic is happening! Start tasting on day 4; when the okra is sour, crisp, and fizzy, it’s ready.
Step 6: Finish and Store
Once your Fermented Okra has reached peak deliciousness, remove any weights, seal the jar with a tight lid, and transfer to the refrigerator. This halts fermentation and keeps your okra vibrant and crunchy for weeks to come.
How to Serve Fermented Okra

Garnishes
Scatter your Fermented Okra with freshly chopped dill, a dusting of smoked paprika, or a foraged sprig of fennel fronds. A few mustard seeds atop the jar add a festive touch, and sliced red chilies bring vivid color and extra heat for the bold.
Side Dishes
Fermented Okra is a conversation-starter on any table. Serve it next to a rustic cheese platter, tuck a few pods alongside bowls of creamy hummus, or brighten up a Southern Sunday lunch beside fried chicken and cornbread. Their zesty snap balances rich or smoky flavors beautifully.
Creative Ways to Present
Don’t just serve them straight from the jar! Thread whole fermented pods on cocktail picks for party snacks, chop them into salads for a tangy crunch, or tuck a few into sandwiches and wraps for a flavorful bite. Try them as a pickle spear alternative on charcuterie boards—they’ll disappear faster than you think!
Make Ahead and Storage
Storing Leftovers
Once you’ve tasted Fermented Okra and sealed the jar, keep it in the refrigerator. The cool temperature preserves the perfect balance of sourness and crunch, and stops fermentation from going too far. Tightly sealed, they’ll stay delicious and safe to eat for up to two months—if you can make them last that long!
Freezing
While some folks experiment with freezing fermented foods, I don’t recommend it for Fermented Okra. Freezing will break down the delicate cell walls, leading to mushy and limp pods when thawed. For best flavor and texture, enjoy them straight from the fridge.
Reheating
No reheating is needed for Fermented Okra! It shines brightest served cold or at room temperature, retaining its sparkly snap and probiotic benefits. If adding to cooked dishes, stir in right before serving so their textures and flavors stay bold and bright.
FAQs
Why does my brine look cloudy?
A cloudy brine is a normal sign that fermentation is proceeding well. Good bacteria can create naturally occurring cloudiness as they multiply. Unless you see mold (which would look fuzzy and sit on the surface), your Fermented Okra is on track and safe to eat.
Can I use table salt instead of sea salt?
It’s best to use non-iodized sea salt or kosher salt, as iodine and anti-caking agents in standard table salt can inhibit proper fermentation. Non-iodized salt guarantees a happier, fizzier ferment and better flavor overall.
What if my okra gets slimy?
A little slipperiness is totally normal with okra, but a good fermentation process should keep them crisp and pleasantly chewy. Using smaller pods and weighing them down fully in brine helps discourage excess slime. If the texture ever seems off or the aroma turns unpleasant, it’s best to discard and try again.
How long does it take to ferment okra?
Fermented Okra typically reaches perfection in five to seven days, depending on your room temperature and your preferred level of tanginess. Start tasting daily from day four—you’re the ultimate judge of when it’s just right for your palate!
Are the probiotics in Fermented Okra good for me?
Absolutely! Lacto-fermented vegetables like this okra are packed with beneficial bacteria that support healthy digestion and overall gut wellness. Enjoying a few pods is a flavorful way to add live cultures to your diet every day.
Final Thoughts
It’s hard not to gush about Fermented Okra—there’s just something magical about turning everyday produce into a zesty, probiotic-rich snack that’s got personality and crunch. I hope you’ll give this easy ferment a try and fall in love with its bold flavor and endless uses. Your taste buds (and your gut) will thank you!
Print
Fermented Okra Recipe
- Total Time: 15 minutes plus 5–7 days fermentation
- Yield: 1 quart 1x
- Diet: Vegan
Description
Learn how to make tangy and probiotic fermented okra at home with this simple recipe. Perfect for adding a zesty crunch to your meals or enjoying as a healthy snack.
Ingredients
Ingredients:
- 1 pound fresh okra pods (washed and trimmed)
- 2 cloves garlic (smashed)
- 1 teaspoon mustard seeds (optional)
- 1 teaspoon chili flakes (optional)
- 1 tablespoon sea salt (non-iodized)
- 2 cups filtered water
Instructions
- Pack the okra pods: Pack the okra pods vertically into a clean quart-size glass jar, fitting them in tightly but without crushing.
- Add garlic and spices: Tuck the garlic cloves and optional spices around the okra.
- Prepare the brine: Dissolve the sea salt in the filtered water to create a brine.
- Pour brine over okra: Pour the brine over the okra, ensuring all pods are fully submerged.
- Weight and cover: Use a fermentation weight or a small zip-top bag filled with brine to keep the okra below the liquid line. Cover the jar with a cloth secured with a rubber band or a loose-fitting lid.
- Ferment: Let ferment at room temperature for 5 to 7 days, checking daily for bubbles and tangy aroma. Taste starting on day 4.
- Seal and store: Once the okra is pleasantly sour and slightly fizzy, remove the weight, seal with a lid, and store in the refrigerator.
Notes
- Use small to medium okra pods for best texture.
- Okra may become slightly slippery but stays crisp when fermented properly.
- Add dill, peppercorns, or bay leaves for more flavor variations.
- Store in the fridge for up to 2 months.
- Prep Time: 15 minutes
- Cook Time: 0 minutes
- Category: Fermented Foods
- Method: Fermentation
- Cuisine: Southern, International
Nutrition
- Serving Size: 2 pods
- Calories: 5
- Sugar: 0g
- Sodium: 180mg
- Fat: 0g
- Saturated Fat: 0g
- Unsaturated Fat: 0g
- Trans Fat: 0g
- Carbohydrates: 1g
- Fiber: 0.5g
- Protein: 0g
- Cholesterol: 0mg


