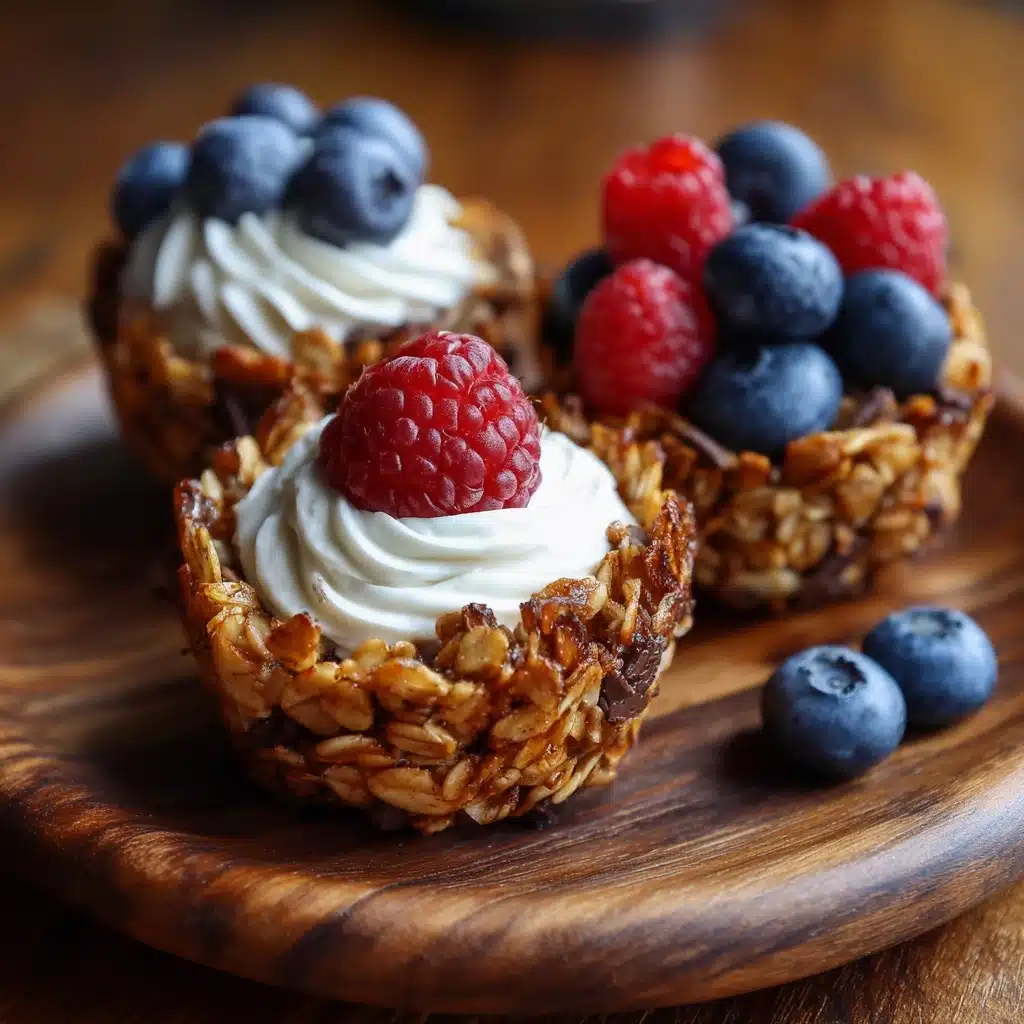
If you’re searching for a fun, wholesome twist on your usual breakfast, look no further than Granola Cups. Imagine all the goodness of classic granola, but hand-shaped into adorable little cups ready to cradle creamy yogurt, juicy fruit, or whatever your breakfast-loving heart desires. They’re crisp, slightly sweet, and the perfect combination of crunchy and chewy. Whether you’re feeding a crowd or prepping your week’s snacks, these Granola Cups are always a hit, both for their taste and their charming presentation.
Ingredients You’ll Need
The beauty of this recipe is how effortlessly a handful of pantry staples can be transformed into something genuinely special. Each ingredient has an important role, creating just the right flavor, crunch, and touch of sweetness for your Granola Cups.
- Old-fashioned rolled oats: The hearty base that gives each cup its classic chewy texture and nutty backbone.
- Chopped nuts (almonds, pecans, or walnuts): Adds crunch, richness, and a boost of healthy fats—choose your favorite or mix and match!
- Ground flaxseed or wheat germ (optional): For a bonus dose of fiber and nutty earthiness. Sneak in the healthy extras!
- Cinnamon: Warm spice brings the cozy comfort of fresh-baked breakfast treats.
- Salt: Just a pinch to balance all the flavors and make those subtle tastes pop.
- Honey or maple syrup: Sweetens the granola naturally and helps bind the mixture together.
- Coconut oil or unsalted butter (melted): Lends rich flavor and ensures the cups bake up golden and crisp.
- Vanilla extract: Rounds out the flavor profile with a classic, aromatic touch.
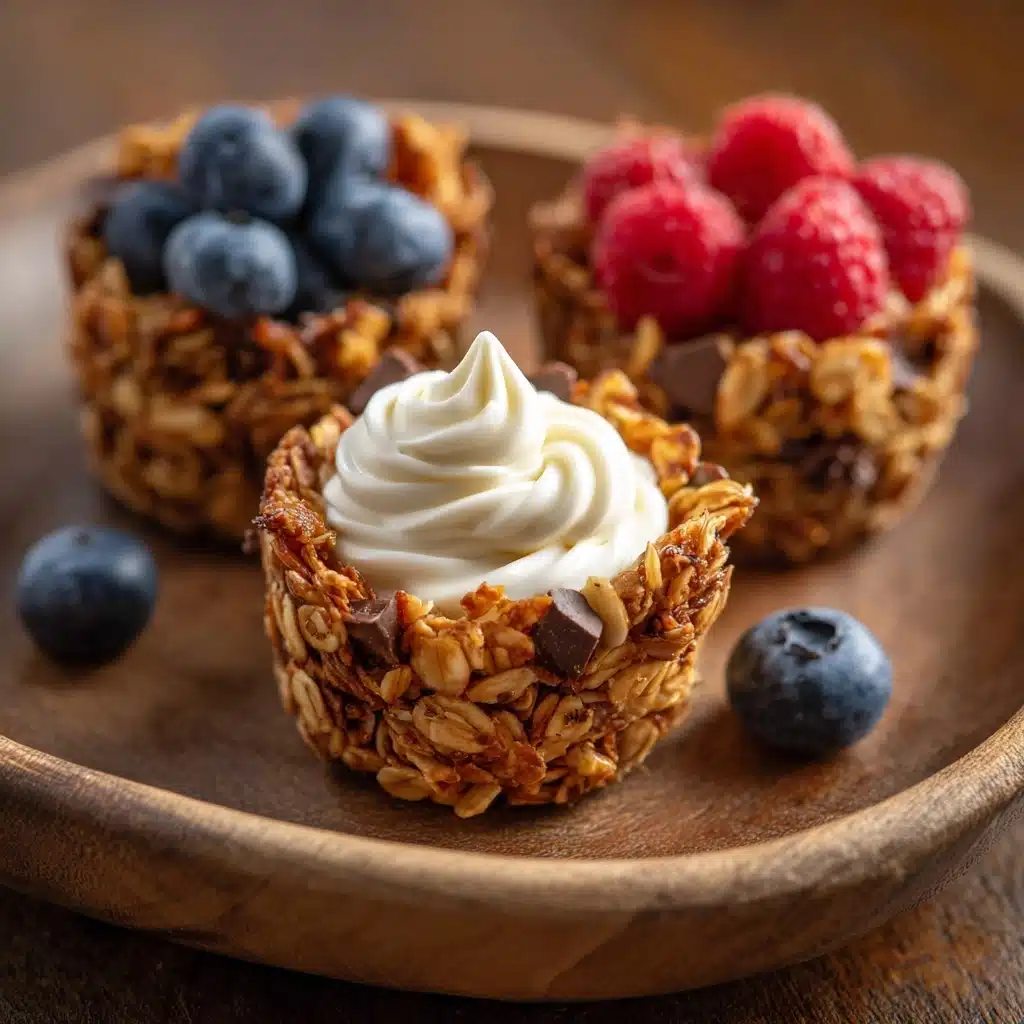
- Mini chocolate chips or dried fruit (optional): Adds little pockets of sweetness or tang—customize to your mood!
- Greek yogurt and fresh berries for filling (optional): The perfect creamy and refreshing contrast to crunchy cups—fill just before serving.
How to Make Granola Cups
Step 1: Prep Your Muffin Tin
Start by preheating your oven to 350°F (175°C). Lightly grease a standard 12-cup muffin tin, or better yet, use silicone muffin cups or parchment liners to make removing your Granola Cups nearly effortless later on. This simple prep will save you from any sticking struggles and ensure beautiful, intact cups every time.
Step 2: Mix the Dry Ingredients
In a large mixing bowl, combine the rolled oats, your chopped nuts of choice, ground flaxseed or wheat germ if you’re using it, the cinnamon, and salt. Stir everything well so each bite will have just the right hint of spice, nuttiness, and satisfying crunch.
Step 3: Stir in the Wet Ingredients
Pour in the honey or maple syrup, your melted coconut oil or unsalted butter, and the vanilla extract. Mix thoroughly until the mixture is evenly coated and clumps together slightly—this is your cue that everything’s ready for shaping. If you’re feeling adventurous, fold in mini chocolate chips or chopped dried fruit for extra delightful surprises throughout your Granola Cups.
Step 4: Shape the Cups
Scoop about 2 tablespoons of your granola mixture into each muffin tin well. Using the back of a spoon or your fingers, press the mixture firmly in the base and up the sides to create a cup shape. Don’t be shy here! The firmer you press, the better the cups will hold together when baked and cooled.
Step 5: Bake and Cool
Bake in your preheated oven for 14 to 16 minutes, or until you see the edges turn beautifully golden and crisp. Here’s the hardest part: let the Granola Cups cool completely in the tin. As they cool, they firm up and become perfectly crisp. Once cooled, gently pop them out—they’re ready for the spotlight!
Step 6: Fill and Enjoy!
Right before serving, fill your Granola Cups with Greek yogurt, a mountain of fresh berries, or even a dollop of nut butter. Or keep them plain for a perfectly portable snack. The sky’s the limit when it comes to fillings!
How to Serve Granola Cups

Garnishes
You can dress up your Granola Cups with just a few simple finishing touches. Try a drizzle of honey, a sprinkle of chia seeds, or a scattering of pepitas for color and texture. A few fresh mint leaves or a dusting of powdered sugar can make each one look like a mini masterpiece ready for a brunch spread.
Side Dishes
Pair your Granola Cups with a bowl of fruit salad, some hard-boiled eggs, or a smoothie for a balanced breakfast. They’re also delightful alongside a steaming mug of coffee or tea, rounding out your morning routine with an extra dose of energy and cheer.
Creative Ways to Present
Granola Cups are just begging to be part of your next brunch board! Arrange them on a platter alongside small bowls of colorful toppings, set up a DIY fill-your-own station for family or guests, or tuck them into a bento box for an Instagram-worthy breakfast on the go. They’re as fun to serve as they are to enjoy.
Make Ahead and Storage
Storing Leftovers
Keep your empty Granola Cups crisp by storing them in an airtight container at room temperature for up to a week. Fill them just before eating to keep that irresistible crunch intact. If your kitchen tends to be humid, you may want to add a small packet of food-safe desiccant or a paper towel inside the container to absorb extra moisture.
Freezing
Believe it or not, Granola Cups freeze beautifully! Wrap each cup in plastic wrap or keep them separated with parchment paper in a freezer-safe container. They’ll stay fresh for up to two months. When you’re ready to use them, simply let them thaw at room temperature for 15 to 20 minutes before filling.
Reheating
If your Granola Cups have softened a bit, pop them in a preheated 300°F oven for 5 to 7 minutes to help them crisp up again. Let them cool before adding any creamy fillings, and they’ll taste freshly baked all over again.
FAQs
Can I make Granola Cups gluten-free?
Absolutely! Just be sure to use certified gluten-free rolled oats. All other ingredients are naturally gluten-free, making these cups a safe treat for gluten-sensitive friends or family.
What if I don’t have a muffin tin?
You can shape mini cups by molding the granola mixture with your hands and baking them on a parchment-lined baking sheet—just be gentle when removing! Alternatively, silicone baking pans also work wonders for easy release.
How do I keep Granola Cups crisp after adding yogurt?
For best crunch, fill your cups with yogurt or fresh fruit just before enjoying. If meal-prepping, pack the yogurt and granola separately, then combine right before eating to avoid sogginess.
Can I swap out the sweetener?
Yes! Honey and maple syrup both work beautifully, but you can also use agave nectar or brown rice syrup if you’d like a different flavor profile. Just be sure to use a sticky liquid sweetener so the cups hold together well.
Are Granola Cups kid-friendly?
Kids love these cups! Not only are they fun to eat, but they’re just as fun to help make. Let little hands press the mixture into muffin tins and pick the toppings—they might even eat a few extra berries before you’re done.
Final Thoughts
If you’re ready to brighten up your breakfast routine, Granola Cups are a must-try recipe. Simple to make, endlessly versatile, and always impressive—these little wonders pack big flavor and fun into every bite. I hope you give them a go and find them as delightful as I do!
Print
Granola Cups Recipe
- Total Time: 25 minutes
- Yield: 12 granola cups 1x
- Diet: Vegetarian
Description
A delightful recipe for homemade granola cups that can be filled with yogurt and fresh berries, perfect for a healthy and satisfying breakfast or snack.
Ingredients
Granola Cups:
- 2 cups old-fashioned rolled oats
- 1/2 cup chopped nuts (almonds, pecans, or walnuts)
- 1/4 cup ground flaxseed or wheat germ (optional)
- 1/2 teaspoon cinnamon
- 1/4 teaspoon salt
- 1/3 cup honey or maple syrup
- 1/4 cup coconut oil or unsalted butter (melted)
- 1 teaspoon vanilla extract
- 1/3 cup mini chocolate chips or dried fruit (optional)
For Filling:
- Greek yogurt
- Fresh berries
Instructions
- Preheat the oven: Preheat the oven to 350°F (175°C) and lightly grease a 12-cup muffin tin.
- Mix the ingredients: In a large bowl, combine oats, nuts, flaxseed, cinnamon, salt, honey/maple syrup, melted coconut oil/butter, and vanilla extract. Mix until fully coated.
- Shape the cups: Scoop about 2 tablespoons of the mixture into each muffin cup. Press firmly to form a cup shape.
- Bake: Bake for 14–16 minutes until golden and crisp. Cool completely in the tin.
- Fill: Fill with desired toppings like Greek yogurt, fresh fruit, or nut butter.
Notes
- Use silicone muffin cups or parchment liners to prevent sticking.
- Store empty granola cups in an airtight container at room temperature for up to 1 week.
- Fill just before serving to maintain crispness.
- Prep Time: 10 minutes
- Cook Time: 15 minutes
- Category: Snack, Breakfast
- Method: Baking
- Cuisine: American
Nutrition
- Serving Size: 1 granola cup
- Calories: 160
- Sugar: 7g
- Sodium: 40mg
- Fat: 8g
- Saturated Fat: 4g
- Unsaturated Fat: 4g
- Trans Fat: 0g
- Carbohydrates: 18g
- Fiber: 2g
- Protein: 3g
- Cholesterol: 0mg


