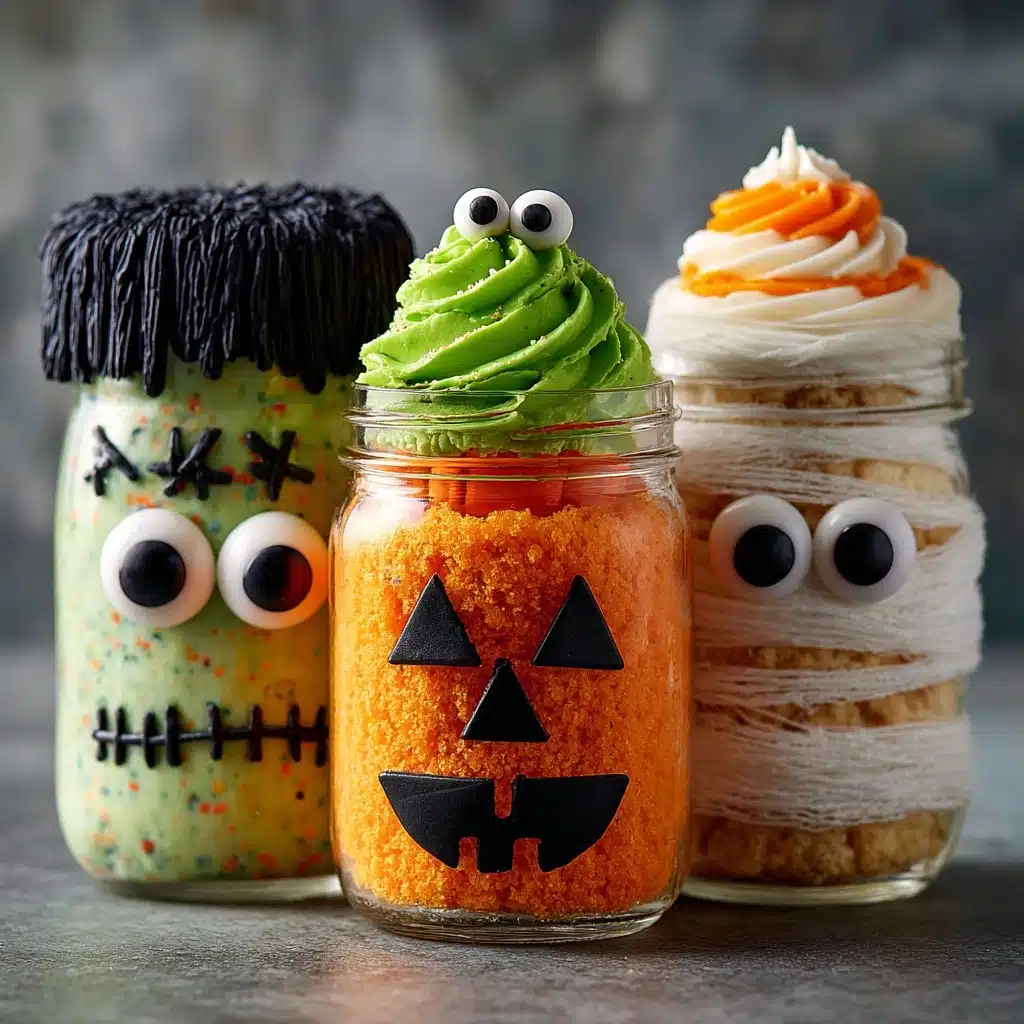
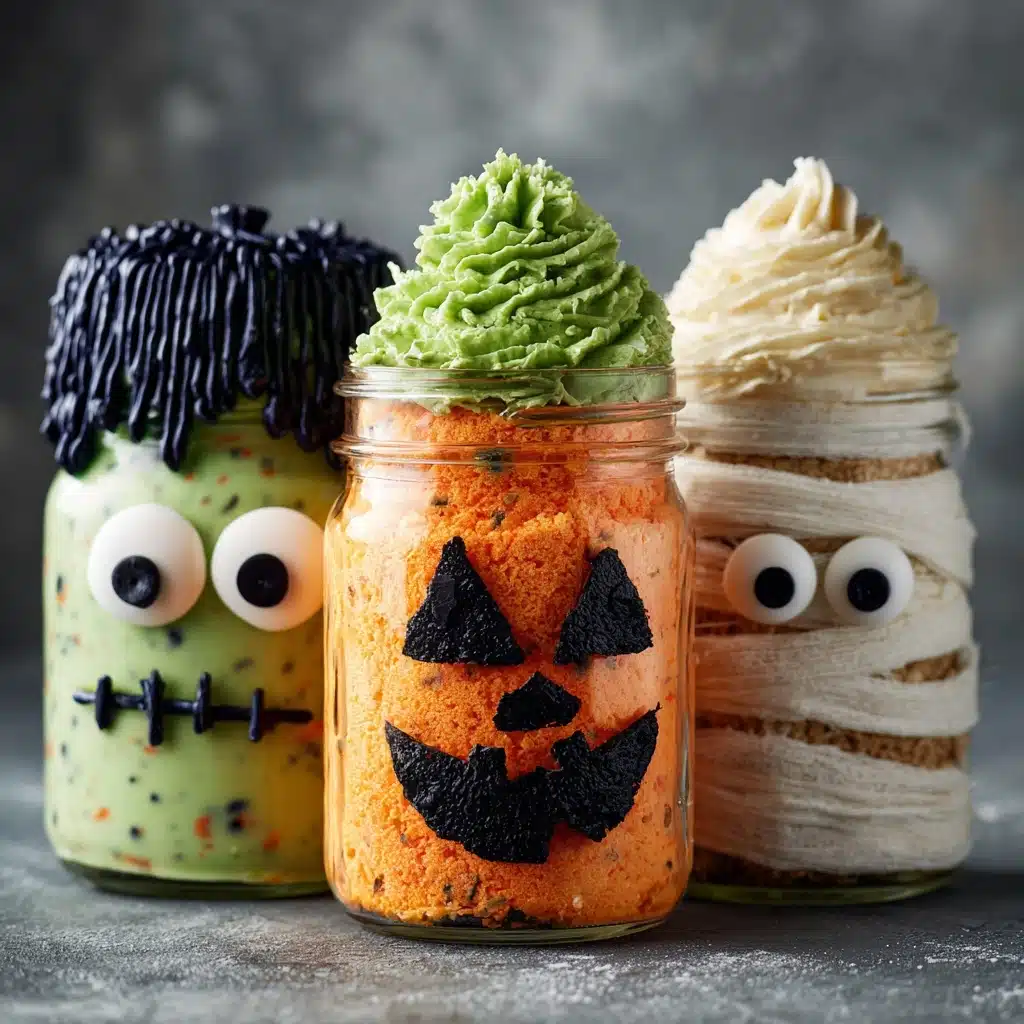
Get ready to be the hero of your Halloween party with these irresistibly festive Halloween Mason Jar Cakes! Imagine layers of moist chocolate cake and vibrant orange and purple swirls of vanilla buttercream, all tucked into charming little mason jars and topped off with playful Halloween sprinkles. With their portable size and eye-catching colors, these cakes are as fun to assemble as they are to eat, making them a perfect treat for gatherings, trick-or-treat events, or simply to add a little magic to a spooky night in.
Ingredients You’ll Need
You won’t believe how easy it is to whip up these show-stopping Halloween Mason Jar Cakes! Each ingredient plays a starring role in creating colorful, flavorful cakes that will delight kids and grown-ups alike. Here’s what you’ll need—and why each one matters.
- Chocolate cake mix: The backbone of every bite, providing rich, moist flavor with minimal fuss.
- Eggs, oil, and water: These box mix essentials ensure your cake bakes up tender and fluffy every time.
- Butter (1 cup, softened): The secret to a creamy, luscious homemade frosting that holds its shape in the jars.
- Powdered sugar (4 cups): Gives your frosting sweet structure and a perfectly smooth texture.
- Heavy cream (1/4 cup): Adds extra richness and helps the frosting whip up light and dreamy.
- Vanilla extract (1 teaspoon): Deepens the frosting flavor and balances the sweetness.
- Orange and purple gel food coloring: A few drops turn plain frosting into a festive Halloween masterpiece—gel is best for vibrant color without thinning.
- Halloween sprinkles: The ultimate finishing touch for color, crunch, and ghoulish fun on top.
- 8 half-pint (8-ounce) mason jars: These compact jars make serving easy and add irresistible charm to your dessert table.
How to Make Halloween Mason Jar Cakes
Step 1: Bake the Chocolate Cake
Preheat your oven as directed on the cake mix box. Prepare the chocolate cake batter following the box instructions using your eggs, oil, and water, then pour it into a large sheet pan for baking. Baking in a sheet pan makes it much easier to cut the cake into perfect circles later. Bake until a toothpick inserted in the center comes out clean, and let the cake cool completely before moving on—this step is crucial for neat layers!
Step 2: Prepare the Festive Frosting
While the cake cools, make your buttercream frosting. Beat the softened butter with an electric mixer until creamy and smooth, then gradually add the powdered sugar, heavy cream, and vanilla. Keep whipping until the mixture is airy and fluffy—it should easily hold a swirl shape. Next, divide the frosting evenly into two bowls. Tint one with orange gel food coloring and the other with purple, stirring until you get those fun, bold Halloween hues.
Step 3: Cut Out Cake Circles
Once the cake has cooled, use a round cookie cutter or the rim of a clean mason jar to cut out circles of cake. The size doesn’t have to be exact (a little snugness is fine), but it’s extra satisfying to get just the right fit for neat layers in the jar. Any scraps are perfect for snacking—chef’s treat!
Step 4: Layer Cake and Frosting in Jars
Now comes the fun part: assembly! Start by placing a cake round at the bottom of each mason jar. Pipe or spoon a generous layer of either orange or purple frosting on top, smoothing it to the edges. Repeat the layers—cake, frosting, cake, frosting—until your jars are full, finishing with a tall swirl of frosting on top. Alternate the frosting colors for even more visual wow!
Step 5: Decorate and Seal
Time to get creative! Shower the tops of your jar cakes with Halloween sprinkles for that special festive touch. If you’re transporting or gifting them, twist on the mason jar lids to keep everything fresh and portable. Otherwise, serve immediately and watch those smiles appear!
How to Serve Halloween Mason Jar Cakes

Garnishes
Finish your Halloween Mason Jar Cakes with a blizzard of bright, spooky sprinkles, or go the extra mile by adding gummy worms, candy eyeballs, or even mini chocolate bats. The extra toppings not only make them festive but are a guaranteed conversation starter with your guests or little ones.
Side Dishes
Pair your jar cakes with a cup of hot apple cider or a creamy pumpkin spice latte for a truly seasonal dessert experience. These cakes are delightfully rich, so a simple fruit salad or even just fresh orange slices can be a refreshing sidekick on the dessert table.
Creative Ways to Present
Arrange the finished jars in a basket lined with orange tissue paper or nestle them among faux cobwebs for a spooky effect. You can wrap ribbon or twine around the jar rims, attach little name tags for party favors, or even set up a “decorate your own” station with assorted toppings. Halloween Mason Jar Cakes are fantastic for Halloween bake sales and trick-or-treat goodie bags too!
Make Ahead and Storage
Storing Leftovers
If you have extras (which almost never happens!), simply close the mason jars tightly and pop them in the refrigerator. The airtight seal keeps your cakes moist and the frosting tasting fresh for up to three days—perfect for prepping ahead or enjoying slowly over the week.
Freezing
Halloween Mason Jar Cakes freeze surprisingly well! Assemble and frost as usual, then secure the lids and place the jars in the freezer. They’ll keep for up to one month. Just allow them to thaw in the fridge overnight when you’re ready to enjoy, and they’ll taste as delicious as the day you made them.
Reheating
Since these cakes are meant to be enjoyed at room temperature or chilled, you don’t need to reheat them. Simply remove from the fridge about 30 minutes before serving to let the flavors shine. If you prefer a slightly warm cake, you could carefully microwave the jar (ensure it’s microwave-safe and without the lid) for a few seconds, but be cautious as glass jars can become hot.
FAQs
Can I use a homemade cake recipe instead of boxed mix?
Absolutely! Whether you’re a scratch baker or a mix enthusiast, both work beautifully here. Just make sure your cake is sturdy enough to be cut into rounds and layered without crumbling. Chocolate, vanilla, or even red velvet will all taste fantastic.
What size mason jars should I use?
Half-pint (8-ounce) mason jars are the sweet spot—they hold just the right amount of cake and frosting for a generous individual serving without being overwhelming, and their wide mouths make layering easy.
Can I make Halloween Mason Jar Cakes in advance?
Definitely! These jar cakes are ideal for making a day ahead. Refrigerate them with the lids on, then decorate with sprinkles right before serving so everything stays perky and fresh.
How can I make these cakes gluten-free or dairy-free?
Swap in your favorite gluten-free cake mix and use plant-based butter and dairy-free heavy cream for the frosting. Be sure to check that your sprinkles and food colorings are allergy-friendly too!
How do I transport the cakes for a party?
One of the best perks of Halloween Mason Jar Cakes is their portability. Simply screw on the jar lids, pack them upright in a box, and they’ll travel beautifully to school functions, office parties, or trick-or-treat gatherings with zero mess.
Final Thoughts
If you’re looking to add a festive, crowd-pleasing dessert to your Halloween celebrations, you can’t go wrong with these Halloween Mason Jar Cakes. They’re fun to make with friends or family, endlessly customizable, and absolutely delicious—so don’t wait for a party to try them! Whip up a batch and start a new Halloween tradition everyone will look forward to year after year.
Print
Halloween Mason Jar Cakes Recipe
- Total Time: 55 minutes
- Yield: 8 mason jar cakes 1x
- Diet: Vegetarian
Description
These Halloween Mason Jar Cakes are a delightful and festive treat perfect for spooky season. Layers of rich chocolate cake and colorful buttercream frosting come together in individual jars for a fun and portable dessert that’s sure to impress at any Halloween gathering.
Ingredients
Chocolate Cake:
- 1 box chocolate cake mix (plus ingredients called for on the box: eggs, oil, water)
Buttercream Frosting:
- 1 cup butter, softened
- 4 cups powdered sugar
- 1/4 cup heavy cream
- 1 teaspoon vanilla extract
- Orange and purple gel food coloring
Additional:
- Halloween sprinkles
- 8 half-pint (8-ounce) mason jars
Instructions
- Preheat Oven: Preheat oven according to cake mix directions. Prepare and bake the chocolate cake in a large sheet pan as directed. Allow the cake to cool completely.
- Make Frosting: In a large bowl, beat the softened butter until creamy. Gradually add the powdered sugar, heavy cream, and vanilla extract, beating until light and fluffy.
- Color Frosting: Divide the frosting evenly into two bowls and tint one bowl orange and the other purple using gel food coloring.
- Assemble: Using a round cutter or the rim of a mason jar, cut out circles of cake that will fit inside the jars. Place a layer of cake in the bottom of each mason jar, then pipe or spoon a layer of frosting on top. Repeat layers until the jars are filled, finishing with a swirl of frosting on top.
- Decorate: Decorate with Halloween sprinkles. Close jars with lids if transporting or serve immediately.
Notes
- Use any cake flavor you like — vanilla or red velvet work great too.
- Add gummy worms or candy eyes for extra spooky fun.
- Cakes can be made a day ahead and stored in the fridge.
- Prep Time: 30 minutes
- Cook Time: 25 minutes
- Category: Dessert
- Method: Baking
- Cuisine: American
Nutrition
- Serving Size: 1 jar cake
- Calories: 600
- Sugar: 65g
- Sodium: 380mg
- Fat: 28g
- Saturated Fat: 16g
- Unsaturated Fat: 12g
- Trans Fat: 0g
- Carbohydrates: 86g
- Fiber: 2g
- Protein: 4g
- Cholesterol: 85mg

