
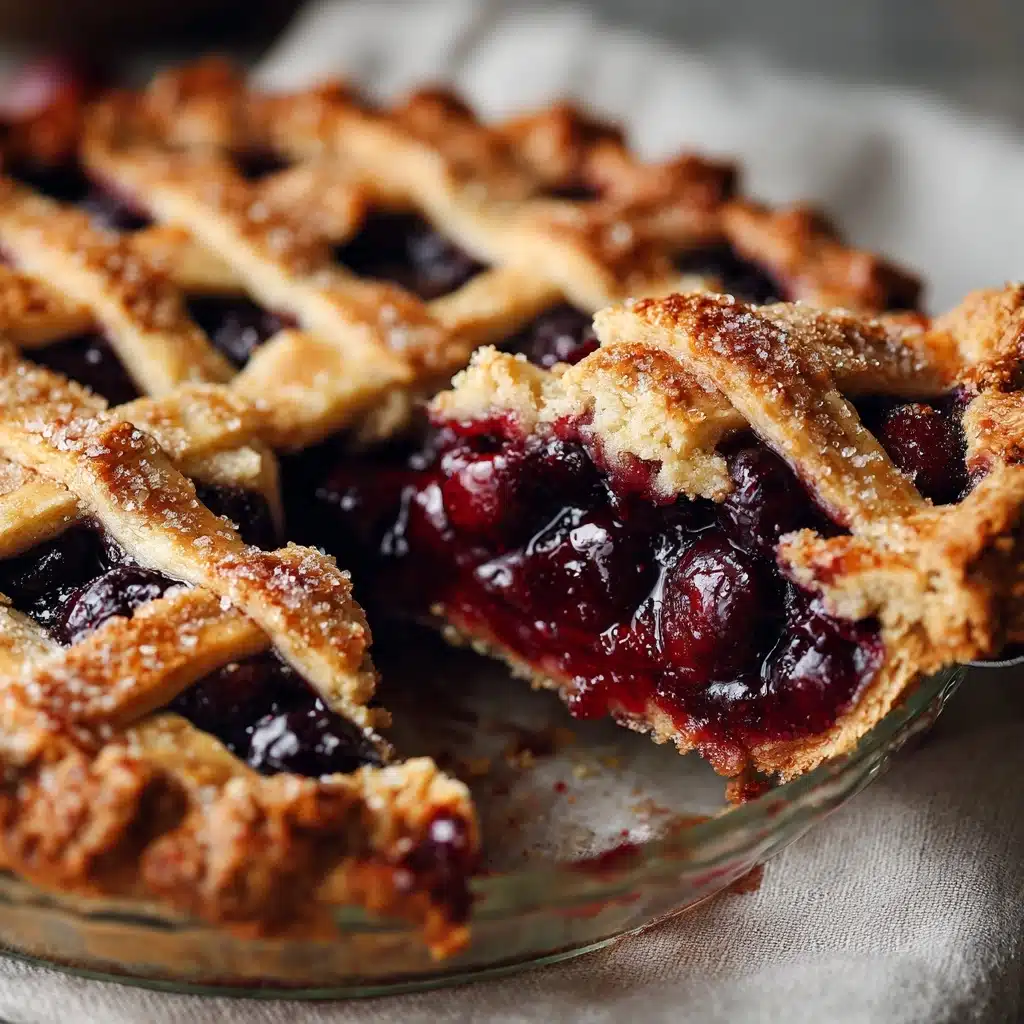
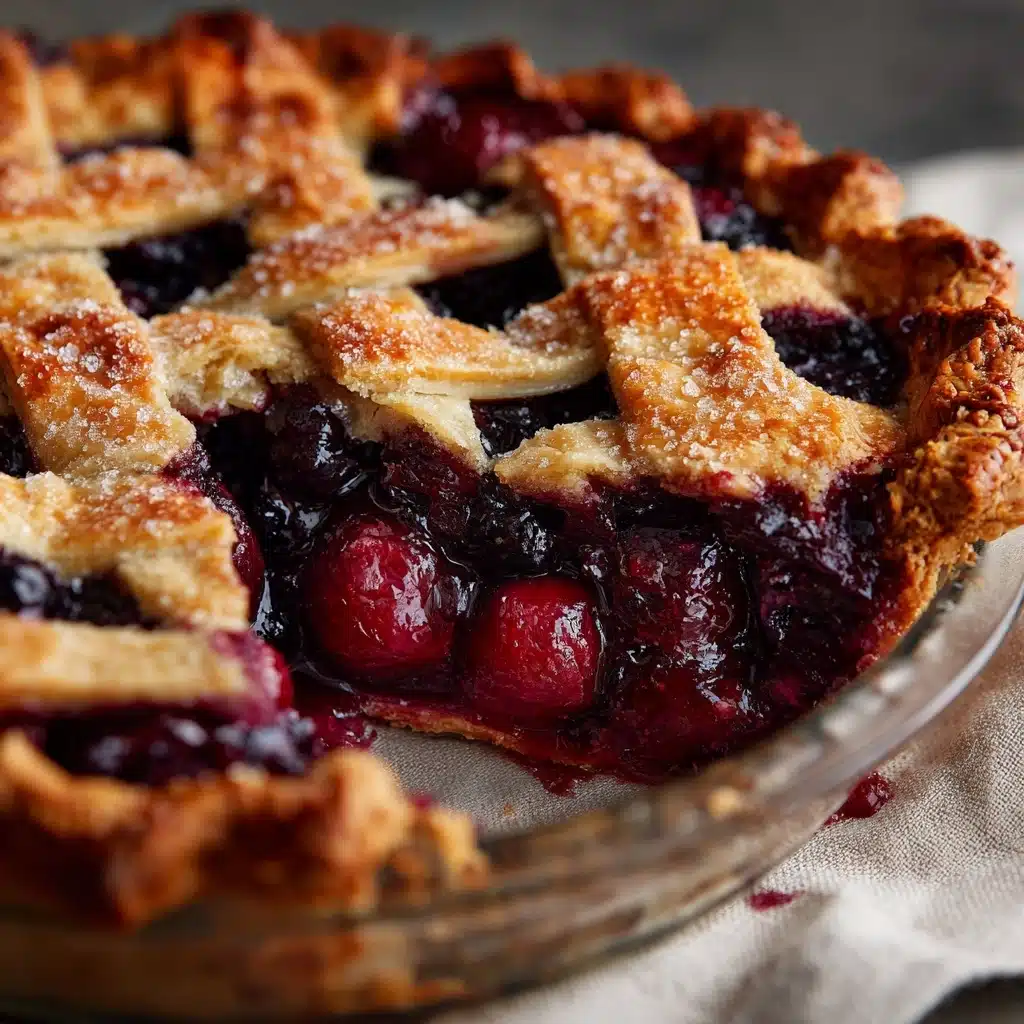
If there’s a single dessert that truly captures the flavor and nostalgia of summer, it’s Homemade Cherry Pie (With Thick Filling). This recipe delivers everything you crave in a classic cherry pie: a flaky, buttery crust brimming with tart cherries, their juices transformed into a lusciously thick filling that holds its shape with every slice. Each bite is a celebration of ruby-red goodness, brightened with lemon, kissed with almond, and wrapped in the simple joy of baking from scratch (or at least, making it taste that way).
Ingredients You’ll Need
Every component of this cherry pie plays a vital role in crafting its unforgettable flavor and texture. From tangy cherries to wholesome pie crusts, these ingredients come together to create magic—so don’t skip a thing!
- Pie Crusts: Two 9-inch rounds (store-bought or homemade) provide that all-important base and beautiful top for your filling.
- Fresh or Frozen Tart Cherries: Six cups of tart cherries bring mouthwatering zing and perfect texture—frozen work well, just thaw and drain thoroughly.
- Granulated Sugar: Just enough sweetness (1 cup) to balance the cherries’ tang without overpowering their natural flavor.
- Cornstarch: A quarter cup is the secret to an irresistibly thick, sliceable filling—don’t be tempted to skimp if you love a pie that holds together.
- Lemon Juice: One tablespoon adds brightness and depth, enhancing the natural cherry flavor.
- Almond Extract: That classic cherry pie aroma comes from just half a teaspoon—be careful, a little goes a long way!
- Ground Cinnamon: A quarter teaspoon for a subtle background warmth—such a small amount, but it truly rounds out the flavor.
- Unsalted Butter: One tablespoon, dotted over the filling, adds a glossy richness as the pie bakes.
- Egg: One egg, beaten with a splash of water, creates a shiny, golden crust when brushed on top.
- Coarse Sugar (optional): A sprinkle on the crust gives your Homemade Cherry Pie (With Thick Filling) a delightful sparkle and sweet crunch.
How to Make Homemade Cherry Pie (With Thick Filling)
Step 1: Prep Your Oven and Cherries
Preheat your oven to 400°F (200°C). If you’re working with frozen cherries, make sure they’re fully thawed and drained so your filling won’t turn watery. This little bit of prep makes all the difference in achieving that legendary, thick texture!
Step 2: Cook the Cherry Filling
Grab a large saucepan and combine the cherries, granulated sugar, cornstarch, lemon juice, almond extract, and ground cinnamon. Cook this enticing mixture over medium heat, stirring often, until it thickens beautifully and starts to bubble—about 8 to 10 minutes. You’ll see the juices go from thin and runny to glossy and substantial. Take it off the heat and let it cool slightly; this helps your crust stay crisp.
Step 3: Assemble the Pie
Roll out your first pie crust and carefully fit it into a 9-inch pie dish, smoothing it up the sides. Spoon in that thick, fragrant cherry filling, making sure to get every luscious bit. Dot the top with small pieces of unsalted butter—these melt into the filling, adding depth and a silky feel with every bite.
Step 4: Top It Off
Now, for the top crust: you can lay it on whole, cutting a few small slits for steam to escape, or get fancy and weave a lattice using strips of dough. Both are wonderful, so do what feels right. Trim and crimp the edges to seal everything in. Whisk your egg and brush it all over the top crust, then sprinkle with coarse sugar if you’re feeling extra indulgent. That glossy, crunchy finish will dazzle everyone.
Step 5: Bake and Cool for Perfect Slices
Set your pie on a baking sheet (to catch stray juices) and bake for 40 to 45 minutes. The crust should be irresistibly golden, and the filling will be bubbling at the edges. Here’s the hard part: let the pie cool completely—ideally several hours. This is essential for getting that signature thick filling that doesn’t spill all over your plate. Patience is so worth it!
How to Serve Homemade Cherry Pie (With Thick Filling)
Garnishes
Nothing beats the classic look of a slice of Homemade Cherry Pie (With Thick Filling) crowned with a dollop of whipped cream or a scoop of vanilla ice cream. You can also add a sprinkle of toasted almond slivers or a dusting of powdered sugar for a simple, elegant touch.
Side Dishes
For a full dessert spread, pair your cherry pie with freshly brewed coffee or cold milk. A citrusy fruit salad or even a handful of dark chocolate squares on the side make for a decadent pairing that brings out the pie’s tart and sweet flavors.
Creative Ways to Present
Consider serving the pie slightly warm in individual ramekins for a rustic, homestyle feel. If you’re hosting a party, cut the pie into small bars for a dessert buffet. You can even try topping slices with a drizzle of cherry syrup, a few fresh cherries, or pieces of dark chocolate for a gourmet twist!
Make Ahead and Storage
Storing Leftovers
Once thoroughly cooled, cover any leftover pie tightly with plastic wrap or aluminum foil and store it in the refrigerator. It will keep fresh for up to 4 days and actually tastes even better the next day as the flavors mingle and the filling sets even more.
Freezing
This Homemade Cherry Pie (With Thick Filling) freezes beautifully. After baking and cooling, wrap the pie (or individual slices) tightly in two layers of plastic wrap and one layer of foil. Store for up to three months. To thaw, simply leave in the refrigerator overnight—easy as pie!
Reheating
To enjoy a slice warm, place it on a baking sheet and warm in a 325°F (165°C) oven for 10 to 15 minutes. You can also microwave a single slice for about 20 seconds, but the oven keeps the crust crisp and flaky, just as it should be.
FAQs
What if I only have sweet cherries instead of tart?
Sweet cherries absolutely work! Just reduce the sugar to about 2/3 cup, since sweet cherries are, well, sweeter. The pie won’t have the same tang but will still be delicious with a rich, fruit-forward flavor.
Can I use canned cherries for Homemade Cherry Pie (With Thick Filling)?
Yes, you can! If using canned cherries, make sure to use cherries packed in water or juice, not syrup. Drain them well and adjust sugar as needed to suit your taste.
How do I prevent my filling from being runny?
The key to a thick filling is draining your cherries thoroughly and using enough cornstarch. If your cherries are especially juicy, add an extra tablespoon of cornstarch to really lock in that luscious, set texture.
Should I blind-bake the pie crust?
For Homemade Cherry Pie (With Thick Filling), there’s no need to blind-bake the crust; the thickened filling and long bake time ensure the bottom crust cooks through and stays beautifully golden.
Can I make the filling ahead and assemble the pie later?
Absolutely! You can prepare the cherry filling up to two days in advance, store it in an airtight container in the fridge, and assemble the pie when ready to bake for ultimate convenience and flavor.
Final Thoughts
This Homemade Cherry Pie (With Thick Filling) is pure comfort and cheer in every bite, a showcase for fresh cherries and sweet summer memories. Whether you’re baking for family, friends, or just yourself, you’ll love how simple, beautiful, and celebratory this recipe feels. Gather your ingredients and treat yourself—your new favorite pie awaits!
Print
Homemade Cherry Pie (With Thick Filling) Recipe
- Total Time: 4 hours
- Yield: 8 servings 1x
- Diet: Vegetarian
Description
Indulge in the deliciousness of this homemade cherry pie with a thick, flavorful filling that’s sure to be a hit at any gathering. Perfect for showcasing fresh or frozen tart cherries in a buttery, flaky crust.
Ingredients
Pie Crust:
- 2 9-inch pie crusts (store-bought or homemade)
Cherry Filling:
- 6 cups fresh or frozen tart cherries (pitted)
- 1 cup granulated sugar
- 1/4 cup cornstarch
- 1 tablespoon lemon juice
- 1/2 teaspoon almond extract
- 1/4 teaspoon ground cinnamon
- 1 tablespoon unsalted butter (cut into small pieces)
- 1 egg (for egg wash)
- 1 tablespoon coarse sugar (optional, for topping)
Instructions
- Preheat the Oven: Preheat the oven to 400°F (200°C).
- Prepare Cherry Filling: Combine cherries, sugar, cornstarch, lemon juice, almond extract, and cinnamon in a saucepan. Cook until thickened.
- Assemble Pie: Line pie dish with crust, add filling, top with second crust or lattice. Brush with egg wash and sugar.
- Bake: Bake for 40–45 minutes until golden and bubbly. Cool before serving.
Notes
- Best with sour (Montmorency) cherries
- Add extra cornstarch for juicy cherries
- Prep Time: 30 minutes
- Cook Time: 45 minutes
- Category: Dessert
- Method: Baking
- Cuisine: American
Nutrition
- Serving Size: 1 slice
- Calories: 370
- Sugar: 27g
- Sodium: 160mg
- Fat: 17g
- Saturated Fat: 6g
- Unsaturated Fat: 9g
- Trans Fat: 0g
- Carbohydrates: 52g
- Fiber: 2g
- Protein: 4g
- Cholesterol: 35mg

