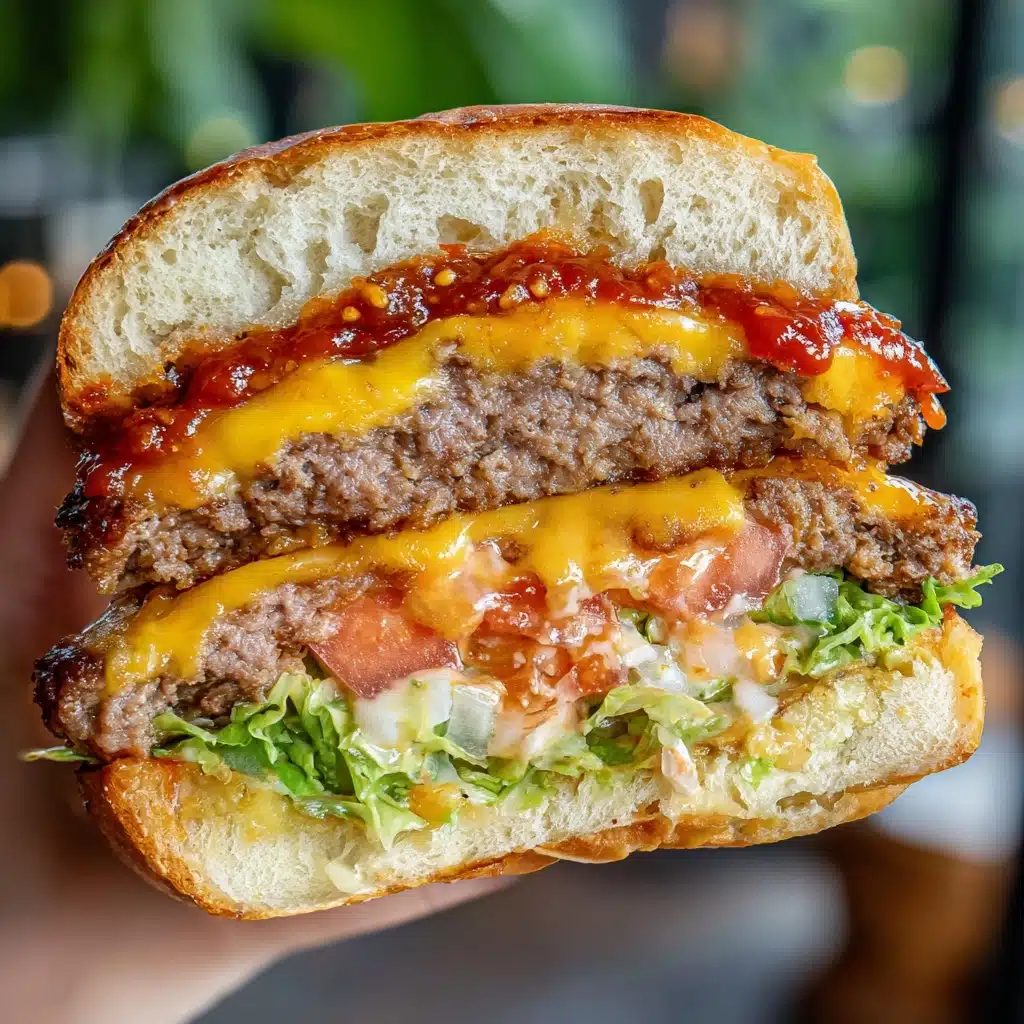
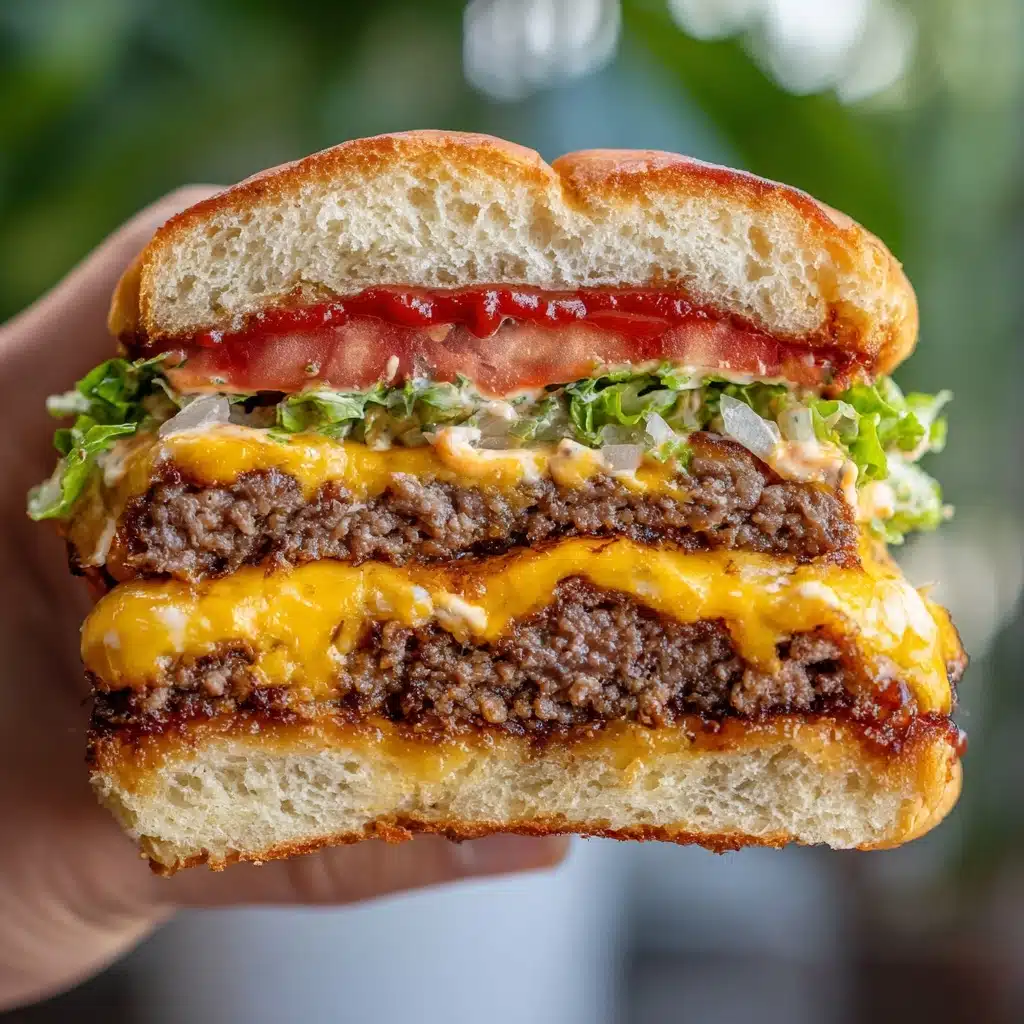
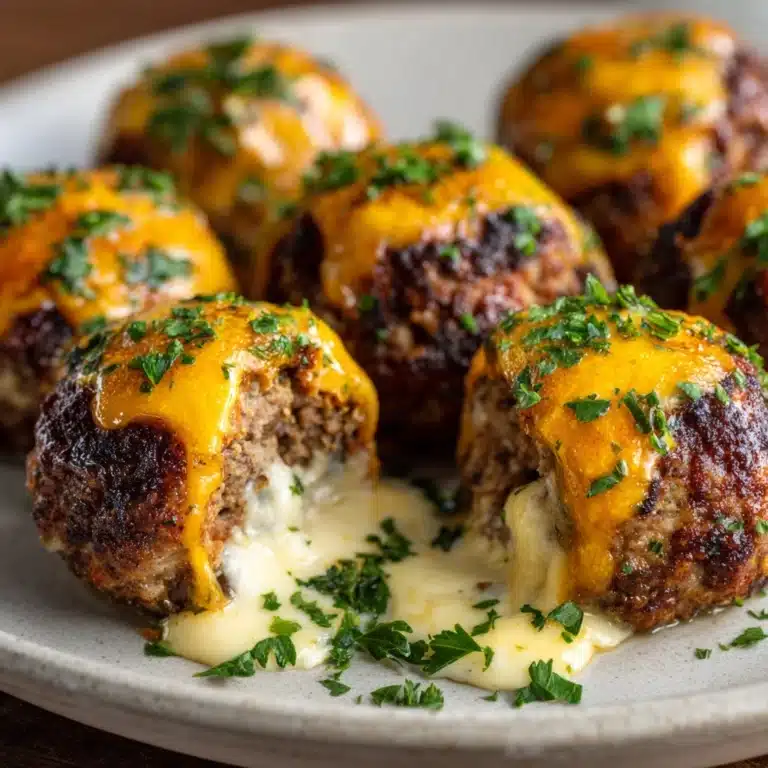
If you’ve ever craved the ultimate cheese-stuffed burger, you’re in for a treat with the legendary Juicy Lucy! This mouthwatering creation is all about an oozy, molten core of sharp cheddar cheese encased perfectly in a tender, well-seasoned beef patty. Every single bite bursts with gooey cheese, juicy burger flavor, and classic toppings, making it an irresistible star at any cookout or dinner table. Whether you’re bringing friends together for a weekend grill-a-thon or simply jazzing up weeknight meals, the Juicy Lucy is the showstopper burger you’ll want to make again and again.
Ingredients You’ll Need
The magic of the Juicy Lucy lies in just a handful of well-chosen, fresh ingredients. Every component serves a purpose, coming together to create that signature melty center, juicy texture, and crave-worthy finish.
- Ground beef (80/20): This ratio delivers the optimum balance of juiciness and flavor, keeping your patties moist and tender.
- Salt: Essential for seasoning the beef and highlighting those rich, savory notes.
- Black pepper: Adds just enough gentle heat and depth to round out the burger’s flavor.
- Sharp cheddar cheese (cubed): The star ingredient for that gooey, molten center—using cubes ensures even meltiness.
- Hamburger buns: Choose soft, sturdy buns that can hold up to all that juicy goodness and cheese.
- Vegetable oil: A splash coats your pan or grill, helping achieve a beautiful sear without sticking.
- Sliced pickles: Their briny crunch is a classic counterpoint to rich beef and cheese.
- Sliced red onion: Adds a bite of sharpness and lovely color to every burger.
- Lettuce: Crisp and refreshing—perfect for balancing all those bold flavors.
- Tomato slices: Juicy, sweet slices add freshness and color to your Juicy Lucy.
- Ketchup and mustard: The classic finishing touches for that burger-shop nostalgia.
How to Make Juicy Lucy
Step 1: Shape and Flatten the Patties
Start by dividing your ground beef into eight equal portions. This keeps your patties uniform, which means even cooking and plenty of space to hide a generous amount of cheese. Flatten each portion into a thin patty, aiming for roughly the size of your palm—remember, you’ll be stacking two together for that iconic cheese-stuffed effect. A gentle touch helps keep the beef tender, which is exactly what you want for your Juicy Lucy adventure!
Step 2: Add the Cheesy Center
Place a cube or two of sharp cheddar cheese right in the center of half of your patties. The cheese cubes are the magic here—they melt slowly, creating a pool of gooey deliciousness at the heart of your burger. This is what sets a Juicy Lucy apart from any regular cheeseburger.
Step 3: Seal and Season the Patties
Top each cheesy patty with a second patty and gently pinch the edges all around to seal in that cheesy treasure. Take your time—press tightly to avoid any leaks during cooking. Once sealed, season both sides with salt and pepper to bring out all the savory flavors in your Juicy Lucy patties.
Step 4: Cook to Perfection
Heat your skillet or grill pan over medium-high heat and add a drizzle of vegetable oil. Cook each Juicy Lucy for about 4 to 5 minutes per side. Don’t press down on the burgers—this keeps all the delicious cheese inside and ensures your patties stay juicy. You’re aiming for beef that’s cooked through and cheese that’s irresistibly melty.
Step 5: Rest, Assemble, and Enjoy
Let the burgers rest a few minutes after cooking so the cheese settles just enough (this prevents molten cheese eruptions!). Toast the buns if you like, then pile each Juicy Lucy high with your favorite toppings: crisp lettuce, juicy tomato, crunchy pickles, zingy onions, and a swipe of ketchup and mustard. Serve right away for the most satisfying cheese-pull moment!
How to Serve Juicy Lucy

Garnishes
Fresh garnishes make every Juicy Lucy pop! Add a leaf or two of iceberg lettuce for supreme crunch, a slice of ripe tomato, and a scattering of sliced red onion and pickles. For those who crave even more flavor, try a dollop of tangy burger sauce or an extra slice of sharp cheddar on the bun.
Side Dishes
The Juicy Lucy loves good company. Classic choices like crispy fries, tater tots, or a cool potato salad are always crowd-pleasers. If you’re feeling a bit fancy, serve alongside homemade coleslaw, grilled corn on the cob, or even a refreshing cucumber salad to balance the indulgence.
Creative Ways to Present
A Juicy Lucy doesn’t need much help to dazzle, but a few creative touches can make it feel extra special. Try serving each burger on a wooden board with all the toppings laid out for a DIY assembly station. Stack your Juicy Lucy tall with colorful layers or use mini buns for fun, party-sized sliders. And for a family meal, offer a build-your-own Juicy Lucy night—everyone will love making their perfect burger creation.
Make Ahead and Storage
Storing Leftovers
If you find yourself with leftover Juicy Lucy burgers, let them cool slightly, then wrap each tightly in foil or plastic wrap. Store in an airtight container in the refrigerator for up to 3 days. Keep garnishes and buns separate to maintain freshness and crispness.
Freezing
To freeze Juicy Lucy patties before or after cooking, wrap each tightly in plastic, then place in a freezer bag or airtight container. Raw, cheese-stuffed patties can be frozen for up to 2 months. Make sure to thaw overnight in the refrigerator before cooking or reheating.
Reheating
For the best results, reheat cooked Juicy Lucy burgers in a skillet over medium-low heat, covered, until warmed through and the cheese is once again melted. You can also wrap in foil and warm in a 350°F oven for about 10 minutes. Microwaving works in a pinch, but go slowly so the cheese heats evenly.
FAQs
What makes a Juicy Lucy different from a regular cheeseburger?
Unlike a classic cheeseburger where the cheese is placed on top, a Juicy Lucy features cheese tucked inside the burger patty. As it cooks, the cheese melts into a luscious, gooey center, making every bite truly unforgettable.
Can I use a different type Main Course
Absolutely! While sharp cheddar is the traditional choice, you can experiment with Swiss, pepper jack, mozzarella, or even a mix of cheeses for unique flavor twists. Just be sure to use cheese that melts well.
How do I keep the cheese from leaking out?
The key is to carefully seal the edges of your patties by pinching them tight all around. Pressing the seam a second time after shaping helps. Also, avoid pressing down on the burgers while they cook, so the cheese stays securely inside.
Can I make Juicy Lucy burgers on the grill?
Yes, Juicy Lucy burgers turn out fabulously on the grill! Just make sure your patties are well-sealed and flip carefully. If you’re worried about cheese leakage, start them over indirect heat before finishing with a quick sear.
Is it safe to eat burgers with melted cheese inside?
It’s perfectly safe as long as the beef is cooked to at least 160°F. Letting the burgers rest for a few minutes after cooking also allows the cheese to set slightly and prevents burns from molten cheese.
Final Thoughts
If your mouth isn’t watering yet, just wait until you try your first bite of a homemade Juicy Lucy. It’s a burger experience unlike any other—bursting with creamy, molten cheese and so much juicy beef flavor. Gather your favorite people, lay out the toppings, and get ready for a burger night that’ll have everyone coming back for seconds!
Print
Juicy Lucy Recipe
- Total Time: 25 minutes
- Yield: 4 servings 1x
- Diet: Non-Vegetarian
Description
Learn how to make a Juicy Lucy, a delicious cheese-stuffed burger that oozes with flavor. This homemade burger recipe is perfect for a quick and satisfying meal.
Ingredients
- 1 1/2 pounds ground beef (80/20)
- 1 teaspoon salt
- 1/2 teaspoon black pepper
- 4 ounces sharp cheddar cheese, cut into cubes
- 4 hamburger buns
- 1 tablespoon vegetable oil
- Sliced pickles, sliced red onion, lettuce, tomato slices, ketchup, and mustard for serving
Ground Beef Patties:
Cheese Filling:
Additional Ingredients:
Instructions
- Prepare the Patties: Divide the ground beef into 8 equal portions and flatten into thin patties. Place cheddar cheese in the center of 4 patties and top with another patty, sealing the edges tightly. Season with salt and pepper.
- Cook the Burgers: Heat oil in a skillet over medium-high heat. Cook burgers for 4-5 minutes per side until cooked through and cheese is melted. Let rest.
- Assemble: Toast buns if desired. Add favorite toppings like pickles, red onion, lettuce, tomato, ketchup, and mustard to each burger. Serve hot.
Notes
- Ensure patties are sealed well to prevent cheese leakage.
- Experiment with different cheeses for varied flavors.
- Prep Time: 15 minutes
- Cook Time: 10 minutes
- Category: Main Course
- Method: Grilling or Stovetop
- Cuisine: American
Nutrition
- Serving Size: 1 burger
- Calories: 630
- Sugar: 5g
- Sodium: 720mg
- Fat: 40g
- Saturated Fat: 18g
- Unsaturated Fat: 18g
- Trans Fat: 1g
- Carbohydrates: 26g
- Fiber: 1g
- Protein: 41g
- Cholesterol: 140mg
