
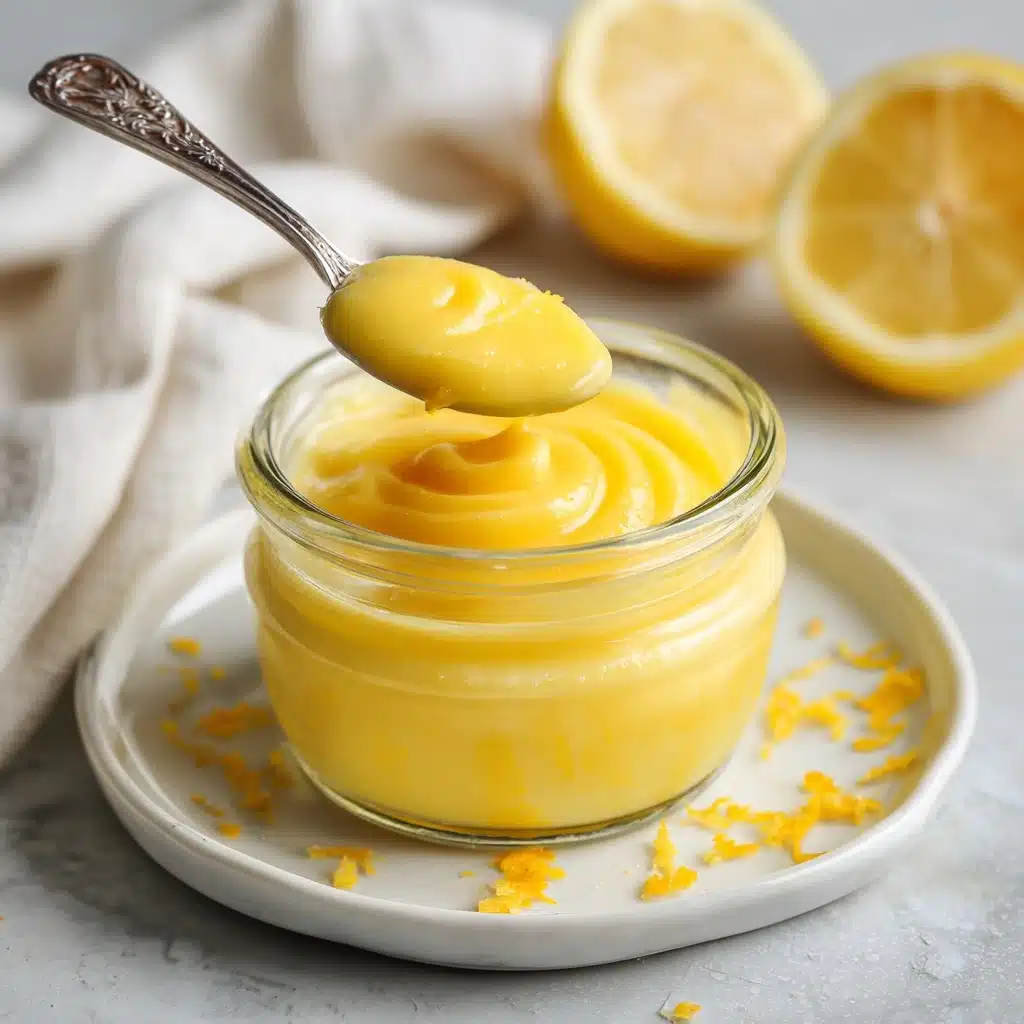
Bright, buttery, and irresistibly tangy, lemon curd is the ultimate citrus treat that simply makes everything better. With its stunning lemon-yellow hue and the perfect balance of sweet and tart, lemon curd perks up anything it touches—whether spooned over scones and pancakes, layered in cakes, or simply enjoyed by the spoonful (my personal favorite!). If you love homemade spreads, this classic British favorite will win your heart, and you’ll quickly see why making your own lemon curd from scratch is a complete game changer.
Ingredients You’ll Need
You only need a handful of fresh, simple ingredients to make a lusciously smooth lemon curd. Each one plays a starring role: from the lemons that provide a vibrant, tangy base, to the eggs and butter that lend rich, creamy texture and that glossy finish you just can’t get from store-bought versions.
- Fresh lemon juice: The backbone of the recipe, delivering bold, bright citrus flavor—you’ll need about 2-3 juicy lemons for 1/2 cup.
- Lemon zest: Adds intense lemony aroma and an extra layer of zing; always zest before you juice!
- Granulated sugar: Balances the tartness and creates that gorgeous, sweet counterpoint to all the citrus.
- Large eggs: Essential for thickening the curd; they give it that velvety, spreadable texture.
- Unsalted butter: Cut into small pieces to melt smoothly into the warm curd, butter provides richness and that signature silky body.
- Pinch of salt: Just enough to sharpen and round out all the flavors—don’t skip it!
How to Make Lemon Curd
Step 1: Whisk Together the Base
Start by grabbing a medium heatproof bowl for easy whisking and even heating. Add the fresh lemon juice, vibrant lemon zest, granulated sugar, eggs, and that little pinch of salt. Whisk everything together until the mixture is completely smooth and the sugar has begun to dissolve. Take your time here—a silky start means your lemon curd will come out beautifully creamy in the end!
Step 2: Set Up a Double Boiler
Place the bowl with your whisked mixture over a pot of simmering water, making sure the water doesn’t touch the bottom of the bowl. This gentle heat keeps the eggs from scrambling and ensures your curd thickens slowly and evenly. If you don’t have a double boiler, resting the bowl in a saucepan works perfectly—the steam does all the magic!
Step 3: Cook and Whisk
Now, whisk constantly as the mixture cooks over the simmering water. This step takes about 10-12 minutes, so keep that whisk moving to avoid any lumps or cooked egg bits. You’ll know it’s ready when the mixture thickens enough to coat the back of a spoon. The moment of transformation is pure satisfaction—don’t rush it!
Step 4: Add Butter for Creaminess
Take the bowl off the heat and start adding in your butter, just a few pieces at a time. Whisk until each piece has melted before adding more. The butter melts into the warm curd, creating a glossy, rich, and utterly luscious texture. Your kitchen will smell like a lemony dream!
Step 5: Strain and Cool
Pour your fresh lemon curd through a fine-mesh sieve into a clean jar or bowl. This removes any bits of zest or stray egg, leaving you with a beautifully smooth spread. Let the curd cool at room temperature, then cover and refrigerate until it sets—it thickens more as it chills, so patience pays off!
How to Serve Lemon Curd

Garnishes
Dress up your lemon curd with a scattering of thinly sliced candied lemon peel, a few fresh raspberries, or even a dollop of whipped cream. These simple additions make each serving feel special and highlight the curd’s brilliant yellow glow.
Side Dishes
Lemon curd is made for breakfast and brunch spreads! Spoon it over fluffy pancakes, spread it atop freshly baked scones, or swirl it into Greek yogurt for a citrusy twist on your morning routine. It also pairs beautifully as a topping for pound cake or angel food cake at dessert.
Creative Ways to Present
Let your imagination run wild! Use lemon curd to fill tart shells for a classic lemon tart, sandwich between layers of vanilla sponge cake, or fill cupcakes for a burst of flavor. For a show-stopping finale at a dinner party, serve in tiny glass jars with little shortbread cookies on the side—the pop of color always gets rave reviews!
Make Ahead and Storage
Storing Leftovers
Homemade lemon curd keeps beautifully in the refrigerator. Transfer it to a clean jar or airtight container and store for up to 2 weeks. The flavor actually deepens after a day, so it’s a perfect make-ahead treat for busy weeks or special occasions.
Freezing
You can absolutely freeze lemon curd! Let it cool completely, then place it in a freezer-safe container, leaving a little room for expansion. It keeps well for up to 3 months. Thaw overnight in the fridge before using, and give it a good stir for the best texture.
Reheating
If your lemon curd thickens a bit too much in the fridge or after freezing, gently warm it in a heatproof bowl set over simmering water, whisking until loosened. Be careful not to overheat—just a gentle warming will bring it back to its silky, spreadable self.
FAQs
Why did my lemon curd turn out runny?
If your lemon curd is on the thin side, it likely didn’t cook quite long enough. Keep whisking over gentle heat and check that it’s thick enough to coat the back of a spoon before removing from the heat. It will thicken more as it cools, but proper cooking is key!
Can I use bottled lemon juice instead of fresh?
Fresh lemon juice is best for both flavor and bright color in homemade lemon curd, but in a pinch, bottled will work—just know that the flavor may be less vibrant. Always use fresh zest for maximum zing!
Is it safe to eat lemon curd with eggs?
Absolutely! The eggs in lemon curd are gently cooked over simmering water, reaching a safe temperature to enjoy. As long as you follow the steps and don’t rush, the final spread will be silky smooth and perfectly safe to eat.
What if my curd looks lumpy?
No worries! That’s what the straining step is for. Pour your finished lemon curd through a fine mesh sieve to catch any lumps, leaving you with a flawlessly smooth texture. Consistent whisking during cooking helps prevent lumps, too.
How do I use leftover lemon curd?
Leftover lemon curd is pure gold in the kitchen! Swirl it into yogurt, layer it in parfaits, drizzle it over waffles, or even use it as a filling for thumbprint cookies. The possibilities are as boundless as your creativity.
Final Thoughts
If you’ve never made lemon curd before, you’re in for a treat that goes way beyond the jarred kind at the grocery store. Give it a try—you’ll be amazed at how simple, rewarding, and incredibly delicious homemade lemon curd can be. Happy citrus cooking!
Print
Lemon Curd Recipe
- Total Time: 17 minutes
- Yield: 1 cup 1x
- Diet: Vegetarian
Description
Learn how to make a delicious and tangy Lemon Curd at home with this easy recipe. Perfect as a spread, filling, or topping!
Ingredients
Lemon Curd Ingredients:
- 1/2 cup fresh lemon juice (about 2–3 lemons)
- 1 tablespoon lemon zest
- 3/4 cup granulated sugar
- 3 large eggs
- 6 tablespoons unsalted butter, cut into small pieces
- Pinch of salt
Instructions
- Prepare the Lemon Curd: In a medium heatproof bowl, whisk together lemon juice, lemon zest, sugar, eggs, and salt until smooth.
- Cook the Mixture: Place the bowl over a pot of simmering water to create a double boiler. Whisk constantly for 10-12 minutes until thickened.
- Whisk in Butter: Remove from heat and gradually whisk in butter pieces until melted and smooth.
- Strain and Chill: Pour the curd through a sieve into a clean jar. Cool to room temperature, then refrigerate until set.
Notes
- Lemon curd keeps well in the fridge for up to 2 weeks.
- Use as a spread, tart filling, or topping for scones and pancakes.
- Prep Time: 5 minutes
- Cook Time: 12 minutes
- Category: Condiment
- Method: Stovetop
- Cuisine: British
Nutrition
- Serving Size: 2 tablespoons
- Calories: 90
- Sugar: 10g
- Sodium: 20mg
- Fat: 5g
- Saturated Fat: 3g
- Unsaturated Fat: 1.5g
- Trans Fat: 0g
- Carbohydrates: 11g
- Fiber: 0g
- Protein: 1g
- Cholesterol: 55mg


