
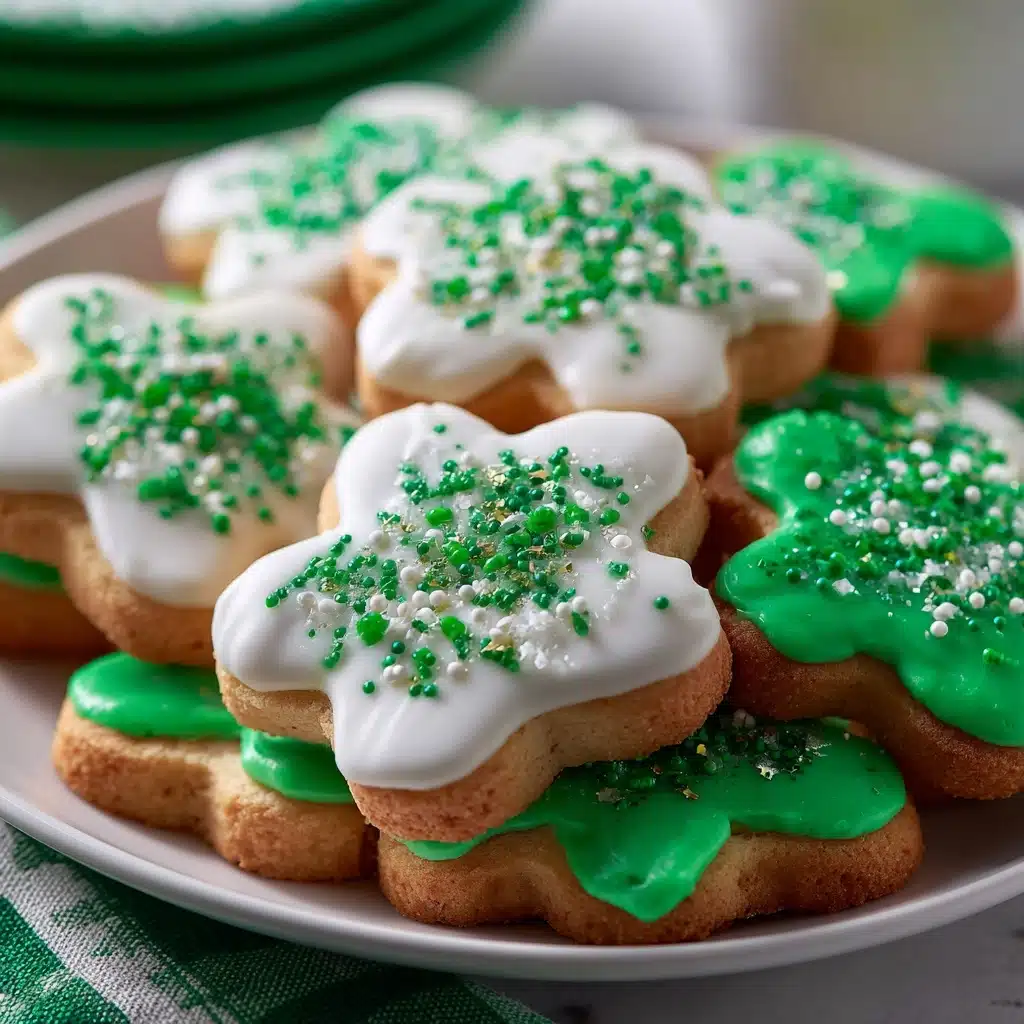
If you’re after a treat that combines cheerful colors, creamy white chocolate, and a burst of sweet, buttery flavor, Pot of Gold Cookies are about to become your new favorite. These festive cookies capture the magic of rainbows and the thrill of finding “gold,” thanks to candy-coated chocolates and a generous shower of sprinkles. Whether you’re baking for St. Patrick’s Day, a birthday bash, or just feel like delighting someone special, this recipe never fails to bring big smiles (and requests for more!).
Ingredients You’ll Need
Baking Pot of Gold Cookies is a breeze, and each ingredient plays an essential role—some for perfect texture, others for that sparkle of color or extra dose of sweetness. Here’s your magical lineup:
- Unsalted butter: Always start with softened butter; it creates the tender, melt-in-your-mouth cookie base we all crave.
- Granulated sugar: Brings sweetness and helps the cookies achieve lightly crisp edges.
- Light brown sugar: Adds a touch of extra richness and subtle caramel notes that elevate the flavor.
- Egg: Binds everything together for a chewy, perfectly structured cookie.
- Vanilla extract: A must for deep, aromatic flavor that rounds out the sweetness.
- All-purpose flour: Sets the stage with a classic, reliable base for the cookies.
- Baking soda: Lends just the right amount of lift for a beautifully soft yet sturdy texture.
- Salt: Balances all the sweet elements and makes the flavors pop.
- White chocolate chips: Creamy pops of sweetness that pair perfectly with colorful candies and sprinkles.
- Rainbow sprinkles or colored sugar: Delivers bright, cheerful pops of color in every bite—a must for that magical look.
- Yellow or gold candy-coated chocolates: These represent the “pot of gold” and add fun crunch; choose your favorites like M&M’s or Sixlets.
- Edible gold glitter or shimmer dust (optional): For that extra sparkle and a professional, party-worthy finish.
How to Make Pot of Gold Cookies
Step 1: Cream the Butter and Sugars
Begin by preheating your oven to 350°F (175°C) and lining a baking sheet with parchment paper. In a large mixing bowl, cream together the softened unsalted butter, granulated sugar, and light brown sugar until the mixture is pale and fluffy. This step is the secret to achieving that perfectly tender cookie texture, so don’t rush it! I recommend using an electric mixer for the best results.
Step 2: Add the Egg and Vanilla
Once your butter and sugars are dreamy and well-combined, beat in the egg and vanilla extract. Mix until everything is thoroughly blended. This ensures you get a cohesive dough that holds its festive mix-ins with every scoop.
Step 3: Combine the Dry Ingredients
In a separate bowl, whisk together the all-purpose flour, baking soda, and salt. This simple step helps distribute the leavening and seasoning evenly, so every Pot of Gold Cookie puffs up just right with balanced flavor.
Step 4: Mix Wet and Dry Together
Gradually add the dry ingredients to the wet mixture, mixing on low speed or by hand just until combined. Take care not to overmix—this keeps the cookies soft and rich. The dough will look thick and a little sticky, which is exactly what you want!
Step 5: Fold in the White Chocolate and Sprinkles
Now for the fun part: gently fold in your white chocolate chips and a generous scoop of rainbow sprinkles or colored sugar. Each swirl brings a promise of color and a burst of creamy sweetness, capturing the playful spirit of Pot of Gold Cookies.
Step 6: Shape and Decorate
Scoop the cookie dough into tablespoon-sized balls and arrange them on your prepared baking sheet, leaving about 2 inches between each for spreading. Press 2–3 yellow or gold candy-coated chocolates gently into the top of each dough ball—this is your pile of “gold” at the end of the rainbow!
Step 7: Bake and Cool
Slide the tray into your preheated oven and bake for 9–11 minutes, just until the edges are set and the centers remain a little soft. This ensures the cookies stay chewy and melt-in-the-mouth. Let them cool on the baking sheet for 5 minutes (they’ll firm up a bit), then transfer to a wire rack. While they cool, you can sprinkle on edible gold glitter or shimmer dust for a magical finishing touch.
How to Serve Pot of Gold Cookies

Garnishes
A light dusting of edible gold glitter takes these cookies from festive to showstopping! You can also roll the edges in extra sprinkles or green sanding sugar if you want to ramp up the color for a party or holiday table. Don’t be shy—the more sparkle, the more smiles!
Side Dishes
For a party platter, pair Pot of Gold Cookies with bowls of fresh fruit, scoops of vanilla ice cream, or even a pitcher of cold milk. They’re just as fun alongside a hot cup of coffee or hot chocolate, making them suitable for both kid-friendly gatherings and grown-up get-togethers.
Creative Ways to Present
For St. Patrick’s Day, try serving your Pot of Gold Cookies in a “treasure chest” box or atop a rainbow-colored napkin. Package them in cellophane bags tied with gold ribbon for sweet gifts. You can even create a DIY cookie bar where guests can dust their own cookies with extra shimmer dust or customize with other toppings!
Make Ahead and Storage
Storing Leftovers
Pot of Gold Cookies stay fresh and delicious for up to five days when stored in an airtight container at room temperature. Just make sure the cookies are fully cooled before you seal them up, so they keep their lovely texture.
Freezing
If you want to get a head start, freeze the dough balls (minus the candy toppings) on a baking sheet until firm, then transfer them to a zip-top bag for up to three months. Just add the candy and bake straight from the freezer, adding an extra couple of minutes to the bake time—they’ll taste perfectly fresh!
Reheating
To recreate that just-baked warmth, pop a cookie in the microwave for about 10 seconds. The white chocolate will go slightly gooey again, and the aromas will fill your kitchen as if you just pulled them from the oven.
FAQs
Can I use regular milk chocolate chips instead of white chocolate?
Absolutely! While white chocolate keeps things sweet and colorful, milk or dark chocolate chips also taste wonderful and give a more classic cookie bite.
What’s the best way to get vibrant “gold” on top of the Pot of Gold Cookies?
I love using yellow or gold candy-coated chocolates like M&M’s or Sixlets, and a little edible gold shimmer dust on warm cookies is the ultimate finishing touch for that golden look.
Can I make Pot of Gold Cookies ahead of time for a party?
Definitely. You can prepare the dough and freeze it, or bake the cookies up to a couple of days ahead. Store them in an airtight container, and they’ll taste like they were baked that morning!
Do I really need to chill the dough?
In this recipe, chilling isn’t necessary, but if you want slightly thicker cookies, pop the shaped dough balls into the fridge for 15–30 minutes before baking.
Are Pot of Gold Cookies safe for kids with nut allergies?
The recipe itself contains no nuts, but always check your candy toppings and chocolate chips for allergy information; manufacturing facilities sometimes process nuts in the same facility.
Final Thoughts
If you’re looking for a treat that delivers color, crunch, and a sprinkle of fun, Pot of Gold Cookies are truly a treasure in every bite. Bake a batch to spread joy at your next gathering, or surprise your family with a plateful “just because”—it’s nearly impossible to stop at one!
Print
Pot of Gold Cookies Recipe
- Total Time: 25 minutes
- Yield: 20 cookies 1x
- Diet: Vegetarian
Description
These Pot of Gold Cookies are a delightful treat, perfect for celebrations like St. Patrick’s Day or any festive gathering. With colorful sprinkles, white chocolate chips, and a touch of golden candies, these cookies are sure to bring a smile to everyone’s face.
Ingredients
Dough:
- 1/2 cup unsalted butter (softened)
- 1/2 cup granulated sugar
- 1/4 cup light brown sugar (packed)
- 1 large egg
- 1 teaspoon vanilla extract
- 1 1/2 cups all-purpose flour
- 1/2 teaspoon baking soda
- 1/4 teaspoon salt
Mix-Ins:
- 1/2 cup white chocolate chips
- 1/2 cup rainbow sprinkles or colored sugar
- 1/4 cup yellow or gold candy-coated chocolates (like M&Ms or Sixlets)
- Optional: edible gold glitter or shimmer dust for decoration
Instructions
- Preheat the oven: Preheat the oven to 350°F (175°C) and line a baking sheet with parchment paper.
- Cream butter and sugars: In a large bowl, cream together the butter, granulated sugar, and brown sugar until light and fluffy.
- Add egg and vanilla: Beat in the egg and vanilla extract until well combined.
- Mix dry ingredients: In a separate bowl, whisk together the flour, baking soda, and salt.
- Combine wet and dry: Gradually add the dry ingredients to the wet ingredients, mixing just until combined.
- Add mix-ins: Fold in the white chocolate chips and rainbow sprinkles.
- Form dough balls: Scoop the dough into tablespoon-sized balls and place them on the baking sheet.
- Add gold candies: Gently press 2–3 gold candy-coated chocolates into the top of each dough ball.
- Bake: Bake for 9–11 minutes, until the edges are set and the centers are slightly soft.
- Cool and serve: Allow the cookies to cool on the baking sheet before transferring to a wire rack. Dust with edible gold glitter if desired.
Notes
- For added festivity, consider tinting the dough with green food coloring or rolling the edges in green or gold sugar.
- Great for St. Patrick’s Day, birthdays, or as kid-friendly treats.
- Prep Time: 15 minutes
- Cook Time: 10 minutes
- Category: Dessert
- Method: Baking
- Cuisine: American
Nutrition
- Serving Size: 1 cookie
- Calories: 150
- Sugar: 12g
- Sodium: 75mg
- Fat: 7g
- Saturated Fat: 4g
- Unsaturated Fat: 2g
- Trans Fat: 0g
- Carbohydrates: 20g
- Fiber: 0g
- Protein: 1g
- Cholesterol: 20mg


