
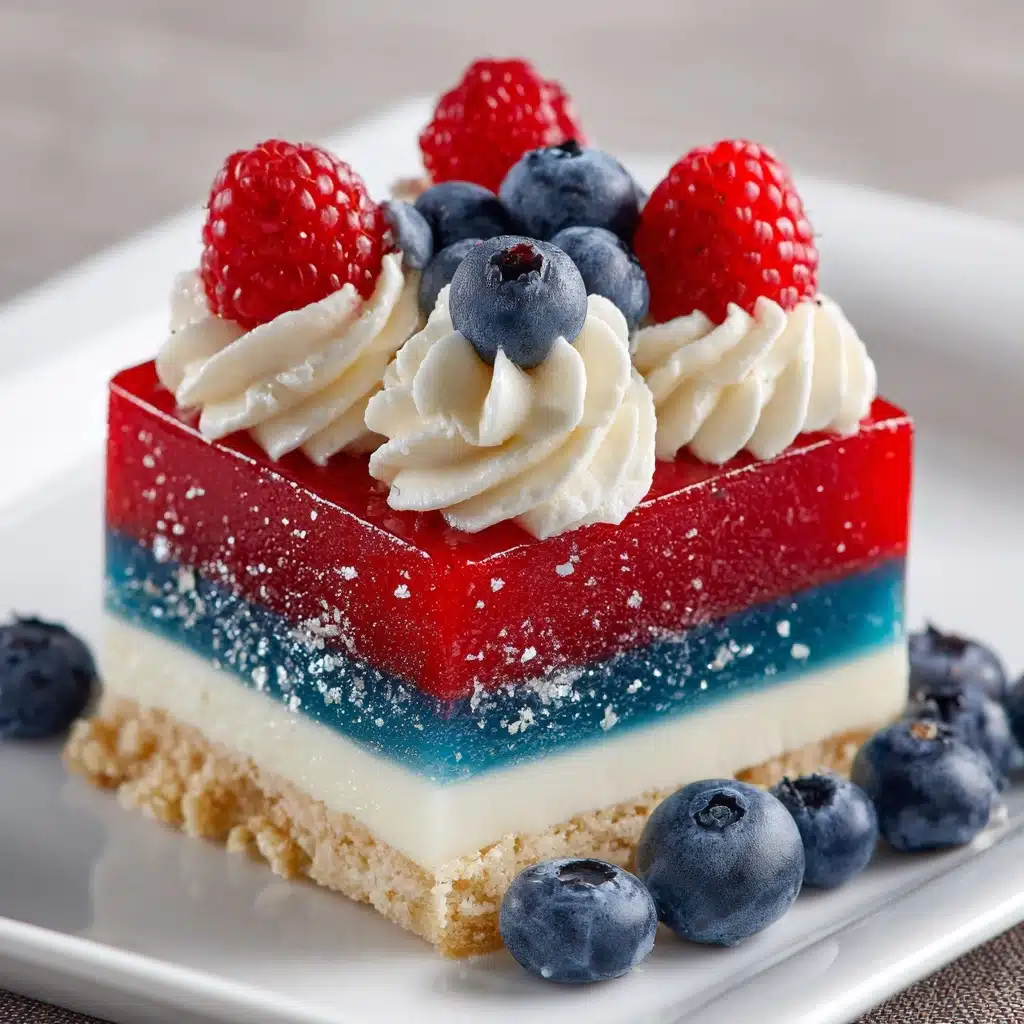
Get ready to wow your friends and family with these Red, White, and Blue Mini Cheesecakes! With a buttery graham cracker crust, rich and creamy cheesecake filling, and a bright burst of patriotic berries on top, these festive treats are irresistible for summer barbecues, 4th of July parties, or any time you’re craving a little bite of happiness. Easy to make, beautifully vibrant, and absolutely delicious, this is a dessert you’ll find yourself coming back to again and again.
Ingredients You’ll Need
The beauty of Red, White, and Blue Mini Cheesecakes lies in their simplicity—each ingredient has a special role in building flavor, texture, and that signature American color scheme. Make sure to use fresh, quality ingredients for the best results, and don’t skip any steps!
- Graham cracker crumbs: The perfect crunchy, slightly sweet foundation for your mini cheesecakes, giving a classic base that everyone loves.
- Granulated sugar (for crust): Adds just the right touch of sweetness to balance the tanginess of the filling.
- Unsalted butter, melted: Holds the crust together and adds richness, making each bite melt in your mouth.
- Cream cheese, softened: The star of the filling, lending luscious texture and creamy flavor—make sure it’s room temperature for easy mixing.
- Granulated sugar (for filling): Sweetens and smooths the cheesecake, allowing the berries to really pop.
- Large eggs: Give structure to the cheesecakes, helping them set up perfectly while staying silky.
- Vanilla extract: Adds depth and warmth to the filling, rounding out every sweet, tangy note.
- Sour cream: A little sour cream creates a lovely tang and soft, creamy consistency in the cheesecake filling.
- Fresh blueberries: These little blue gems add a juicy burst of flavor and that all-important blue for our red, white, and blue theme.
- Diced strawberries: Bright, sweet, and perfectly red—when paired with blueberries, they bring a festive look to the cheesecakes.
- Optional whipped cream: For an extra flourish, a dollop on top adds creaminess and makes each bite dreamy and celebratory.
How to Make Red, White, and Blue Mini Cheesecakes
Step 1: Prepare the Muffin Tin and Preheat the Oven
Start by preheating your oven to 325°F (163°C) to ensure even baking. Line a standard 12-cup muffin tin with paper liners to make unmolding your Red, White, and Blue Mini Cheesecakes a breeze and keep serving simple. Having everything ready at this stage makes the process smooth and stress-free.
Step 2: Make the Graham Cracker Crust
In a small bowl, stir together the graham cracker crumbs, two tablespoons of granulated sugar, and the melted butter until the mixture resembles wet sand. Divide this evenly among the muffin liners and press down firmly with a spoon or the bottom of a small glass. This step gives each cheesecake a sturdy, flavorful base that holds up to the creamy filling.
Step 3: Whip Up the Cheesecake Filling
Using a large bowl and either an electric mixer or a sturdy whisk, beat the softened cream cheese and sugar together until ultra-smooth and creamy—no lumps allowed! Next, add the eggs one at a time, mixing well after each to keep the filling light and uniform. Stir in the vanilla extract and sour cream, blending just until everything is combined; over-mixing isn’t necessary.
Step 4: Fill and Bake the Mini Cheesecakes
Spoon the luscious cheesecake filling over the prepared crusts, filling each liner almost to the top. Bake in your preheated oven for 18-20 minutes; the cheesecakes should be just set in the center but not dry. Their tops might have a slight wiggle, but they’ll firm up as they cool. Let them rest in the pan for 10 minutes, then gently transfer to a wire rack.
Step 5: Chill and Add the Red, White, and Blue Topping
After cooling, place the mini cheesecakes in the refrigerator for at least 2 hours—this is where the texture transforms into creamy perfection. When chilled, top each with fresh blueberries and diced strawberries for that festive patriotic flair, and if you’d like, finish with a dollop of whipped cream right before serving. This final flourish makes your Red, White, and Blue Mini Cheesecakes party-ready!
How to Serve Red, White, and Blue Mini Cheesecakes

Garnishes
To make your Red, White, and Blue Mini Cheesecakes pop, pile each one high with glossy fresh blueberries and strawberry pieces. For even more drama, swirl on a cloud of whipped cream and sprinkle with a few extra berries or a dusting of powdered sugar. It’s a little detail that gets big “oohs” and “aahs.”
Side Dishes
Pair your Red, White, and Blue Mini Cheesecakes with an array of summer favorites—think bowls of fresh fruit salad, crispy shortbread cookies, or a light lemony sorbet. These cheesecakes are rich, so lighter sides help balance things out and bring out their flavors even more.
Creative Ways to Present
If you’re hosting a crowd, try arranging these mini cheesecakes on a tiered cupcake stand or a big platter scattered with extra berries and mint. For backyard parties, nestle each cake in a festive cupcake wrapper or top with little flags for extra patriotic charm. They’re gorgeous on a buffet or as take-home treats packed in cupcake boxes!
Make Ahead and Storage
Storing Leftovers
If you’re lucky enough to have leftovers, store your Red, White, and Blue Mini Cheesecakes in an airtight container in the refrigerator for up to four days. The flavors stay lively, and the texture remains creamy—just hold off on adding whipped cream until right before serving.
Freezing
These mini cheesecakes freeze beautifully! Place them (ungarnished) in a single layer on a baking sheet until firm, then transfer to a zip-top freezer bag or airtight container. They’ll keep for up to two months—just thaw overnight in the fridge and top with fresh berries and whipped cream before serving for that just-made freshness.
Reheating
Good news: No need to reheat! Simply enjoy Red, White, and Blue Mini Cheesecakes chilled straight from the fridge. If you prefer a slightly softer texture, let them sit at room temperature for 15-20 minutes before serving.
FAQs
Can I use frozen berries instead of fresh?
Absolutely! Frozen berries can be used for topping, but let them thaw and drain well on a paper towel first to avoid excess moisture, which can make the cheesecakes soggy.
Can I swap out the graham cracker crust for another type?
Of course! Crushed vanilla wafers, chocolate cookies, or even gingersnaps make great alternatives for the crust, giving your Red, White, and Blue Mini Cheesecakes a unique twist.
How do I know when the cheesecakes are done baking?
The centers should appear just set with a slight jiggle when you gently tap the pan. They’ll finish setting up as they cool and chill, so be careful not to overbake—this keeps the texture ultra-creamy.
Can I make these cheesecakes a day ahead?
Yes! In fact, chilling them overnight allows the flavors to meld and the texture to become even more velvety. Add the fresh toppings and whipped cream just before serving to keep everything vibrant.
Are Red, White, and Blue Mini Cheesecakes gluten-free?
The traditional crust contains gluten, but you can easily make them gluten-free by using gluten-free graham crackers or cookies for the base. The filling and toppings are naturally gluten-free!
Final Thoughts
I hope you’re as excited as I am to bring these Red, White, and Blue Mini Cheesecakes to your next celebration! They’re a true crowd-pleaser with their colorful looks and rich, creamy taste—so easy, so festive, and so much fun to share with people you love. Happy baking!
Print
Red, White, and Blue Mini Cheesecakes Recipe
- Total Time: 40 minutes (plus chilling)
- Yield: 12 mini cheesecakes 1x
- Diet: Non-Vegetarian
Description
These Red, White, and Blue Mini Cheesecakes are a delightful treat perfect for patriotic holidays and summer parties. With a graham cracker crust, creamy cheesecake filling, and fresh berry toppings, they are bursting with flavor and festive colors.
Ingredients
Crust:
- 1 cup graham cracker crumbs
- 2 tablespoons granulated sugar
- 4 tablespoons unsalted butter, melted
Filling:
- 16 oz cream cheese, softened
- 1/2 cup granulated sugar
- 2 large eggs
- 1 teaspoon vanilla extract
- 1/4 cup sour cream
Topping:
- 1/2 cup fresh blueberries
- 1/2 cup diced strawberries
- optional whipped cream for garnish
Instructions
- Preheat the oven: Preheat the oven to 325°F (163°C) and line a 12-cup muffin tin with paper liners.
- Prepare the crust: Mix graham cracker crumbs, sugar, and melted butter. Divide among liners and press down to form the crust.
- Make the filling: Beat cream cheese and sugar until smooth. Add eggs one at a time, then mix in vanilla extract and sour cream.
- Fill and bake: Spoon the filling over each crust and bake for 18–20 minutes until set.
- Cool and chill: Cool in the pan, then transfer to a wire rack and refrigerate for at least 2 hours.
- Add toppings: Top each cheesecake with blueberries and strawberries. Garnish with whipped cream before serving.
Notes
- These mini cheesecakes are perfect for patriotic holidays and summer parties.
- You can make them a day ahead and garnish right before serving.
- Prep Time: 20 minutes
- Cook Time: 20 minutes
- Category: Dessert
- Method: Baking
- Cuisine: American
Nutrition
- Serving Size: 1 mini cheesecake
- Calories: 220
- Sugar: 13g
- Sodium: 160mg
- Fat: 15g
- Saturated Fat: 9g
- Unsaturated Fat: 5g
- Trans Fat: 0g
- Carbohydrates: 18g
- Fiber: 0g
- Protein: 4g
- Cholesterol: 55mg


