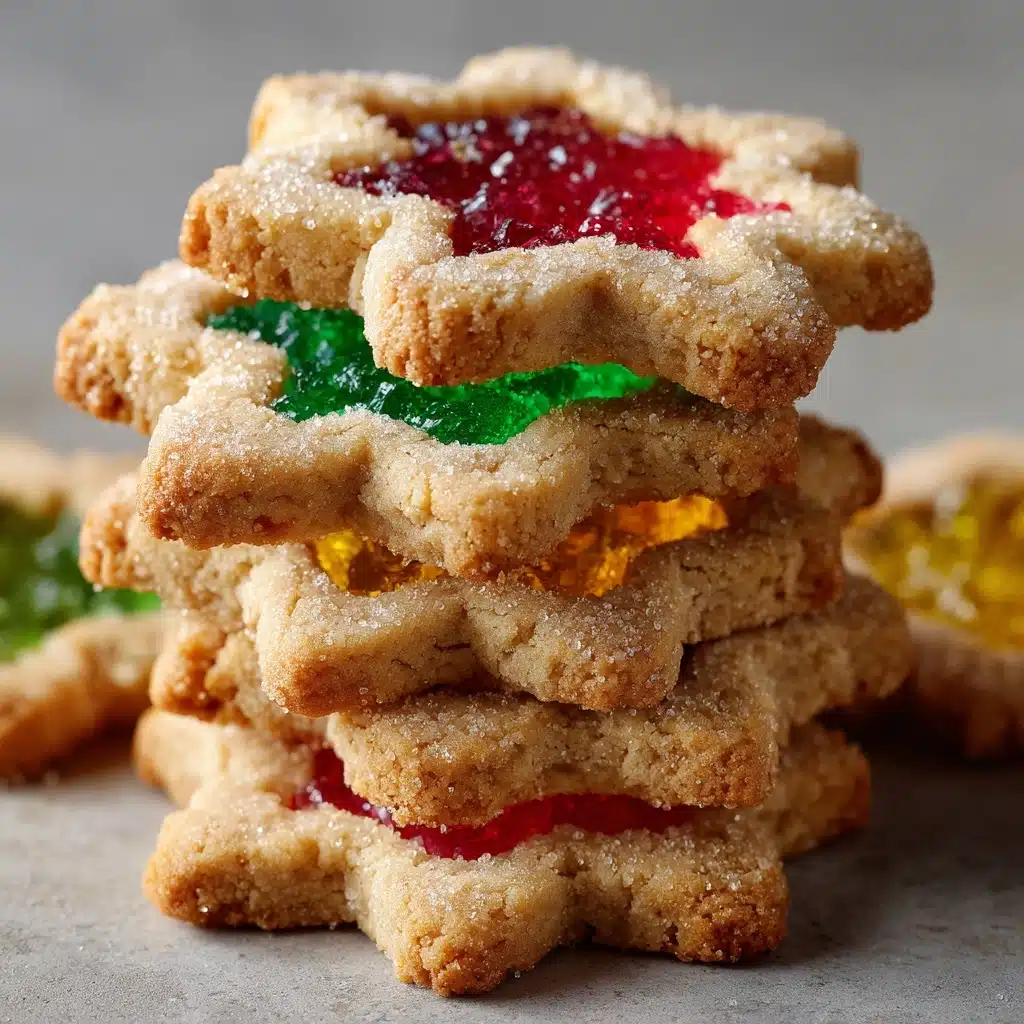
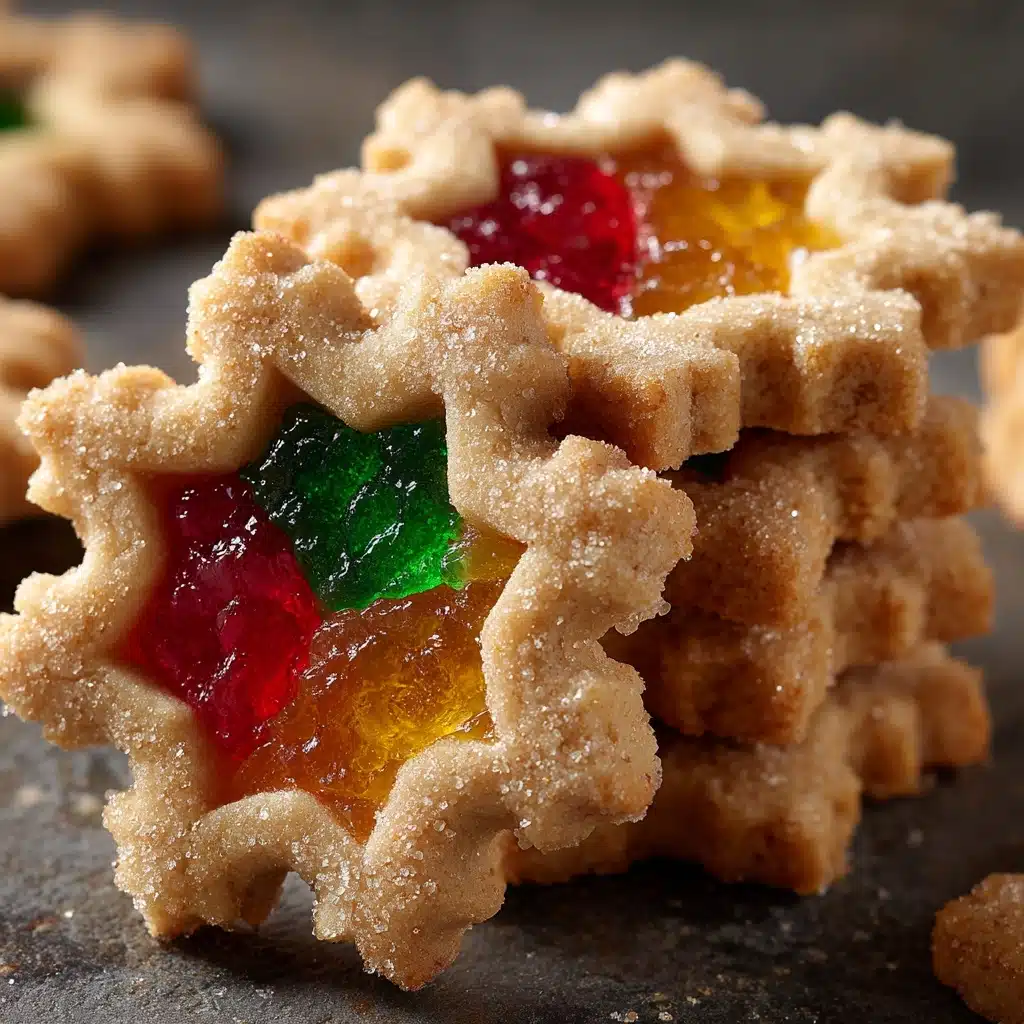
If you’re dreaming of a cookie that’s as beautiful as it is delicious, look no further than Stained Glass Window Cookies. These cheerful treats feature buttery sugar cookie dough with vibrant, jewel-bright centers made from melted candy, creating a magical “stained glass” effect that delights kids and adults alike. They’re the kind of cookie that always draws oohs and ahhs on a holiday platter and is just as perfect for family baking days as they are for festive gatherings. Whether you’re gifting them, hanging them as edible ornaments, or simply snacking with a cup of tea, Stained Glass Window Cookies bring artful charm and sweet, nostalgic flavor to any occasion.
Ingredients You’ll Need
Gather just a handful of kitchen staples and a colorful twist! Each ingredient in Stained Glass Window Cookies has a special role—think buttery richness, delicate crumb, and that show-stopping candy glass. Together, these simple elements create a cookie that’s pure magic.
- All-purpose flour: This is the backbone of your cookie, providing structure and a tender bite.
- Baking powder: Adds the perfect hint of lift so the cookies are never too dense.
- Salt: Just a quarter teaspoon brings all the flavors into harmony and balances the sweetness.
- Unsalted butter (softened): The foundation of every great cookie, lending richness and a soft texture.
- Granulated sugar: Sweetens the dough and helps produce the light, golden edges we love.
- Large egg: Binds everything together and contributes to that classic cookie chew.
- Vanilla extract: Essential for a warm, comforting aroma—pure cookie bliss.
- Almond extract (optional): Just a dash gives a sophisticated depth and a hint of nuttiness.
- Assorted hard candies (crushed): The star of the show! Choose colorful candies like Jolly Ranchers or Life Savers for those gleaming stained glass centers.
How to Make Stained Glass Window Cookies
Step 1: Prepare Your Baking Sheets
Preheat the oven to 350°F (175°C) and line two baking sheets with parchment paper. The parchment not only prevents sticking but also makes cleanup a cinch and helps the candy centers release cleanly once cooled.
Step 2: Mix Dry Ingredients
In a medium bowl, whisk together the flour, baking powder, and salt. This ensures that your leavening and seasoning are evenly distributed throughout the dough, so every bite is just right.
Step 3: Cream Butter and Sugar
In a large bowl, beat the softened butter and sugar together until the mixture is light and fluffy, usually about 2–3 minutes. This process incorporates air for a tender texture and starts building that delightfully inviting flavor base.
Step 4: Add Egg and Extracts
Crack in the egg, then pour in the vanilla and almond extracts (if using). Beat until well combined. These ingredients not only bind your dough but also infuse it with lovely aromas that will waft through your kitchen as they bake.
Step 5: Combine Wet and Dry Ingredients
Gradually add the dry ingredient mixture to your wet ingredients, mixing just until a soft dough forms. Overmixing can lead to tough cookies, so aim for a dough that holds together and feels pliable, not sticky.
Step 6: Chill the Dough
Divide the dough into two discs, wrap each in plastic wrap, and chill for 30 minutes. Chilling is the secret to clean-cut shapes and helps keep your windows crisp and sharp during baking.
Step 7: Roll and Cut the Cookies
On a lightly floured surface, roll out one disc of dough at a time to about 1/4-inch thickness. Use cookie cutters to create shapes, then use a smaller cutter to cut “windows” from the center of each one. Have fun with shapes—stars, circles, hearts—the more variety, the more magical your Stained Glass Window Cookies will look!
Step 8: Add Crushed Candy
Place the cookies onto prepared baking sheets, then fill each center window with a generous mound of finely crushed hard candy. The candy will melt down, so don’t worry if it looks a bit heaped up at this stage.
Step 9: Bake and Cool
Bake for 8 to 10 minutes, just until the cookie edges are lightly golden and the candy centers are completely melted. Let the cookies cool on the baking sheets until the centers are set, then transfer to a wire rack to finish cooling. This step is crucial—the candy needs to harden before moving, or you’ll lose that beautifully transparent glass effect.
How to Serve Stained Glass Window Cookies

Garnishes
For an extra touch of sparkle, dust the edges of your cookies with a little sanding sugar before baking, or brush with a light sugar glaze after cooling. If you want a festive finish, edible glitter or silver dragees around the borders look absolutely striking against the candy glass.
Side Dishes
Serve Stained Glass Window Cookies with mugs of hot chocolate, mulled cider, or a creamy latte for a heartwarming treat. If you’re building a dessert platter, pair them with classic sugar cookies, spiced gingerbread, or chocolate-dipped fruits for a colorful, crowd-pleasing spread.
Creative Ways to Present
This cookie is all about the “wow” factor! Thread ribbon through a small hole at the top to create edible ornaments for your tree, or stack and wrap them in cellophane as beautiful homemade gifts. For parties, display the cookies in a sunny window or under string lights so the candy centers glow like real stained glass—it’s practically guaranteed to be a conversation starter!
Make Ahead and Storage
Storing Leftovers
Layer cooled Stained Glass Window Cookies between sheets of parchment in an airtight container. This keeps them fresh and prevents the gorgeous candy windows from sticking together. Stored properly at room temperature, they’ll stay crisp for up to a week.
Freezing
You can freeze the dough discs for up to three months—just thaw in the fridge before rolling and cutting. Freezing the baked cookies is also possible: wrap tightly in a single layer with parchment between each, then place in a sealed freezer bag. Let them come to room temperature before serving to preserve the clarity of the candy centers.
Reheating
Stained Glass Window Cookies are best enjoyed at room temperature, but if you like a warm cookie, give them a very quick (10-second) zap in the microwave. Any longer and the candy centers may bubble or become sticky, so keep warming brief and gentle.
FAQs
Can I use gluten-free flour for Stained Glass Window Cookies?
Absolutely! A quality cup-for-cup gluten-free blend works well here. The texture may be slightly different, but you’ll still get stunning, delicious results.
What brands of hard candy work best?
Jolly Ranchers and Life Savers are favorites for their bright colors and good meltability. Choose bold, clear candies for the most dramatic stained glass effect.
How do I keep the cookie shapes from spreading?
Chilling the dough both before and after cutting shapes is key. If you’re working in a warm kitchen, pop the trays back in the fridge for 10 minutes before baking to help the cookies hold their crisp silhouette.
Can I make these cookies without almond extract?
Definitely! Almond extract adds depth, but if you prefer a pure vanilla flavor—or need to avoid nuts—just leave it out. The cookies will still be utterly delicious.
How do I crush the hard candies without making a sticky mess?
Place unwrapped candies in a sturdy plastic bag and use a rolling pin or meat mallet to crush them. A food processor also does a quick, even job. Just make sure the pieces are small for the clearest, smoothest windows.
Final Thoughts
There’s something truly special about rolling, cutting, and baking a batch of Stained Glass Window Cookies—they’re a blend of childhood wonder and timeless kitchen craft. If you’ve never tried making them, I hope this guide inspires you to create your own batch and share the colorful, homemade magic with someone you love!
Print
Stained Glass Window Cookies Recipe
- Total Time: 50 minutes
- Yield: 24 cookies
- Diet: Vegetarian
Description
Stained Glass Window Cookies are a delightful treat perfect for the holiday season. These colorful, translucent cookies are not only visually stunning but also deliciously sweet with a hint of almond flavor. They make a festive addition to any cookie platter and are sure to impress your friends and family.
Ingredients
Dough:
2 1/2 cups all-purpose flour, 1/2 teaspoon baking powder, 1/4 teaspoon salt, 3/4 cup unsalted butter (softened), 3/4 cup granulated sugar, 1 large egg, 1 teaspoon vanilla extract, 1/2 teaspoon almond extract (optional).
Decoration:
Assorted hard candies (such as Jolly Ranchers or Life Savers), crushed.
Instructions
- Preheat the oven: Preheat the oven to 350°F (175°C) and line two baking sheets with parchment paper.
- Prepare the dough: In a medium bowl, whisk together the flour, baking powder, and salt. In a large bowl, beat the butter and sugar together until light and fluffy. Add the egg, vanilla extract, and almond extract if using, and beat until combined. Gradually add the dry ingredients and mix until a soft dough forms.
- Chill the dough: Divide the dough in half, shape into discs, wrap in plastic wrap, and chill for 30 minutes.
- Roll out the dough: On a lightly floured surface, roll out one disc at a time to about 1/4-inch thickness. Use cookie cutters to cut out shapes, then use a smaller cutter to cut out a window in the center of each cookie.
- Add candy centers: Transfer the cookies to the prepared baking sheets. Fill each cut-out center with crushed hard candies.
- Bake: Bake for 8 to 10 minutes, or until the cookies are lightly golden and the candy centers have melted completely.
- Cool and serve: Let the cookies cool on the baking sheets until the candy centers have hardened, then transfer to a wire rack to cool completely.
Notes
- To make the candy centers extra clear, crush the candies finely and fill the windows generously.
- Store in an airtight container with parchment between layers to prevent sticking.
- Prep Time: 30 minutes (plus chilling)
- Cook Time: 10 minutes
- Category: Dessert, Holiday
- Method: Baking
- Cuisine: American
Nutrition
- Serving Size: 1 cookie
- Calories: 130
- Sugar: 10g
- Sodium: 30mg
- Fat: 5g
- Saturated Fat: 3g
- Unsaturated Fat: 2g
- Trans Fat: 0g
- Carbohydrates: 19g
- Fiber: 0g
- Protein: 1g
- Cholesterol: 20mg

