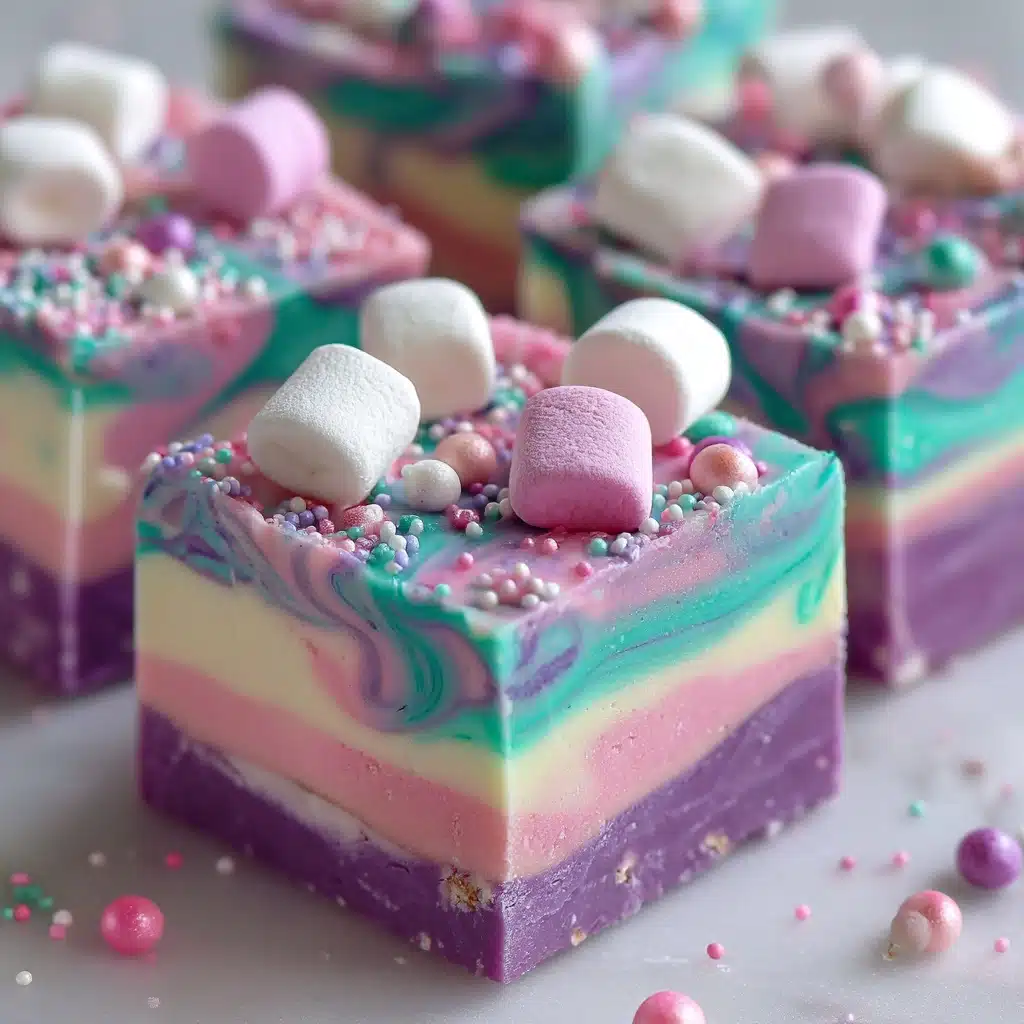
Brace yourself for a burst of color and sweetness, because Unicorn Fudge is about to whisk you into a magical dessert daydream! This no-bake treat is irresistibly creamy, swirling together playful pink, purple, and blue bands that bring out anyone’s inner child. Whether you’re seeking a show-stopping party centerpiece or a whimsical way to brighten up a rainy afternoon, Unicorn Fudge hits that magical sweet spot. The best part? Every sparkly square is as fun to make as it is to devour!
Ingredients You’ll Need

Ingredients You’ll Need
The beauty of Unicorn Fudge is that with just a handful of basic ingredients, you can whip up something truly eye-catching and delicious. Each element brings its own flair to the flavor, texture, or kaleidoscopic look—the secret is in how you use them together!
- White chocolate chips: These melt into a luscious, creamy base and give the fudge its signature sweetness.
- Sweetened condensed milk: Adds richness, a fudge-like density, and ensures that the finished treat is silky smooth.
- Vanilla extract: Rounds out the flavors with its warm, comforting aroma—pure magic in every bite.
- Pink, purple, and blue gel food coloring: The heart of the unicorn magic—gel colors provide intense, vibrant swirls without watering down the mixture.
- Pastel rainbow sprinkles: These little confetti add crunch and a final wow-factor that’s impossible to resist.
- Edible glitter (optional): For the true unicorn sparkle, a dash of edible glitter gives your fudge that extra shimmer and pizzazz.
How to Make Unicorn Fudge
Step 1: Prepare Your Pan
Start by lining an 8×8-inch baking pan with parchment paper, making sure there’s enough overhang on the sides. This little step is the key to stress-free removal later, leaving you with flawless, easy-to-cut pieces. You’ll thank yourself when it’s time to unveil your rainbow masterpiece!
Step 2: Melt the Base
Grab your trusty saucepan, and combine the white chocolate chips and sweetened condensed milk over low heat. Stir constantly, gently coaxing the chips to melt and incorporate smoothly with the milk. Keep the heat low and slow—patience pays off for that ultimate creamy texture.
Step 3: Add Vanilla
Once your mixture is satin-smooth, remove it from the heat and stir in the vanilla extract. This one splash transforms the aroma, infusing your fudge with a warm, inviting undertone that rounds out all the sugary magic.
Step 4: Divide and Color
Pour the fudge mixture evenly into three small bowls. Now comes the really fun part! Tint each bowl with a different gel food coloring—one pink, one purple, and one blue. Stir to evenly distribute those gorgeous hues, but don’t overmix; bold color is what we’re after!
Step 5: Swirl it Up
Using a spoon, drop dollops of each color into the lined pan in random patterns. Once every last drop is in, grab a toothpick or butter knife and gently swirl the mixtures together. This is where Unicorn Fudge earns its name—just a few twirls and you’ll have a mesmerizing mosaic of colors. Go easy, though! Over-mixing will muddy the swirls.
Step 6: Sprinkle on the Magic
Immediately sprinkle the top with a generous shower of pastel rainbow sprinkles and, if you like, a dusting of edible glitter. Press the toppings gently into the surface with clean hands or the back of a spatula to be sure everything sticks once chilled.
Step 7: Chill to Set
Slide the pan into your refrigerator and let it chill for at least 3 hours—patience is the secret ingredient! Once the fudge feels firm and set, use the parchment paper overhang to lift it out and place it onto a cutting board. Cut into bite-sized squares, cleaning your knife between cuts for the sharpest lines.
How to Serve Unicorn Fudge
Garnishes
For a real unicorn-worthy finish, serve each square with an extra pinch of rainbow sprinkles or a light shimmer of edible glitter just before serving. If you’re making it for a themed party, add small, edible sugar pearls or cute candies to make each piece feel truly enchanted.
Side Dishes
A spread of Unicorn Fudge pairs beautifully alongside bowls of fresh berries or a platter of crisp vanilla wafers. For lively gatherings, set next to a selection of pastel-hued candies, miniature cupcakes, or even fruity punch—perfect for both kids and grown-up unicorn fans alike!
Creative Ways to Present
Bring the magic to life by wrapping individual Unicorn Fudge squares in pastel parchment and tying them with sparkly ribbon—adorable party favors or heartfelt, homemade gifts. Or, arrange the fudge on a tiered dessert stand surrounded by more sprinkles and tiny paper flags for a centerpiece bursting with personality.
Make Ahead and Storage
Storing Leftovers
After the party, simply tuck any remaining Unicorn Fudge into an airtight container and stash it in the refrigerator. It’ll stay deliciously fresh and creamy for up to one week—just try not to sneak a square every time you open the fridge!
Freezing
Need to prepare ahead? Unicorn Fudge is freezer-friendly! Wrap each square tightly in plastic wrap, then place all the wrapped pieces in a freezer-safe bag or container. It’ll keep beautifully for up to 2 months. For optimum texture, thaw overnight in the fridge before serving.
Reheating
Since this fudge is meant to be enjoyed chilled, reheating isn’t necessary. If your fudge comes out of the fridge extra firm, let it sit at room temperature for a few minutes to soften slightly for that just-set melt-in-your-mouth bite.
FAQs
Can I use regular food coloring instead of gel?
Gel food colorings are preferred because they give bold, vibrant color without thinning out the fudge mixture. If you only have liquid coloring, go light on the drops to avoid affecting the texture, but keep in mind the colors may not be quite as bright.
Is it possible to make vegan Unicorn Fudge?
Absolutely! Substitute the sweetened condensed milk for a plant-based alternative and use vegan white chocolate chips. Double-check that your sprinkles and glitter are vegan-friendly too—there are lots of choices out there!
Can I customize the colors for different holidays?
That’s half the fun! Swap the pink, purple, and blue for any color combo to fit the occasion—think red and green for Christmas or orange and black for Halloween. Unicorn Fudge is all about creative expression.
How do I keep the swirls from blending together?
The key is to swirl gently and stop as soon as you see a pretty marbled effect. Resist the urge to keep going! Over-mixing will muddy the colors, so less is definitely more here.
What’s the best way to slice Unicorn Fudge cleanly?
Use a sharp knife and wipe it clean between each cut for crisp, show-off-worthy squares. Chilling the fudge thoroughly before slicing helps too—you’ll get perfect edges every time!
Final Thoughts
If you’re searching for a dessert that’s as delightful to make as it is to share, Unicorn Fudge deserves a spot on your next menu. With every creamy, colorful bite, it brings a twist of magic into the everyday. Try it once, and you might just find yourself coming back any time you need a sparkly pick-me-up!
Print
Unicorn Fudge Recipe
- Total Time: 3 hours 15 minutes (including chilling)
- Yield: 36 small squares 1x
- Diet: Vegetarian
Description
Unicorn fudge is a whimsical and colorful treat that is perfect for parties or special occasions. This no-bake fudge is made with white chocolate, sweetened condensed milk, and a swirl of pink, purple, and blue hues, topped with pastel rainbow sprinkles and edible glitter for a magical touch.
Ingredients
Ingredients:
- 3 cups white chocolate chips
- 1 (14-ounce) can sweetened condensed milk
- 1/2 teaspoon vanilla extract
- Pink, purple, and blue gel food coloring
- Pastel rainbow sprinkles
- Edible glitter (optional)
Instructions
- Line the pan: Line an 8×8-inch baking pan with parchment paper, leaving an overhang for easy removal.
- Melt ingredients: In a saucepan over low heat, melt white chocolate chips and sweetened condensed milk until smooth. Stir in vanilla extract.
- Divide and color: Divide the mixture into three bowls and tint each with pink, purple, and blue food coloring. Drop spoonfuls of each color into the pan.
- Swirl and decorate: Swirl the colors together gently. Top with rainbow sprinkles and edible glitter. Press toppings into the surface.
- Chill and serve: Refrigerate for at least 3 hours until firm. Cut into squares and serve.
Notes
- For clean cuts, wipe the knife between slices.
- Customize with different color combinations for various themes or holidays.
- Store in the refrigerator in an airtight container for up to one week.
- Prep Time: 10 minutes
- Cook Time: 5 minutes
- Category: Dessert
- Method: No-Bake
- Cuisine: American
Nutrition
- Serving Size: 1 square
- Calories: 120
- Sugar: 15 g
- Sodium: 25 mg
- Fat: 5 g
- Saturated Fat: 3 g
- Unsaturated Fat: 2 g
- Trans Fat: 0 g
- Carbohydrates: 18 g
- Fiber: 0 g
- Protein: 1 g
- Cholesterol: 5 mg


