
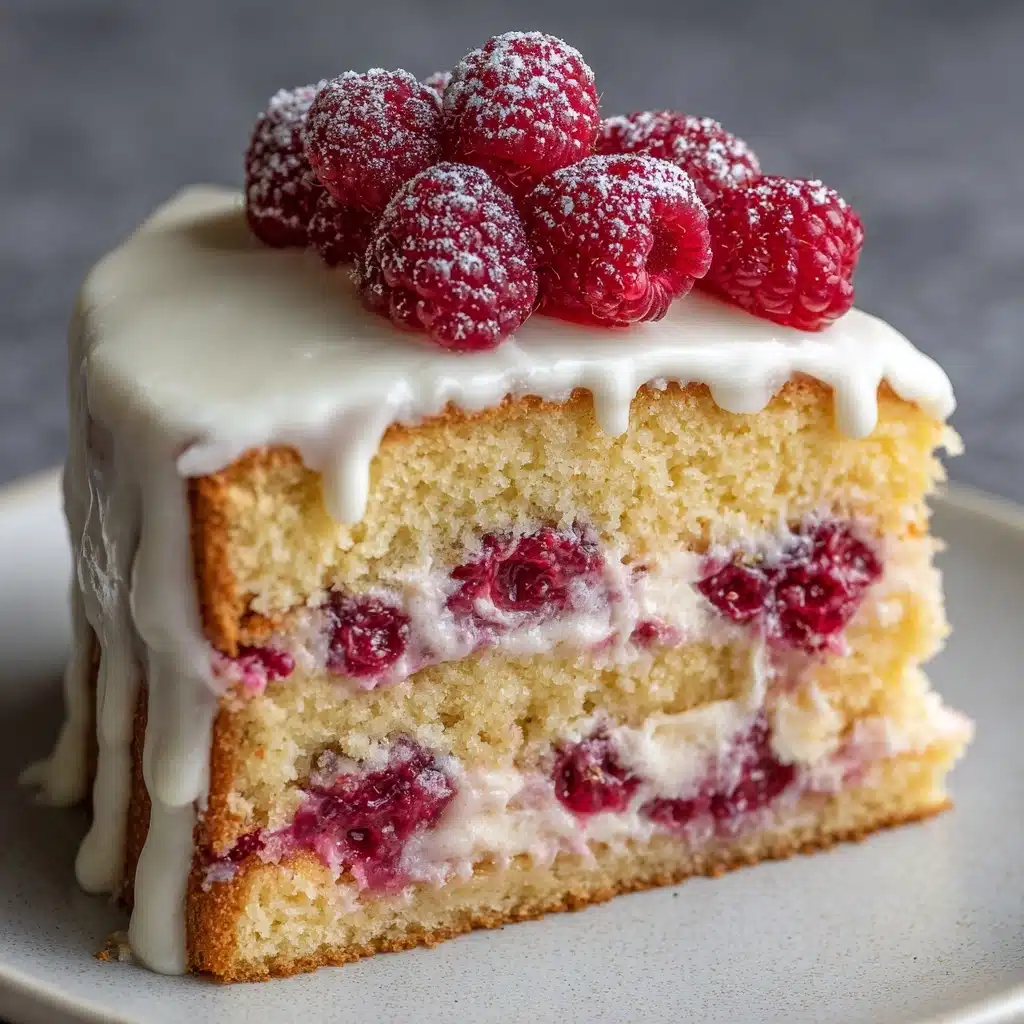
If you’re looking for a showstopping dessert that combines luscious layers, vibrant berry flavor, and melt-in-your-mouth sweetness, the White Chocolate Raspberry Dream Cake is about to become your new favorite. This cake is pure celebration: moist and buttery vanilla layers are kissed with white chocolate and sandwiched with tangy raspberry preserves, then slathered in a rich cream cheese white chocolate frosting. Every slice is an irresistible mix of sweet, tart, creamy, and a hint of almond. Whether you’re planning a birthday, a holiday, or just a day you want to be unforgettable, this cake lives up to its dreamy name.
Ingredients You’ll Need
You’ll be amazed at how such classic, simple ingredients transform into something so magical. Each element in the White Chocolate Raspberry Dream Cake recipe is essential, working together for perfect taste, texture, and eye-catching color.
- All-purpose flour: The sturdy backbone of our cake, keeping those tender layers lofted and light.
- Baking powder: This ensures your layers rise beautifully with a soft crumb.
- Salt: A pinch sharpens and balances the sweetness of the cake and frosting.
- Unsalted butter (softened): Adds rich flavor and a melt-in-your-mouth texture.
- Granulated sugar: Sweetens the cake and helps create that soft, airy crumb.
- Eggs (large): Provide structure and a creamy, velvety batter.
- Vanilla extract: A must for warm flavor, rounding out both cake and frosting.
- Almond extract (optional): One drop offers a subtle, sophisticated aroma that pairs perfectly with raspberries.
- Whole milk: Makes the batter luxuriously moist and tender.
- White chocolate chips (melted and cooled): The star ingredient for those decadent, creamy cake layers.
- Raspberry preserves or seedless raspberry jam: Gives a color pop and a bold fruit flavor in every bite.
- Cream cheese (softened): The secret to tangy, velvety frosting that’s not overly sweet.
- Powdered sugar: For a fluffy, smooth frosting with the perfect level of sweetness.
- Heavy cream: Whips the frosting into a pillowy cloud and ensures easy spreading.
- Fresh raspberries (optional): Gorgeous, juicy, and the perfect garnish.
- White chocolate curls (optional): Adds showy flair and extra creamy bites on top.
- Powdered sugar (optional): A light dusting before serving is the simplest, prettiest finish.
How to Make White Chocolate Raspberry Dream Cake
Step 1: Prepare Your Cake Pans and Ingredients
Preheat your oven to 350°F (175°C) and grease and flour three 8-inch round cake pans, tapping out any excess flour. This is key for releasing those lovely layers later! Gather all your ingredients and ensure your butter, eggs, cream cheese, and white chocolate are all at room temperature — this guarantees a velvety batter and smooth frosting.
Step 2: Mix the Dry Ingredients
In a medium bowl, whisk together the flour, baking powder, and salt. Stir them thoroughly so the leavening is evenly dispersed — this simple step is what gives your layers that lovely, consistent crumb. Set this bowl aside; your batter will come together in no time.
Step 3: Cream Butter and Sugar, Add Eggs
In a large mixing bowl, beat the softened butter and granulated sugar together until the mixture turns pale and fluffy, about 3 minutes. This incorporates air for a delicate cake. Beat in the eggs, one at a time, mixing well with each addition, then stir in the vanilla and almond extracts. The batter will smell positively heavenly at this point!
Step 4: Combine Remaining Batter Ingredients
Alternately add the flour mixture and milk to your butter mixture in three parts, starting and ending with the flour. Mix gently, just until everything is combined — avoid over-mixing for the most tender cake. Finally, fold in the melted, slightly cooled white chocolate. This is what gives your White Chocolate Raspberry Dream Cake its signature richness.
Step 5: Bake the Cake Layers
Divide the batter evenly among your prepared pans and smooth the tops. Bake for 25 to 30 minutes, until the cakes are golden and a toothpick inserted into the center emerges clean. Let the cakes cool in their pans for 10 minutes, then carefully turn them out onto wire racks to cool completely. Resist the urge to frost while they’re warm for a mess-free, stacked masterpiece.
Step 6: Make the White Chocolate Cream Cheese Frosting
In a clean bowl, beat the softened butter and cream cheese together until silky smooth. Mix in the melted and cooled white chocolate with a dash of vanilla extract, then gradually add the powdered sugar. Whip until fluffy, then add heavy cream one tablespoon at a time until your frosting is cloud-like and easy to spread.
Step 7: Assemble and Frost the White Chocolate Raspberry Dream Cake
Place your first cake layer on a serving plate and gently spread on half the raspberry preserves. Top with the second layer and repeat with the remaining preserves. Position the final layer on top. Using an offset spatula, coat the sides and top with your dreamy, creamy white chocolate frosting. Now is the time to get a little fancy: smooth, swirl, or create rustic swoops—whatever brings you joy!
Step 8: Garnish and Chill Before Serving
Adorn your cake with fresh raspberries, luxurious white chocolate curls, and a snow-like sprinkle of powdered sugar, if desired. Pop the cake in the fridge for at least 30 minutes to help everything set and make for cleaner slicing.
How to Serve White Chocolate Raspberry Dream Cake

Garnishes
For a truly breathtaking presentation, crown your White Chocolate Raspberry Dream Cake with plump fresh raspberries and a generous drift of white chocolate curls. These simple touches not only look beautiful but heighten the flavor and luxurious feel of each slice. A final dusting of powdered sugar will make it look straight out of a bakery window!
Side Dishes
Because this cake is rich and full of character, a few simple accompaniments work best. Serve with a scoop of good-quality vanilla ice cream or a dollop of lightly whipped cream on the side. If you’re offering drinks, try a pot of black tea, a glass of chilled prosecco, or even tart raspberry lemonade for a lovely contrast.
Creative Ways to Present
Slice it tall for a grand main-event dessert, or cut into petite squares and serve on a tiered tray for elegant afternoon teas. For brunches or showers, you can even assemble the layers as mini cakes in clear glasses, perfect for single servings. No matter how you present it, the White Chocolate Raspberry Dream Cake radiates pure joy.
Make Ahead and Storage
Storing Leftovers
Wrap leftover cake slices tightly with plastic wrap or store them in an airtight container in the fridge. The cake remains moist and delicious for up to three days — the flavors even deepen slightly as it sits!
Freezing
This cake freezes beautifully! Place well-wrapped individual slices or even a whole (unfrosted) cake in the freezer for up to two months. Thaw overnight in the fridge before serving; if it’s frosted, let it sit at room temperature for about 30 minutes for best texture.
Reheating
There’s no need to reheat, as this cake is best enjoyed at room temperature. If it’s cold from the fridge, set it out for 20-30 minutes before serving to let all the flavors bloom and the frosting soften beautifully.
FAQs
Can I use fresh raspberries instead of preserves for the filling?
Absolutely! In fact, making a fresh raspberry compote is a fantastic way to add a tart, juicy layer. Just be sure to strain out the seeds if you prefer a smooth texture, and cool the compote before spreading it onto your cake layers.
How do I make white chocolate curls for garnishing?
Use a vegetable peeler on the long edge of a white chocolate bar at room temperature. Press gently to create beautiful, feathery curls. If the chocolate crumbles, warm it slightly in your hand or microwave for a few seconds to soften.
Can I make White Chocolate Raspberry Dream Cake ahead of time?
Yes! This cake actually gets better after a day in the fridge, as the flavors meld together. Fully assemble and frost the cake, then chill. Just let it come to room temperature before serving for the creamiest bite.
What’s the best way to melt white chocolate for the cake and frosting?
Melt white chocolate chips or bars in a microwave-safe bowl in 20-second bursts, stirring each time, until smooth. Or use a double boiler over gently simmering water. Always make sure it cools slightly before adding to your batter or frosting to prevent seizing or curdling.
Can I bake the cake layers in advance and freeze them?
Definitely! Bake and cool your cake layers, wrap them tightly, and freeze for up to two months. Thaw them on the counter (still wrapped) before assembling your White Chocolate Raspberry Dream Cake — this makes party prep a breeze!
Final Thoughts
If you’re craving a dessert that feels elegant yet utterly comforting, put White Chocolate Raspberry Dream Cake at the top of your must-bake list. Each slice is a little celebration on a plate, bursting with color, sweetness, and just enough tang. Gather your ingredients, call over a friend or two, and enjoy some true baking magic right from your kitchen!
Print
White Chocolate Raspberry Dream Cake Recipe
- Total Time: 1 hour 30 minutes
- Yield: 12 slices 1x
- Diet: Vegetarian
Description
Indulge in the dreamy combination of white chocolate and raspberry with this delightful White Chocolate Raspberry Dream Cake. Moist layers of white chocolate cake filled with raspberry preserves and topped with a luscious white chocolate cream cheese frosting.
Ingredients
For the cake:
- 2 1/2 cups all-purpose flour
- 2 1/2 teaspoons baking powder
- 1/2 teaspoon salt
- 1 cup unsalted butter, softened
- 1 3/4 cups granulated sugar
- 4 large eggs
- 1 teaspoon vanilla extract
- 1/2 teaspoon almond extract (optional)
- 1 cup whole milk
- 1/2 cup white chocolate chips, melted and slightly cooled
For the filling:
- 1 cup raspberry preserves or seedless raspberry jam
For the frosting:
- 1 cup unsalted butter, softened
- 8 oz cream cheese, softened
- 4 cups powdered sugar
- 4 oz white chocolate, melted and cooled
- 1/4 cup heavy cream
- 1/2 teaspoon vanilla extract
For garnish (optional):
- fresh raspberries
- white chocolate curls
- powdered sugar
Instructions
- Preheat the oven: Preheat the oven to 350°F and grease and flour three 8-inch round cake pans.
- Prepare the cake: In a medium bowl, whisk together the flour, baking powder, and salt. In a large bowl, beat the butter and sugar until light and fluffy. Add eggs one at a time, then stir in the extracts. Alternate adding the flour mixture and milk, ending with flour. Fold in the melted white chocolate.
- Bake the cakes: Divide batter into pans and bake for 25 to 30 minutes. Cool in pans before transferring to wire racks.
- Make the frosting: Beat butter and cream cheese until smooth. Add white chocolate and vanilla. Gradually add powdered sugar and cream until fluffy.
- Assemble the cake: Layer cake with raspberry preserves, frost, and garnish with raspberries and chocolate curls. Chill before serving.
Notes
- You can substitute fresh raspberry compote for a more tart filling.
- This cake can be made a day ahead and refrigerated. Bring to room temperature before serving.
- Prep Time: 40 minutes
- Cook Time: 30 minutes
- Category: Dessert
- Method: Baking
- Cuisine: American
Nutrition
- Serving Size: 1 slice
- Calories: 590
- Sugar: 48 g
- Sodium: 210 mg
- Fat: 35 g
- Saturated Fat: 21 g
- Unsaturated Fat: 12 g
- Trans Fat: 0 g
- Carbohydrates: 65 g
- Fiber: 1 g
- Protein: 6 g
- Cholesterol: 115 mg


